How to Make a Picture Less Blurry: Fix and Enhance Images Easily
Don't let motion or focus errors ruin your visuals. Discover how to fix blurry pictures to improve image clarity and maintain a professional edge effortlessly.


Finding out your best shot is soft is incredibly frustrating. Hitting delete on a botched exposure shouldn't be your first move, though. You can actually claw back visual data that looks completely dead on your monitor. While completely ruined files rarely survive post-processing, targeted adjustments often salvage what appears lost. From mobile sliders to AI recovery, this guide explores strategic methods to fix blurry photos and refine your composition without creating a crunchy, over-edited disaster.
Understanding Why Your Photos Become Blurry?
Soft images start with a tiny mistake. Missed focus happens incredibly fast. Even the absolute best camera sensors fail under pressure. Your autofocus gets confused in complex environments. It grabs a bright background object instead of your subject's eyes.
Physics always wins here. Handheld shooting naturally introduces camera shake. Dim lighting forces your camera to hold the shutter open longer just to gather enough ambient light. Those extra milliseconds record every single micro-tremor in your hands. Darkness completely blinds the sensor's edge detection. Expensive gear tries to compensate for internal stabilization. It rarely works perfectly in a dark, chaotic room.
Identifying the Type of Blur in Your Photos
Not all blur is identical. Before trying to fix blurry photos, you absolutely have to figure out what actually broke the shot. Throwing a generic sharpening filter with the wrong type of blur just makes a bad image look deep-fried.
-
Camera Shake: This is usually what ruins your best shots. Your hands jiggled while the shutter was open. You'll see a weird ghosting effect where everything in the frame has a directional double-image attached to it. It's annoying to deal with since the whole composition suffers uniformly. Trying to fix this perfectly is often a losing battle, honestly.
-
Subject Motion: Sometimes you stand like a statue. Your subject just doesn't care. If a kid runs past faster than your shutter speed, only that specific thing turns into a smear. The background stays crisp. Fixing this means masking out the moving object manually. Takes ages.
-
Softness vs. Blur: People confuse these constantly. True blur comes from movement. Softness is a hardware limitation. Shooting wide open at f/1.4 leaves you with a soft image lacking micro-contrast. Sharpening softness is quite easy. Severe motion blur puts up a real fight.
Proven Methods to Fix Blurry Photos
Figure out your strategy first. Dragging every slider to the absolute maximum won't magically rescue a ruined shot. It definitely guarantees hideous digital artifacts.
Subtlety wins out in the end. The output quality usually depends on the workflow here. Mobile editing focuses on convenience. Browser software offers deeper precision.
You have to decide how to make a picture less blurry based on the level of detail you need. Here are the three most reliable routes depending on your project goals:
-
Sharpen Images Instantly with Zawa AI Image Enhancer
Nudging pixels around by hand steals hours of your life. Zawa steps in when your deadline is tight. As a dedicated AI image enhancer, its performance easily outpaces basic gallery filters to make photos less blurry. Rather than slapping a cheap contrast mask across your frame, the engine attempts genuine structural repair.
It aggressively searches for shattered pixel clusters. It rebuilds messy, high-frequency details. Think flyaway hairs or thick wool textures. You aren't just adjusting contrast. You're forcing edges back into alignment using AI technology.
Here is the step-by-step guide:
Step 1: Get onto the Zawa platform. Navigate through the left-hand menu and follow this exact path: AI Tools> Image Tools to use the "Image Enhancer" tool.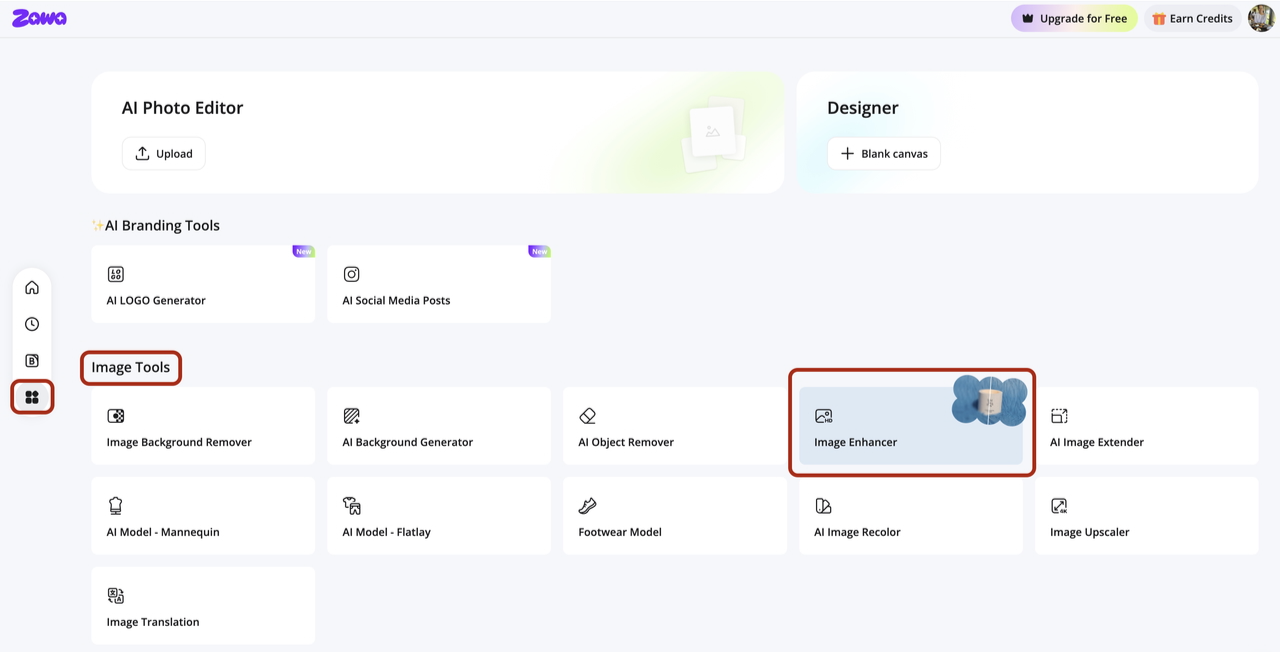
Step 2: Upload your blurry file right into the workspace. Select your target resolution quality (pick HD or UHD), and click on "Image Enhancer".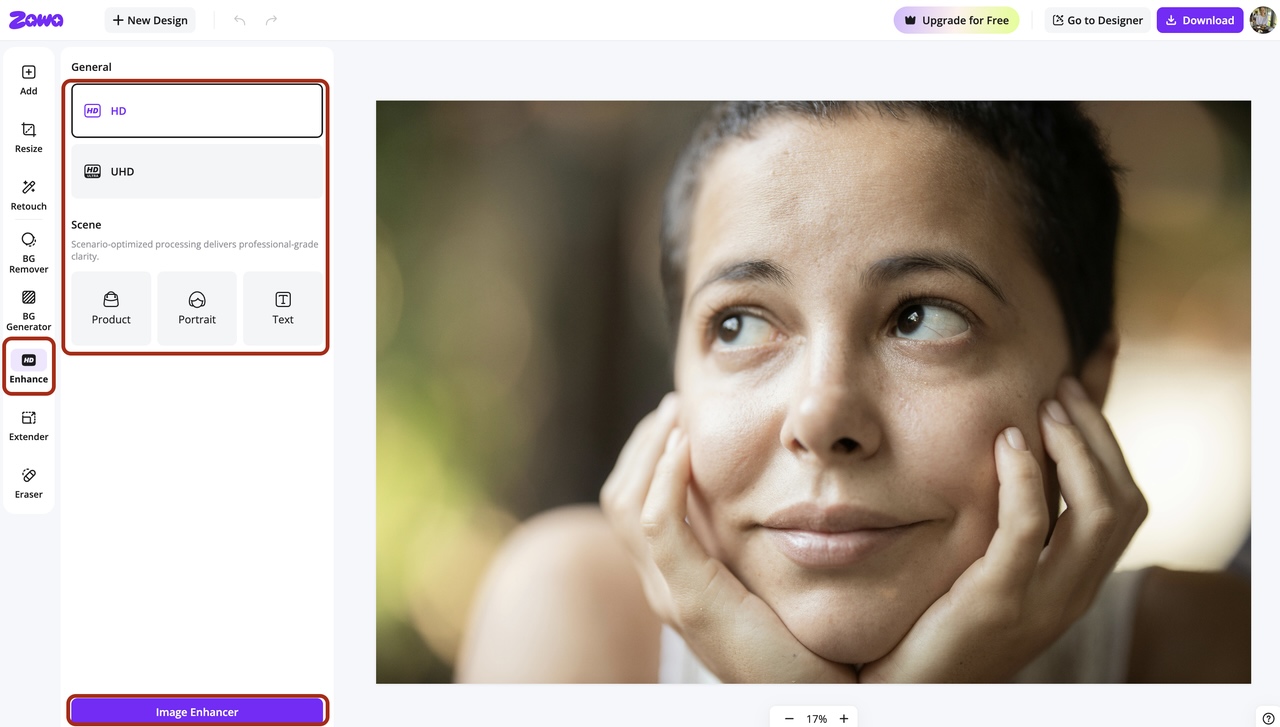
Step 3: Run the automated processing engine. Check intricate details like eyes and hair. Then download your high-resolution asset.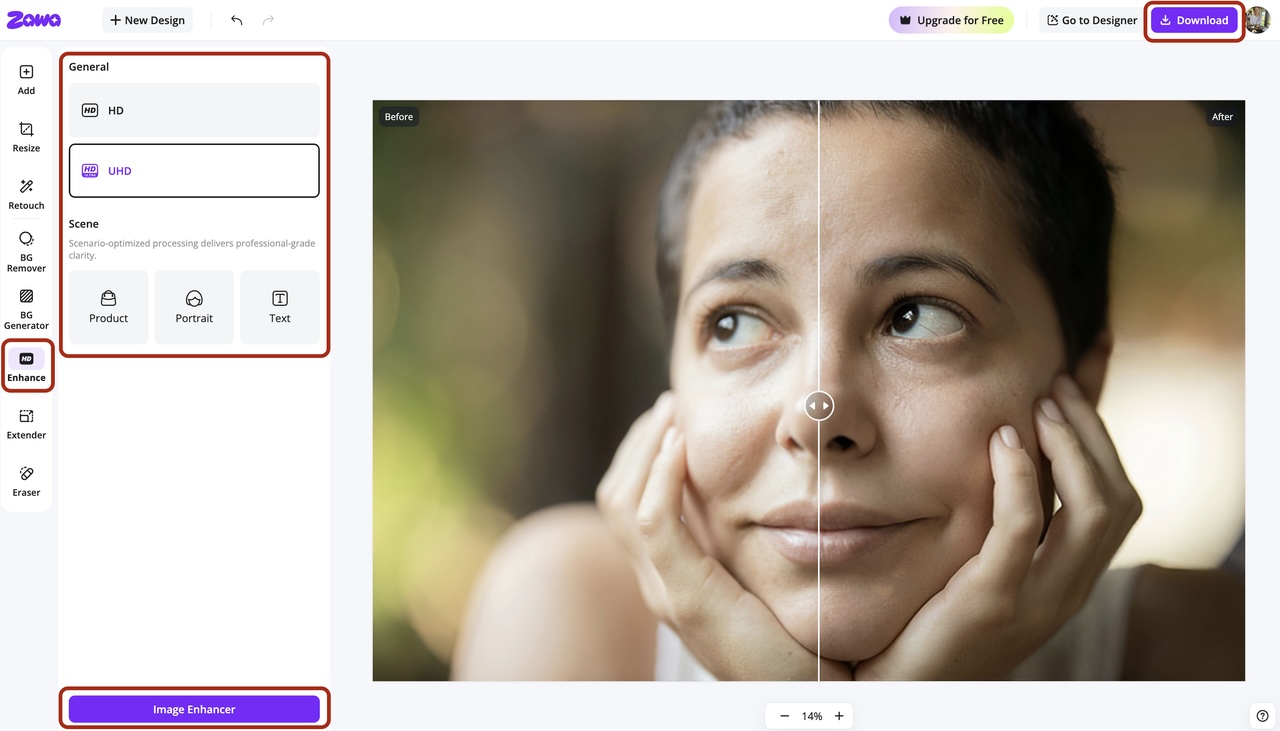
Professional Motion Correction in Photoshop
Desktop software eats your hard drive alive. You don't always want to install massive files just to fix one ruined shot. Photoshop on the Web handles this surprisingly well to make images less blurry. It gives you actual pixel-level control. The interface isn't cluttered at all. Honestly, the browser version is plenty for most basic retouching jobs. Just keep in mind it gets painfully slow if you've got twenty other tabs open.
Here's the exact workflow I usually stick to:
-
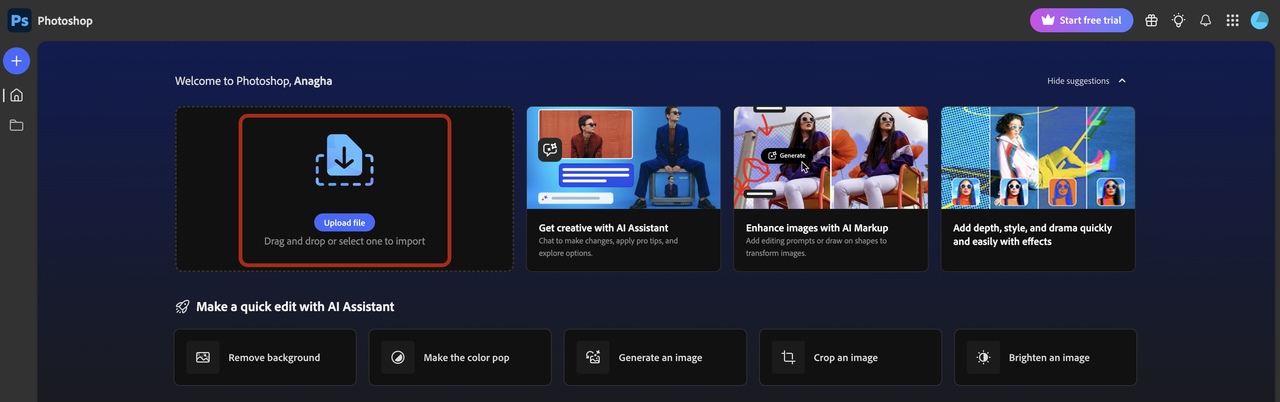
Set Up the Web Workspace: Go straight to web-based Photoshop. Drag your ruined file right onto the welcome canvas, then give it a second. Large RAW files take forever to render here.
-
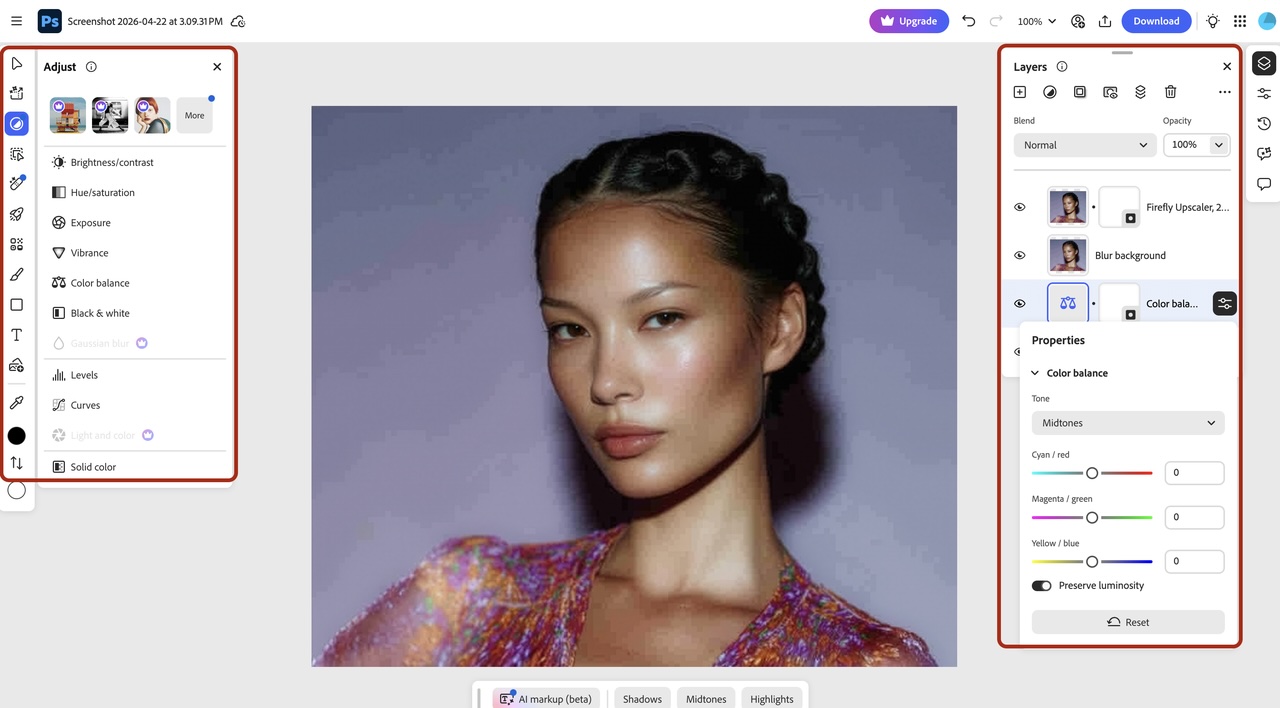
Access the Adjustments Panel: Click the three-slider icon on the right toolbar, then scroll down until the detail options appear. Adjust the properties and color balance to achieve an enhanced image.
-
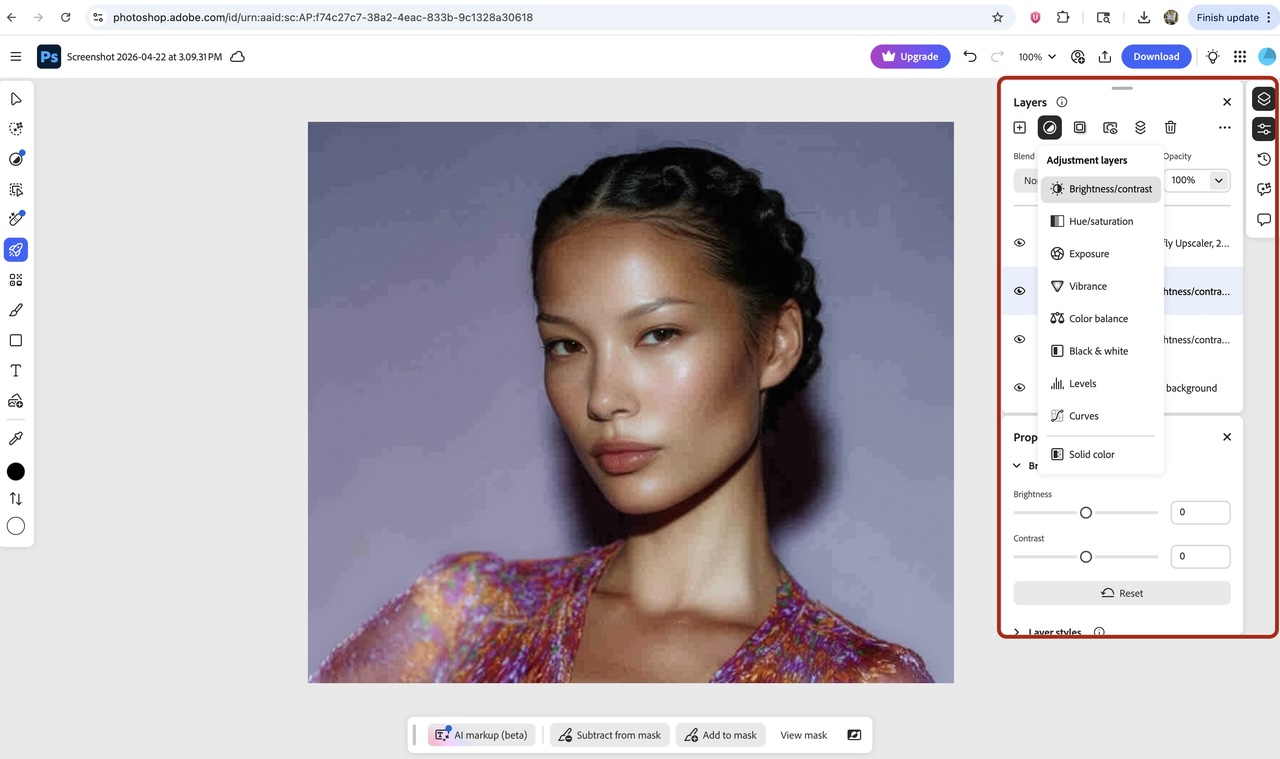
Dial in the Sharpening Carefully: Push that slider up slowly. If you just yank it to the right, your subject will suddenly look deep-fried and covered in white halos, so back it off the second digital noise creeps into the shadows. Look at the very bottom of your Layers panel. Click the circle icon that's half-black and half-white. Choose Brightness/Contrast. Bump the contrast up significantly. That forces harder, crisper edges on your subject.
-
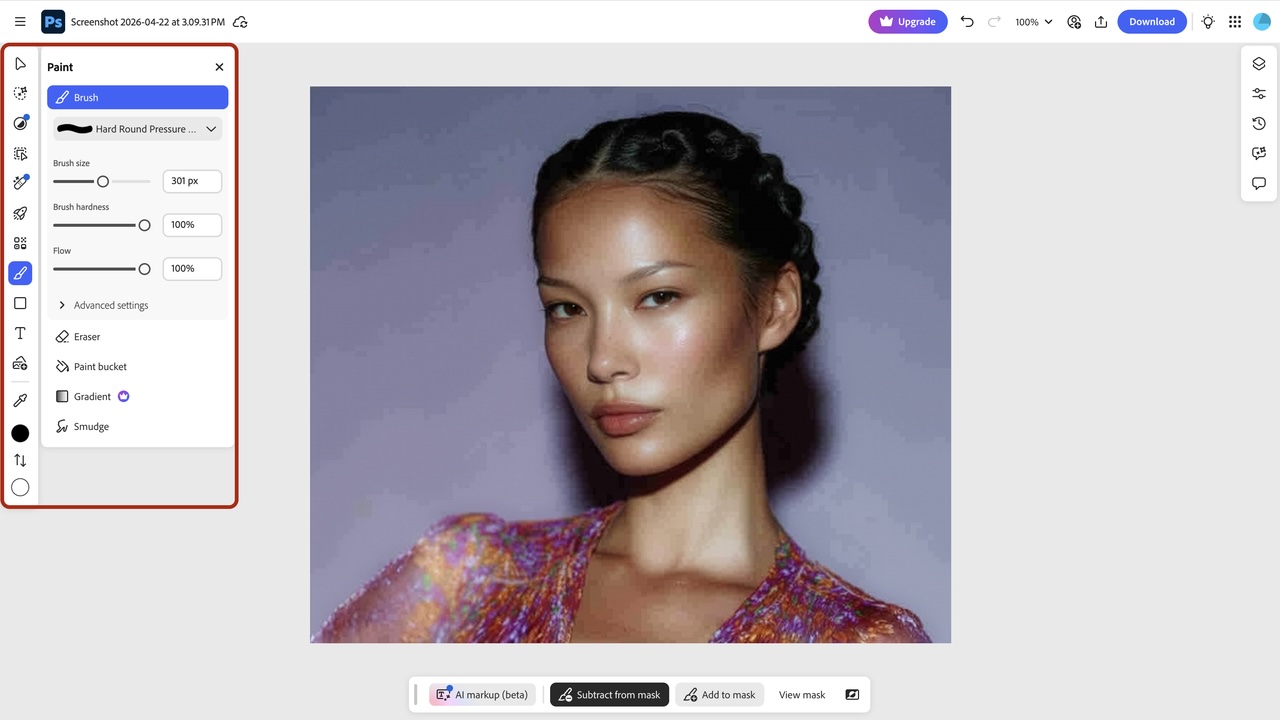
Paint Out the Unnecessary Features: Move your eyes over to the tall toolbar on the far left. Grab the Brush tool. Check the two overlapping color circles at the very bottom of the left toolbar. Make sure the top circle is set to black. Paint over everything behind your subject. It hides those harsh contrast adjustments in the trees or walls behind them.
Fast Fixes Using Mobile Photo Editors
The built-in tools in your phone's photo gallery pack a serious punch for quick fixes. Open your native gallery editor to fix blurry photos. The Definition slider uses local contrast to fake a clearer image. It tricks your eyes. It makes a photo not blurry to the naked eye on a small smartphone screen by darkening the dark and lightening the lights right at the edges of objects.
The Clarity slider acts entirely differently. It hunts down midtone contrast. Pushing those values up adds a heavy, punchy weight to your subject rather than drawing brittle lines around them. Human skin texture absolutely crumbles under heavy clarity.
Push those native sliders gently. Keep it subtle. Figure out how to make images less blurry without making them look like a cheap 2012 HDR filter.
Strategic Tips to Prevent Blurry Images
Fixing mistakes is annoying. Preventing them in the camera is always better. Let's look at stopping this before you even press the shutter button.
-
The Reciprocal Rule: Memorize this math. Your shutter speed should always match or exceed your focal length. Shoot with a 200mm lens, and your shutter speed must be at least 1/200s. It prevents hand jitter from ruining the shot. Ignoring this simple math destroys countless photos.
-
Advanced Stabilization: Handheld photography guarantees shake. You can't cheat human anatomy. Tuck your elbows in tightly against your ribs to turn your body into a human tripod. Physical anchors beat internal software stabilization every single time. A solid stance to fix blurry image issues before they happen saves you hours of post-processing frustration later. Just don't rely on it when shooting from awkward, twisted angles.
-
Shooting in Burst Mode: Action shots are completely unpredictable. Hold down the shutter and take ten shots in a rapid row. You mathematically increase the probability of capturing one perfectly sharp frame while the subject rests between micro-movements. Delete the bad ones later. Storage is cheap.
-
The Right Gear: Sometimes your equipment actively fights you. A cheap kit lens performs terribly in low light. Dim lighting forces your camera to hold the shutter open longer to gather light. Invest in glass with wider apertures to let more light in faster. Clean your lenses, too. A greasy thumbprint on your front element scatters incoming light and mimics digital blur perfectly. It takes two seconds to wipe off.
Conclusion
Don't delete your soft shots just yet. Even if a file looks dead on your monitor, you can often claw back lost visual data with the right strategy.
For the most reliable recovery, we recommend trying Zawa. Instead of a crunchy, over-edited disaster, this AI image enhancer performs genuine structural repair to make a blurry image clear. It's the smartest way to salvage your best compositions and refine your details instantly.
FAQs
-
What causes motion blur in photos?
Your shutter stayed open too long. That's really it. Any movement from your hands or the subject during that specific fraction of a second turns into a visual smear across the digital sensor.
-
How to make a photo less blurry on an iPhone?
You've got two quick options. First, tap "Edit" in the native app and nudge the "Sharpness" and "Definition" sliders. For worse files, grab the Zawa mobile app since it attempts actual structural AI repair on the pixels. Basic contrast sliders can't do that.
-
Why are my Nikon photos blurry?
Brand doesn't matter at all. Physics applies to all cameras equally. If your Nikon shots look soft, you probably missed focus or dropped your shutter speed way too low. Having a filthy lens does it too. Check your settings and find better light.
-
How to fix blurry photos with camera settings?
Get out of full Auto mode immediately. Bump your shutter speed up to freeze motion. You'll probably need to raise your ISO to compensate for the lost light. Narrow your aperture to f/4 or so. That gives you a wider depth of field and hides minor focus mistakes perfectly.
-
Does upscaling a photo make it less blurry?
Upscaling just makes your blurry pixels bigger. It won't fix the core issue alone. Pairing upscaling with AI-driven sharpening tools (such as Zawa) can pull out lost details sometimes.
You May Be Interested
Document Picture Enhancer Free

Discord Logo maker

Create Free Device Mockups
The Complete Guide: How to Make a Picture Bigger Without Losing Quality

How to Get into Real Estate Photography