Google Photos Magic Eraser: Honest Review & Best Alternatives
Google Photos Magic Eraser removes unwanted objects using on-device AI - but its results vary by scene complexity. This guide covers how it works, what it struggles with, and when a dedicated AI object remover delivers cleaner output.


Google Photos Magic Eraser removes unwanted objects from photos using on-device AI. It has been available at no cost to all Google Photos users since May 2024. No subscription needed. This guide covers how it works, what it struggles with, and when another tool makes more sense.
What Is Google Photos Magic Eraser and How Does It Work?
The Technology Behind Magic Eraser
The Google magic eraser feature scans your photo automatically when you open it. It highlights objects it thinks are distracting: power lines, background strangers, litter. Tap any highlight to remove it. Or skip the suggestions and brush over an area yourself.
The tool uses two processes. First, semantic segmentation finds the object. Then, generative inpainting fills the gap using pixel data from the surrounding area.
There is also a Camouflage mode. It does not remove an object. It mutes the color so the object blends into the background instead. This works when the object stands out because of its color, not its shape.
Magic Eraser and Magic Editor are not the same tool. Google designed Magic Eraser for small background fixes. Magic Editor handles bigger, more complex removals. They live in the same app but do very different jobs. Mixing them up is the most common reason users feel let down by the results.
Which Devices Support Magic Eraser in 2026?
Magic Eraser works on all Pixel 6 and later devices. It is fully unlimited there.
For everyone else on Android or iPhone, it became available at no cost in May 2024. No usage cap applies to Magic Eraser specifically.
One thing confuses many users. Google Photos shows a 10 saves per month limit. That limit applies to Magic Editor, not Magic Eraser. They are separate. Magic Eraser stays unlimited for all users.
There is no desktop version. The web interface for Google Photos has limited tools. If Magic Eraser is missing from your app, update Google Photos. An outdated version is usually the cause.
Step-by-Step Guide: How to Use Magic Eraser in Google Photos
The workflow is straightforward and nearly identical on Android and iOS. Magic Eraser lives inside the Edit menu, and the whole process from opening the photo to saving the edit takes under a minute for most images.
On Android
Open Google Photos. Tap the photo you want to edit. Tap Edit at the bottom. Then tap Tools and select Magic Eraser.
The tool scans the image. It marks suggested objects with a highlight. Tap any highlight to remove it. Use the brush to paint over anything it missed.
Tap Done when finished. Then tap Save as copy. This keeps the original photo separate from the edited version. To try Camouflage instead of full removal, look for the toggle inside the Magic Eraser panel before you confirm.
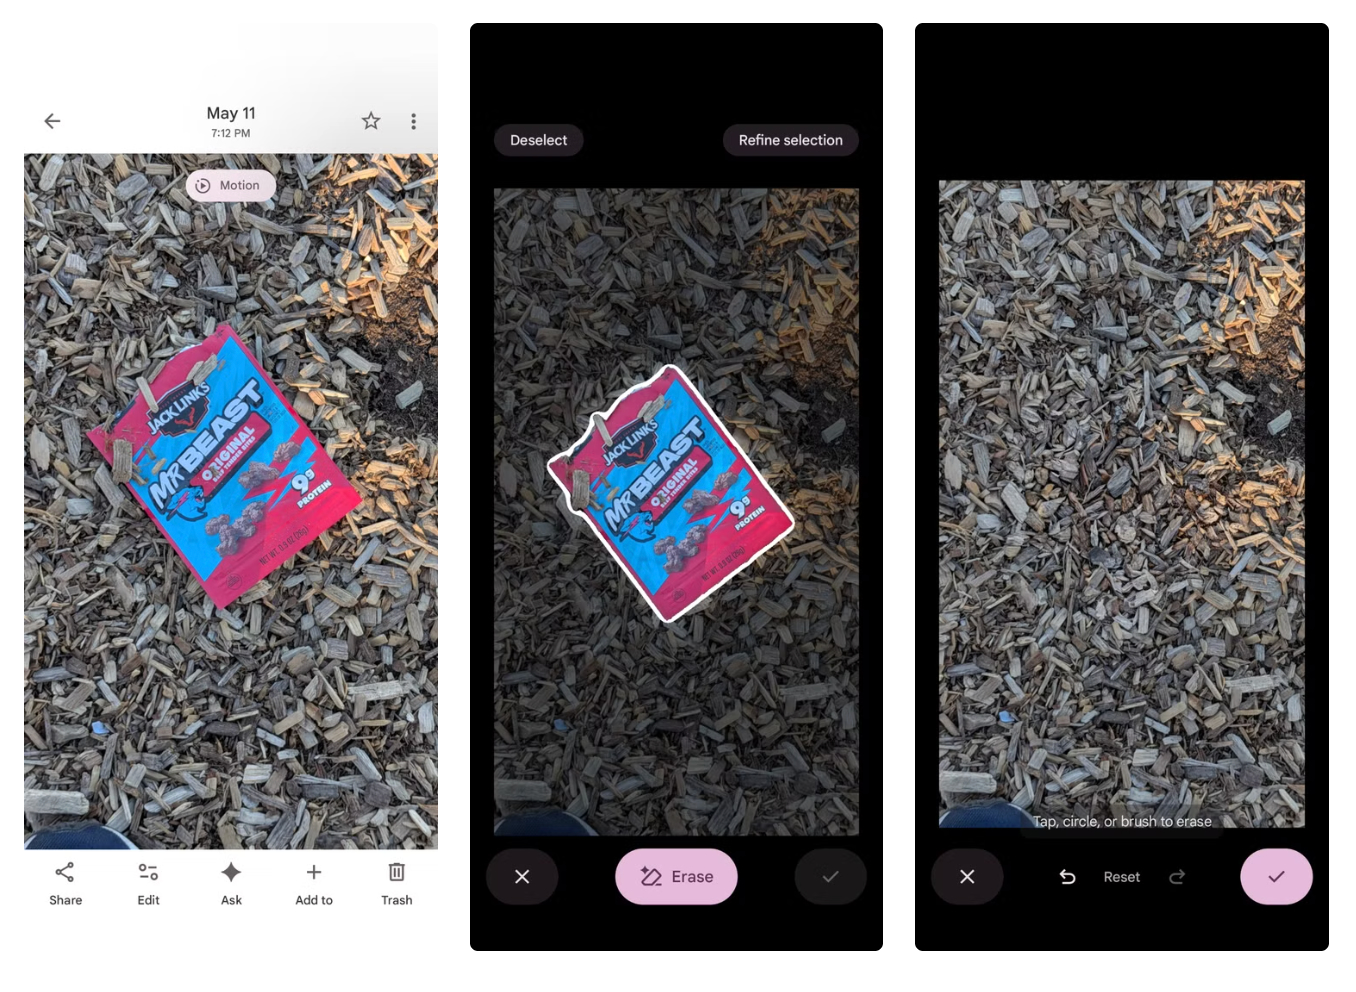
On iPhone (iOS)
Open the photo in Google Photos. Tap Edit, then Tools, then Magic Eraser. The auto scan and manual brush both work the same way as Android.
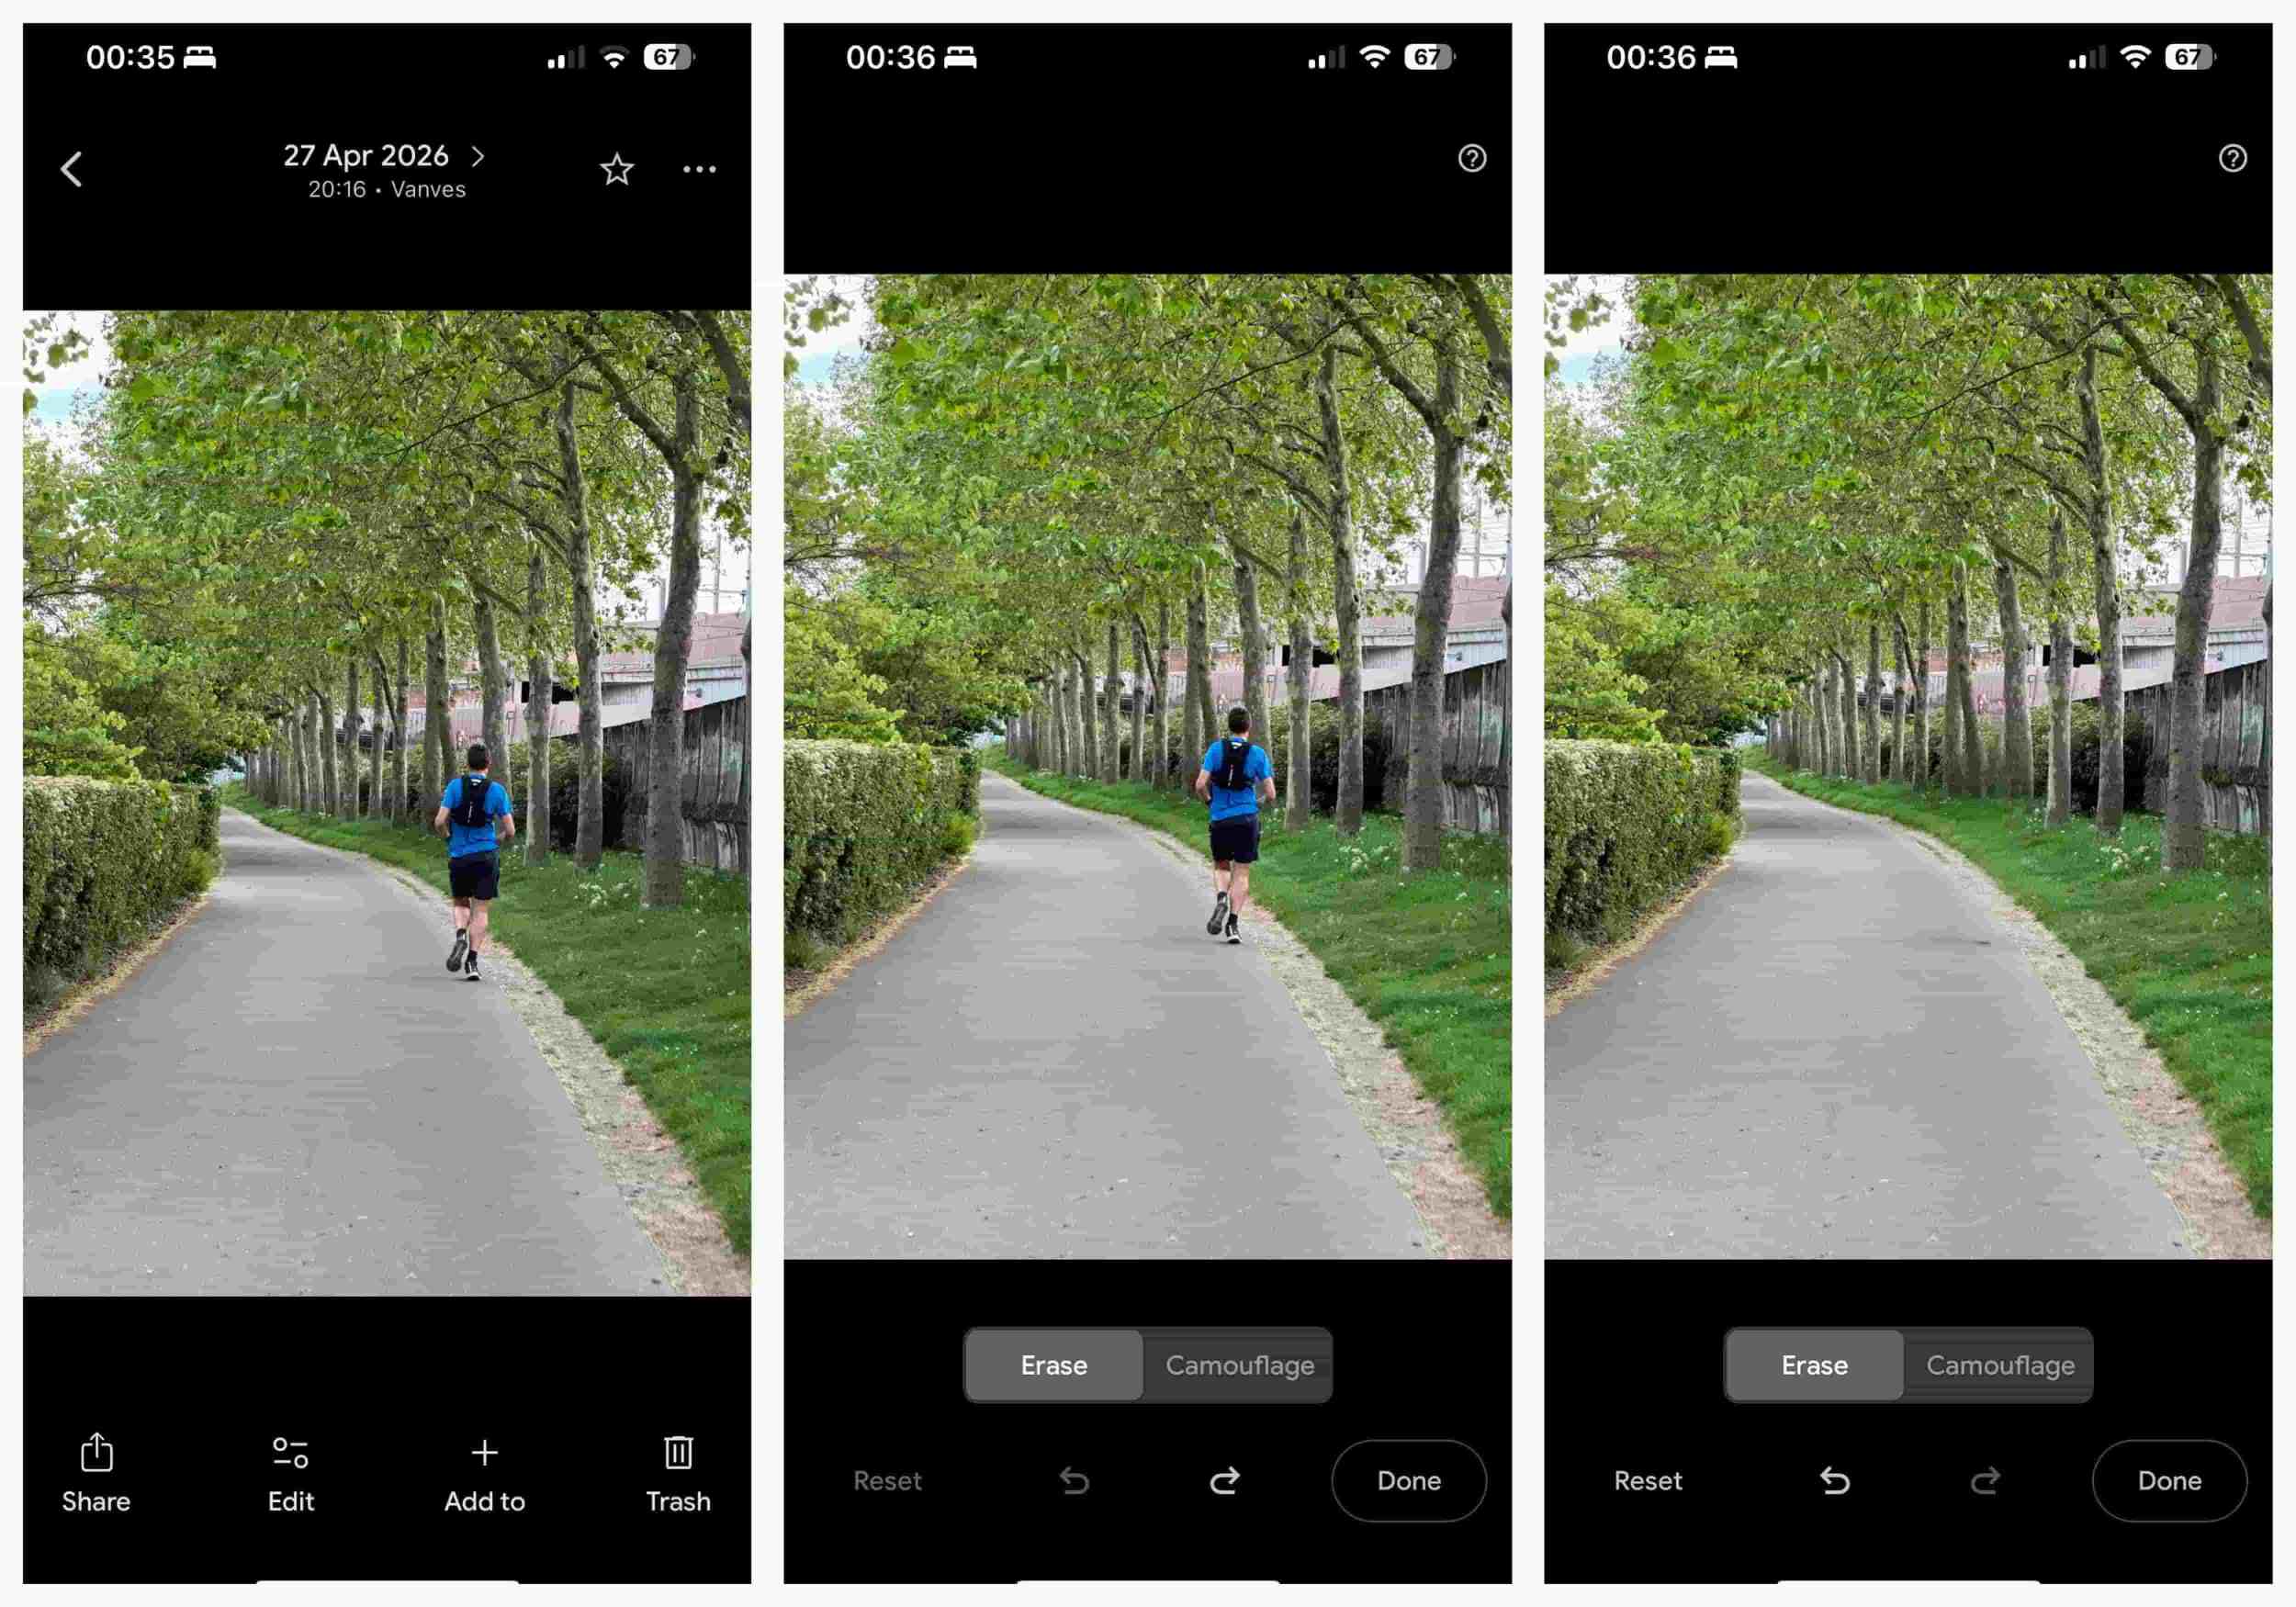
One difference: Camouflage mode does not exist on iOS. It is Android only as of 2026.
Real-World Test: Putting Google Photos Magic Eraser to the Test
To understand where Magic Eraser holds up and where it produces unreliable output, we tested it across three scenarios of increasing complexity. Testing was done on Android with the current version of Google Photos. Each scenario was chosen to expose a specific limitation rather than to find the easiest possible use case.
Test Case 1 - Removing an Isolated Object (Simple Background)
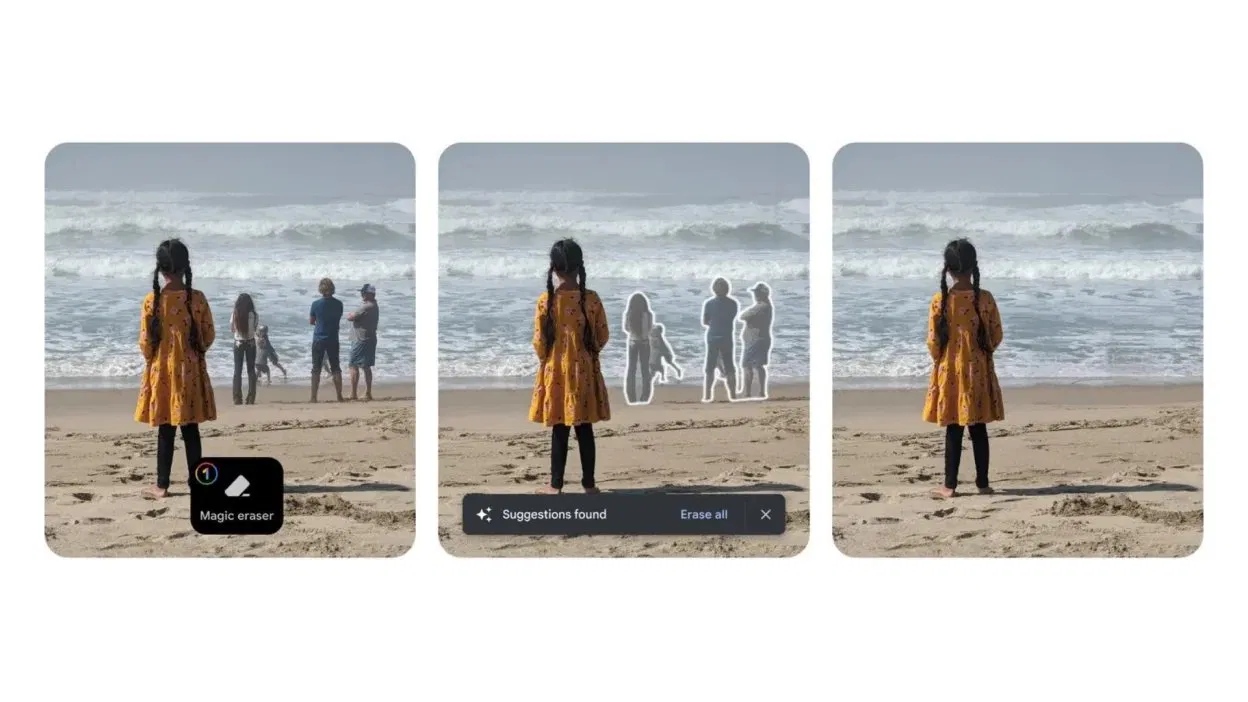
The original photo shows a girl standing on a beach facing the ocean. A group of four people and a dog stand to her right in the background. The Magic Eraser icon is visible at the bottom left, ready to scan.
In the middle panel, Magic Eraser has already done its work. It identified the entire group automatically and outlined all of them without any manual brushing. The "Suggestions found" prompt gives the option to tap individual figures or erase all at once.
The final result on the right is clean. The group is gone. The sand, the shoreline, and the water behind them all reconstruct naturally. There are no visible patches or color mismatches. The girl is untouched.
This is the scenario where Magic Eraser performs best. The background behind the group is mostly open ocean and wet sand. Both are relatively uniform in texture. The algorithm had enough consistent surrounding data to reconstruct the area convincingly. Auto-detection also worked without needing any manual input, which makes the whole edit a single tap.
Test Case 2 - Removing Background People (Crowded Scene)
The original photo shows two people sitting on concrete stairs. Three bystanders appear on the lower left. A fourth person stands at the top right near the railing.
Magic Eraser detected the group on the left and outlined them. The final result clears that side cleanly. The stair concrete fills without obvious patching. The sky on the left blends well. Those figures stood against open sky and plain concrete. That gave the algorithm enough clean data to work with.
The person at the top right tells a different story. Magic Eraser did not select them automatically. In the final result, that figure remains as a faint ghost. The railing edge behind them gave the tool too little clean background to reconstruct confidently.
Keep in mind: Magic Eraser works best on subjects with clear separation from the background. The more structural detail sits directly behind the object you want to remove, the harder the reconstruction becomes. This is the pattern that repeats across similar photos. Magic Eraser works well when the background behind a subject is open and uniform. It leaves remnants when a subject sits near a structural edge or detailed surface.

Test Case 3: Where Magic Eraser Hits Its Limit
Magic Eraser has no auto-detection for text or watermarks. It will not highlight them. There is no dedicated mode for them either.
Brushing over text manually produces a blurry smear rather than a clean fill. The inpainting model was built for natural photo objects like people and wires. It was not trained to recover fine background detail underneath text.
User reports from 2026 also note that accuracy on small, precise edits has dropped after a recent Google Photos interface update. This is consistent with what we saw in testing. The same issue appears with large objects over detailed backgrounds. When the removed area is big and the surrounding texture is complex, the fill cannot match what was there. The result looks smudged at full resolution.
Where Magic Eraser Works and Where It Doesn't
Reliable: small background objects, isolated subjects against open sky or plain walls, power lines, outdoor people removal with clean backgrounds.
Inconsistent: text and watermarks, subjects near frame edges or structural details, large removal areas, complex indoor backgrounds.
A More Capable Alternative: Zawa AI Object Remover
When Magic Eraser falls short, Zawa AI Object Remover is worth trying. It handles the cases that give Magic Eraser trouble: watermarks, complex backgrounds, and large removal areas.
Zawa runs in a browser. No app install needed. It works on any device. It also supports batch processing, so you can clean up several photos in one session instead of one at a time.
The key difference shows up in the detailed backgrounds. Magic Eraser smears them. Zawa's inpainting pulls from a wider pixel analysis. The fills tend to be cleaner on textured surfaces.
Step-by-Step: Using Zawa AI Object Remover
Step 1: Upload Your Photo
Go to the Zawa Object Remover page. Click Upload to add your image. For multiple photos, use the Batch upload option. You can also drag and drop into the upload area. Sample images appear at the bottom of the panel if you want to test first.
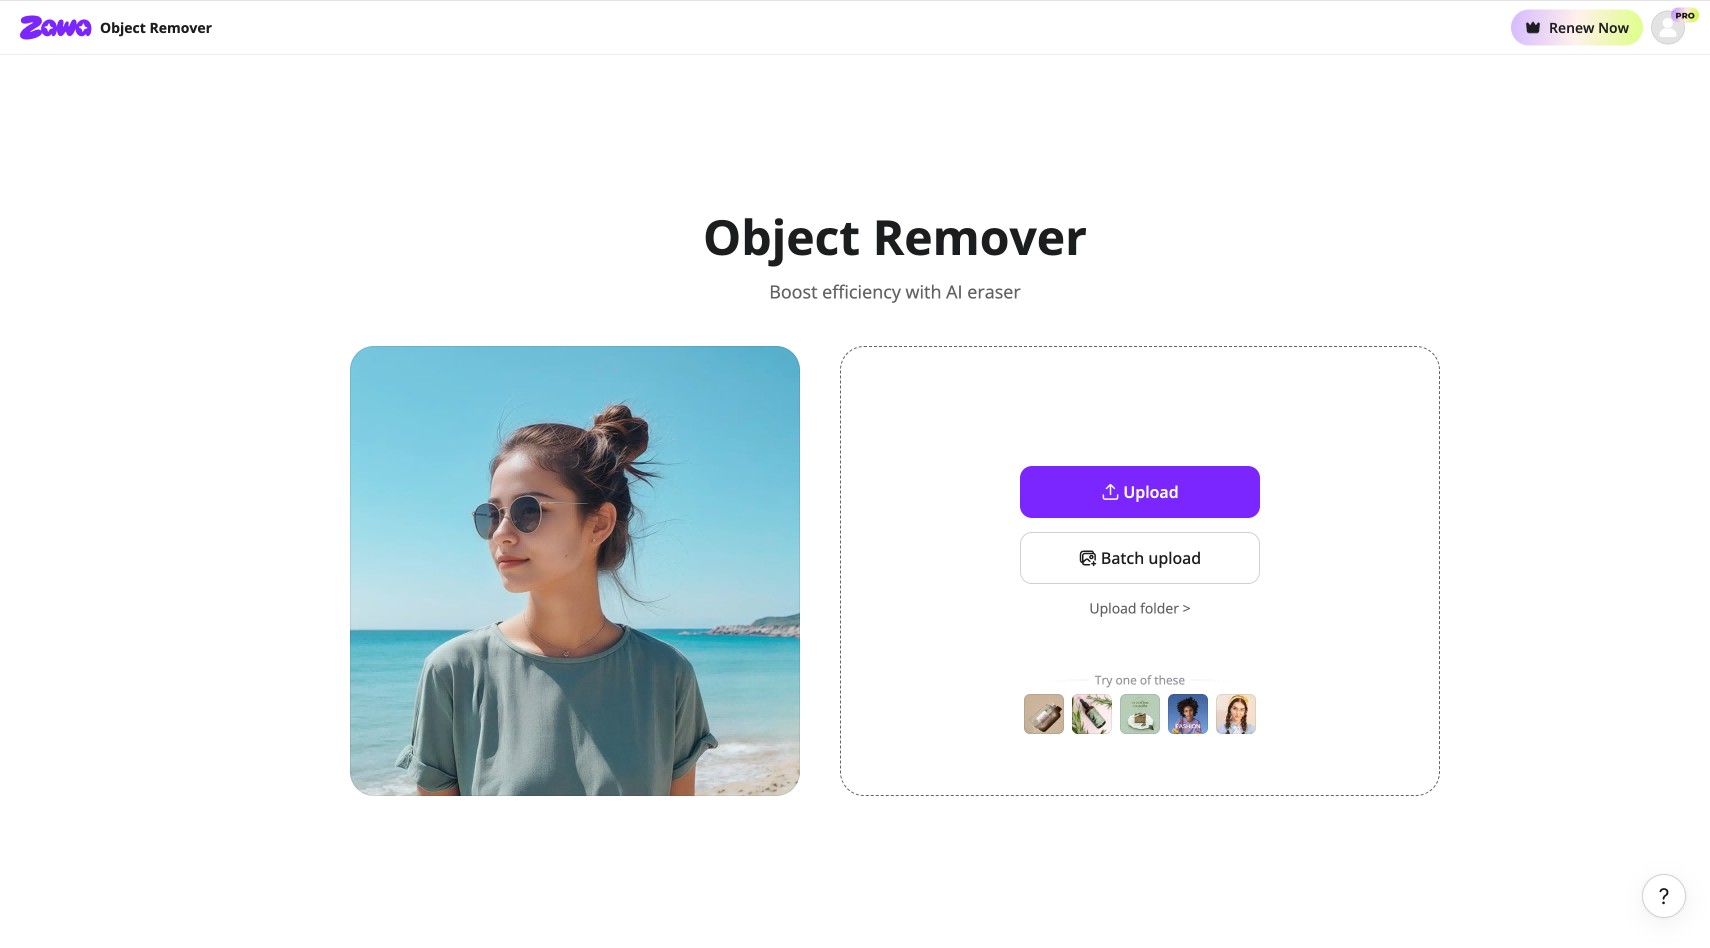
Step 2: Choose Your Removal Mode
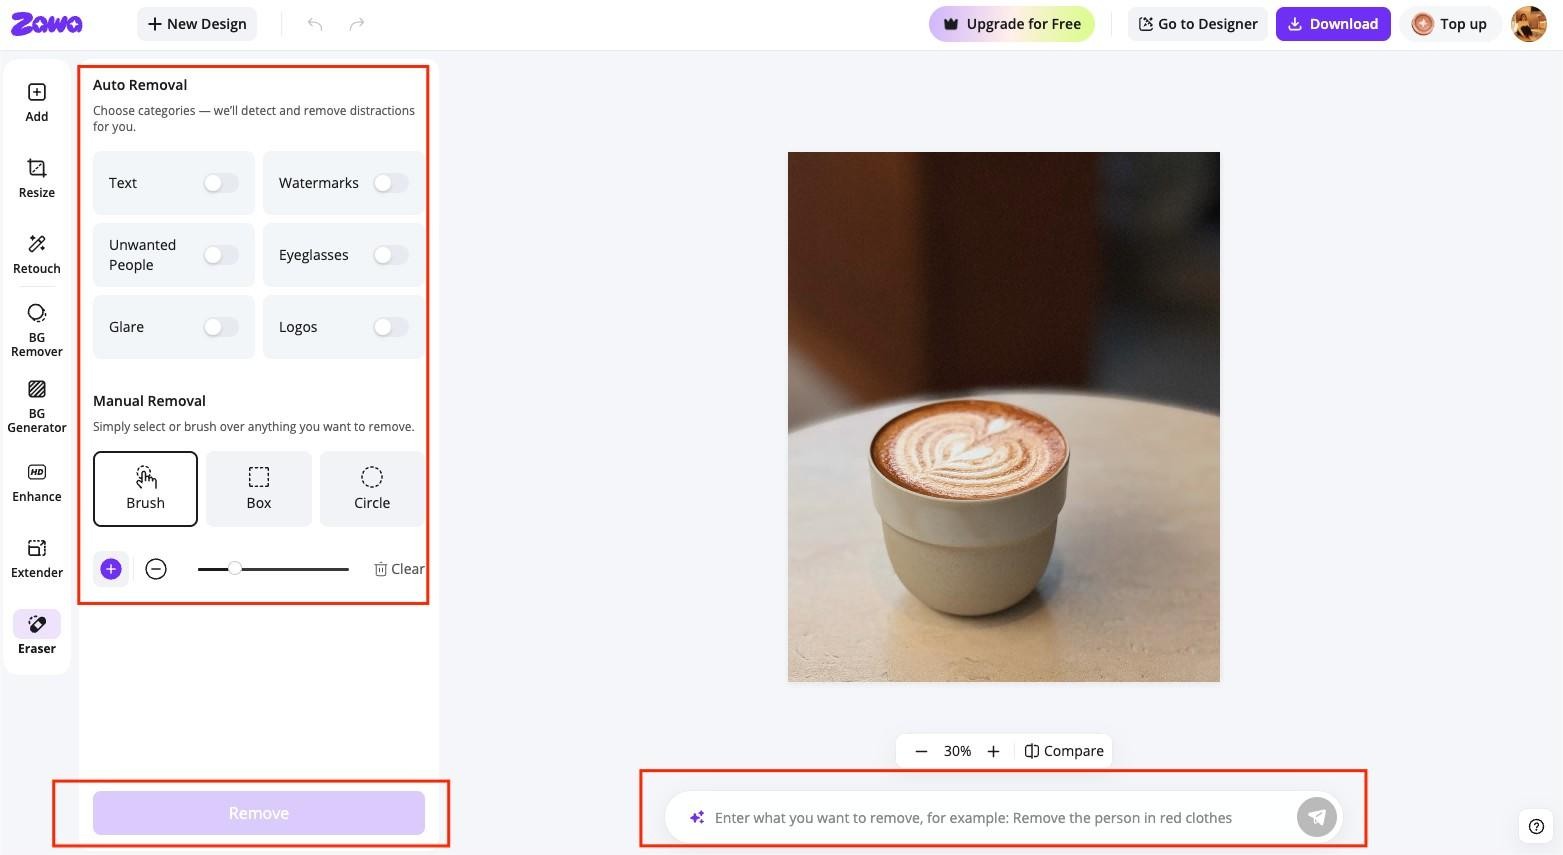
Once the image loads, the left panel shows two sections. Quick Start handles automatic detection. Toggle on what you want removed: Text, Overlay Watermark, Unwanted People, Eyeglasses, or Glare. Zawa finds and removes those categories without any manual brushing.
For more control, use the Advanced section. Pick Brush, Box, or Draw. Use the slider to adjust brush size. Click "Remove" when you are ready. Zawa can remove unwanted objects using simple text descriptions. Just tell the AI what you want to remove, and it will handle the rest automatically.
Step 3: Download or Continue Editing
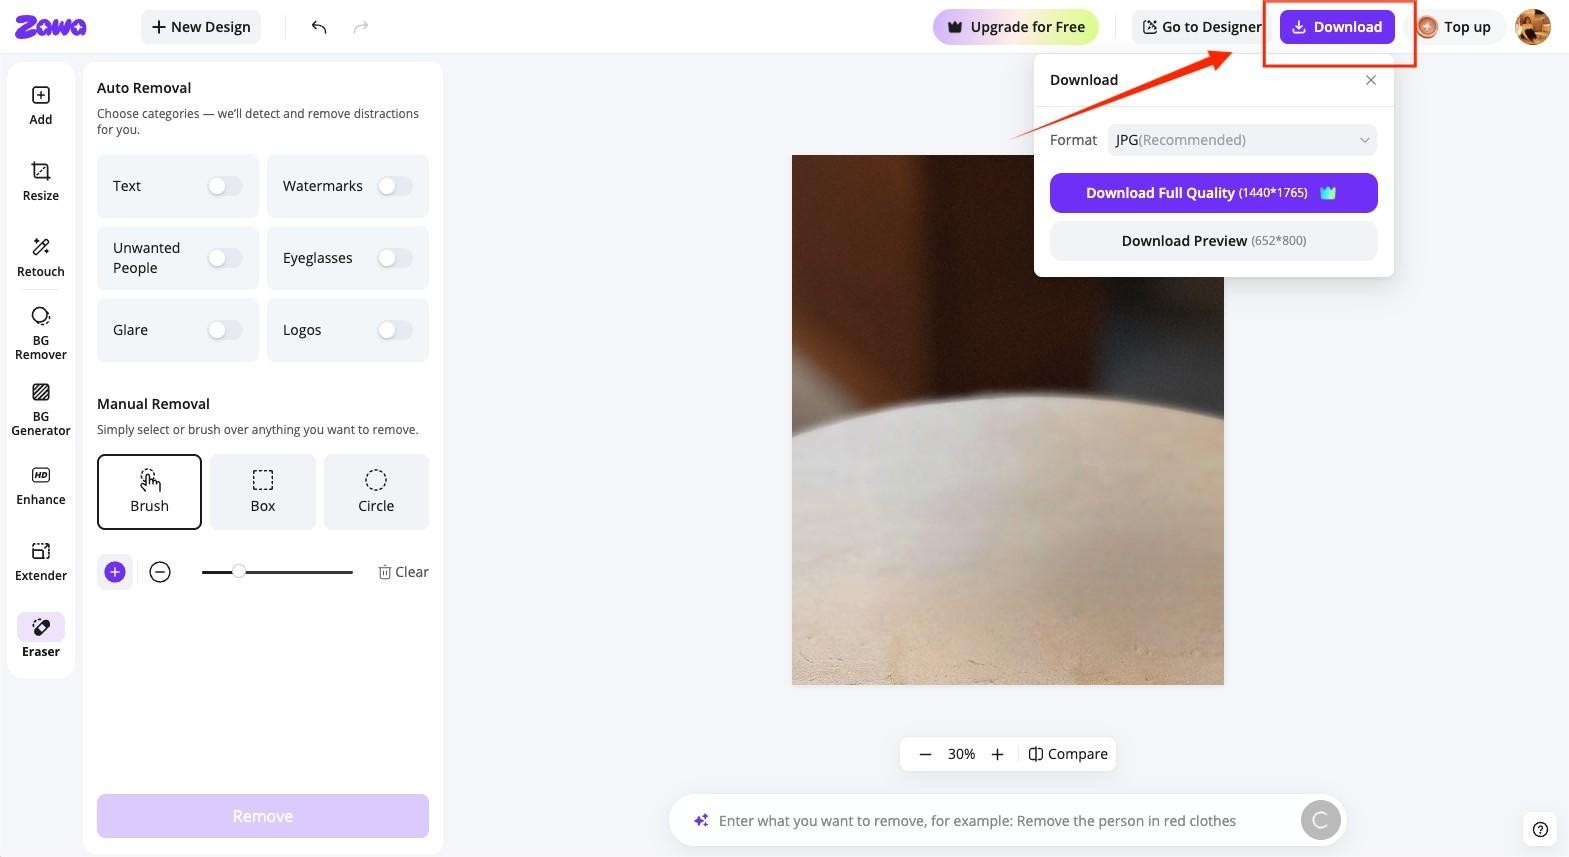
When the removal is done, click Download at the top right. Save as JPG or PNG. If you want to keep editing, the Advanced Editing panel connects directly to Image Enhance, AI Background Removal, Image Upscale, and Photo Editor. All without leaving the page.
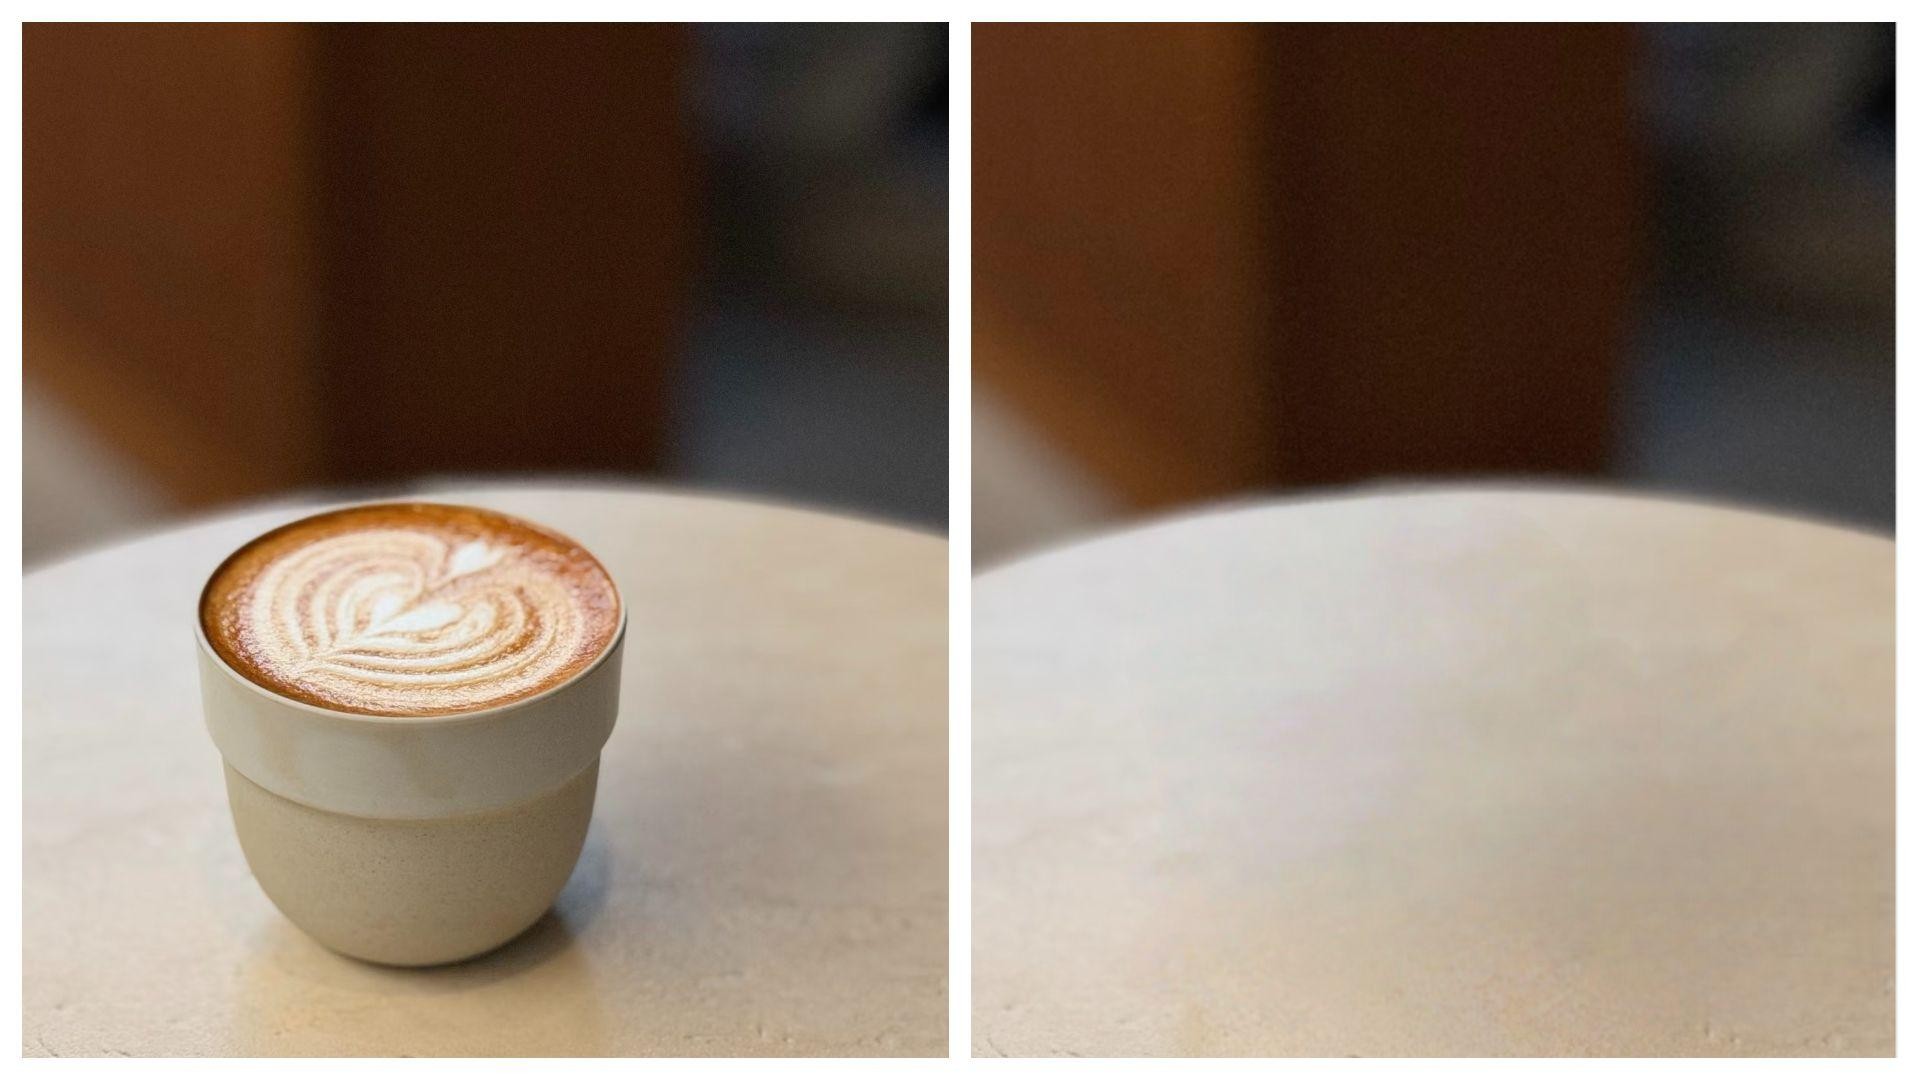
Zawa successfully removes the coffee cup from the table while preserving the surrounding texture and lighting. The AI-generated fill blends naturally with the tabletop, leaving no obvious traces of the removed object and creating a clean, realistic result.
Best Practices: How to Use AI Object Removal Without Losing Authenticity
The Risk of Over-Erasing
Heavily edited photos follow a pattern. The more you remove, the more the image starts to look built rather than taken. AI fills large areas with uniform texture. At full resolution, that texture reads as fake.
Think of it this way: every AI fill is a guess. The algorithm predicts what the background looked like before the object was there. One guess is usually fine. Five guesses in the same photo start to compound. The problem gets worse when you remove several elements from one photo. Each edit looks fine on its own. But remove a background figure, a street sign, a parked car, and a power wire from the same scene and the background becomes too clean. Real outdoor photos have variation and imperfection. That is what makes them look like photos.
Knowing What to Keep for Better Storytelling
Before erasing anything, ask one question: does this element pull focus from the main subject, or does it add to the scene?
A blurred figure in the distance, a bicycle leaning against a wall, a sign over someone's shoulder. These are part of where the photo was taken. Removing them makes the photo flatter, not better.
There is no formula for this. It comes down to judgment. A stranger in the far background of a street photo adds life to the scene. The same stranger standing directly behind your subject in a portrait is a distraction. Context determines which is which.
Remove what actively competes with your subject. Keep what gives the scene a sense of place. That approach tends to produce more credible results on social media and in print than a fully sanitized image does.
Conclusion
Google Photos Magic Eraser is a practical tool for quick edits. It handles small background objects and outdoor people removal well. It works at no cost with no usage limits on any device running Google Photos.
It struggles with watermarks, text, complex indoor backgrounds, and anything requiring a large fill. For those cases, Zawa AI Object Remover gives you more control, better output on detailed backgrounds, and the ability to process multiple images at once. It covers the removal tasks that google photos magic eraser was not built for.
FAQs
-
Is Google Photos Magic Eraser free?
Yes. Since May 2024, Magic Eraser is available to all Google Photos users on Android and iOS with no usage limit. The 10 saves per month cap applies to Magic Editor only. It does not affect Magic Eraser.
-
Can Magic Eraser remove watermarks?
Not reliably. There is no auto-detection for text or watermarks. Brushing over them manually produces blurred or smeared output on detailed backgrounds. A dedicated tool trained on text removal handles this better.
-
Why does Magic Eraser leave blurry patches?
It fills the removed area using surrounding pixels. When that background is complex, such as stone texture, dense foliage, or a crowd, the surrounding data is too varied. The fill cannot match it. Cleaner backgrounds produce cleaner results.
-
What is the difference between Magic Eraser and Magic Editor in Google Photos?
Magic Eraser handles small background fixes quickly. Magic Editor uses a more advanced AI model for larger, more complex edits such as moving objects, swapping backgrounds, or adjusting the framing of the main subject. They are different features inside the same app.
-
Why doesn't Magic Eraser show up in Google Photos?
On non-Pixel devices, update the Google Photos app first. An outdated version is the most common cause. On some older Android or iOS builds, the feature may still be missing after updating. In that case, Zawa AI Object Remover works through any mobile browser with no install required.
You May Be Interested

[2026 Updated] Best Apps to Remove Person From Picture

How to Remove Image Background in GIMP

4 Ways To Remove Backgrounds from Photos

Google Gemini 3 Pro: The Next Great Leap in AI Development