How to fix grainy photos: Remove grain and enhance image quality fast
Discover how to fix grainy photos with practical methods, tools, and tips to reduce graininess in photos, improve clarity, and enhance every grainy image effortlessly.


Ever take a photo you love, only to notice it's covered in that annoying, fuzzy "static"? It can ruin an otherwise great shot, and it usually happens when you're shooting in low light or your camera settings are working a bit too hard. The good news is that you don't have to delete it—all it takes is the right tool to bring back crisp details.
In this guide, we'll show you exactly how to fix grainy photos. We'll talk about how to tweak your camera for next time, how to use Zawa for an instant AI fix, and the best ways to use apps like Lightroom to get your photos looking sharp and clear again. Let's get to it!
What is a grainy photo?
A grainy picture looks fragmented, fuzzy, or speckled. You might see these dots in the darkest parts of your photo or where the light wasn't very good. In photography, this effect is called "digital noise." When your camera's sensor has trouble reading the light, it shows "static" instead of a clear picture.
There are two major types of noise that can cause a grainy image. The first type of noise is luminance noise, which looks like sand or grit. It makes things brighter, but not much else. The second type is color noise, which appears as blue, red, or green dots that get in the way. Both of these noise styles can hide fine details, making your pictures look cheap and unprofessional.
Why are my photos grainy?
If you ever wonder, "Why are my pictures so grainy?" It's mainly because of how your camera processes light and data. Graininess isn't just bad luck; it's a reaction of the camera or computer to the settings or environment you choose during the shoot.
There are a few things that can cause that annoying "grainy" effect in your pictures:
-
The ISO is cranked too high: ISO is like a "fake" brightness boost. It’s handy when you're in a dim room, but it comes at a price. The higher you push it, the more "digital grit" you’re going to see in your frame.
-
Sensor size matters: This is the main reason phones struggle compared to "real" cameras. Phone sensors are tiny, so they can’t soak up much light. They have to work twice as hard to get a clear shot, which usually leads to more grain.
-
Social media "squishing" your files: When you save a photo in a low-quality format or upload it to an app, the file gets compressed to save space. This often leaves behind weird, blocky patterns that look a lot like grain.
-
The "Digital Zoom" trap: When you pinch-to-zoom on your phone, you aren't actually getting closer to the subject; you're just stretching the pixels you already have. This makes any tiny bit of existing grain look huge and distracting.
-
Over-editing in post: We’ve all been there—trying to save a dark photo by cranking up the brightness or dragging the shadows up. If you push the sliders too far, the image "breaks," and noise starts popping up in places it wasn't even visible before.
How to fix grainy images: Practical methods that work
Low-quality photos don't have to stay that way. There are several reliable techniques to reduce blur and grain, such as adjusting your gear or using specialized software and tools.
Here are the best ways to make your photos clearer and more professional.
-
Optimize camera settings
The key to a clean image is maximizing the signal-to-noise ratio at the source. By mastering your camera's manual controls, you can capture cleaner data and ensure your sensor isn't working overtime. Proper settings allow more natural light to reach the sensor, which naturally hides the grit that leads to grainy images.
To keep your shots clear, pay attention to these important camera changes:
-
Lower the ISO: Always set your ISO to the lowest base value, like 100 or 200. Only raise it when you really need to, because larger values generate the most digital noise.
-
Open the aperture: Use a wide aperture, such as f/1.8 or f/2.8. This lets more light reach the sensor, so you can keep the ISO low even in dark conditions.
-
Slow down the shutter: A slower shutter speed provides the camera with more time to gather light. Always use a tripod to keep the camera still so that it doesn't get blurry while you do this.
-
Go manual: When you shoot in manual mode, you have full control over the "Exposure Triangle." This stops the camera from generating "guesses" that could lead to blurry or grainy photographs after editing.
-
Expose correctly: Try to get "bright" exposure without blowing out the highlights. Later, it's harder to lighten a dark, grainy photo than it is to darken a brilliant one.
-
Use Zawa AI image enhancer for fast online enhancement
The Zawa AI Image Enhancer is a game-changer if you need a professional repair without dealing with a lot of software. This online program employs the most advanced AI to make old, bad photos look new again. Zawa's engine not only blurs the backdrop as conventional filters do; it also detects and removes digital noise and rebuilds deleted textures. It is designed to handle challenging lighting conditions, making it great for sharpening edges and clarifying blurry images. It gives you clean, studio-quality results with only a few clicks, whether you are a social media manager or just doing it for fun.
Step 1: Access AI tools in the Zawa workspace
Open the Zawa workspace. To access the picture-altering tools, click on "AI Tools" in the left panel.
Step 2: Upload your blurry picture
On the AI Tools page, click "Image Enhancer", then choose the grainy picture you want to enhance from your device.
Step 3: Improve your picture and save it
Select HD or UHD from the left panel and click "Image Enhancer" after the picture is on the canvas. It will be clearer in seconds. Once done, click "Download" at the top right to save your photo as a PNG or JPG.
-
Use the mobile app for quick noise reduction
You might not always have time to sit down at a computer and make changes. The quickest approach to editing grainy images right after you take them is to use a mobile app. Modern smartphones are strong enough to run complicated AI algorithms, so it's easy to clean up your gallery while you're on the go.
The Zawa smartphone app is an ideal choice for those who need rapid and reliable repair. Using a specialized AI image enhancer that automatically detects and removes noise while preserving the subject's original texture is the best way for folks who want professional results without doing anything.
To fix your pictures on the move, just do these simple things:
Step 1: Open the app
Get the Zava app on your phone and then open it. At the bottom, click on the "Tools" option. From there, choose "Enhancer" from the All Tools menu.
Step 2: Choose enhancement settings
Choose your favorite option in the Enhancer tool. You can remove grain or upgrade your image to HD, Ultra HD, or AI UHD quality. After you pick the setting you want, "Import" the picture you want to improve from your gallery.
Step 3: Process and save
Give the app a few minutes to work on your picture and improve it. When you're done editing, tap the "Save" button at the top to add the picture to your album. After you save, a new screen will open where you can choose to edit your picture, add it to a canvas, create a collage, or share it right away on Facebook, Instagram, and other sites.
-
Reduce noise using Adobe Lightroom
Adobe Lightroom is your greatest bet if your camera settings didn't work exactly right. Lightroom gives you precise control over noise reduction while preserving details. It lets you fix particular faults in a blurry picture instead of just blurring the whole thing. This keeps crucial information clear.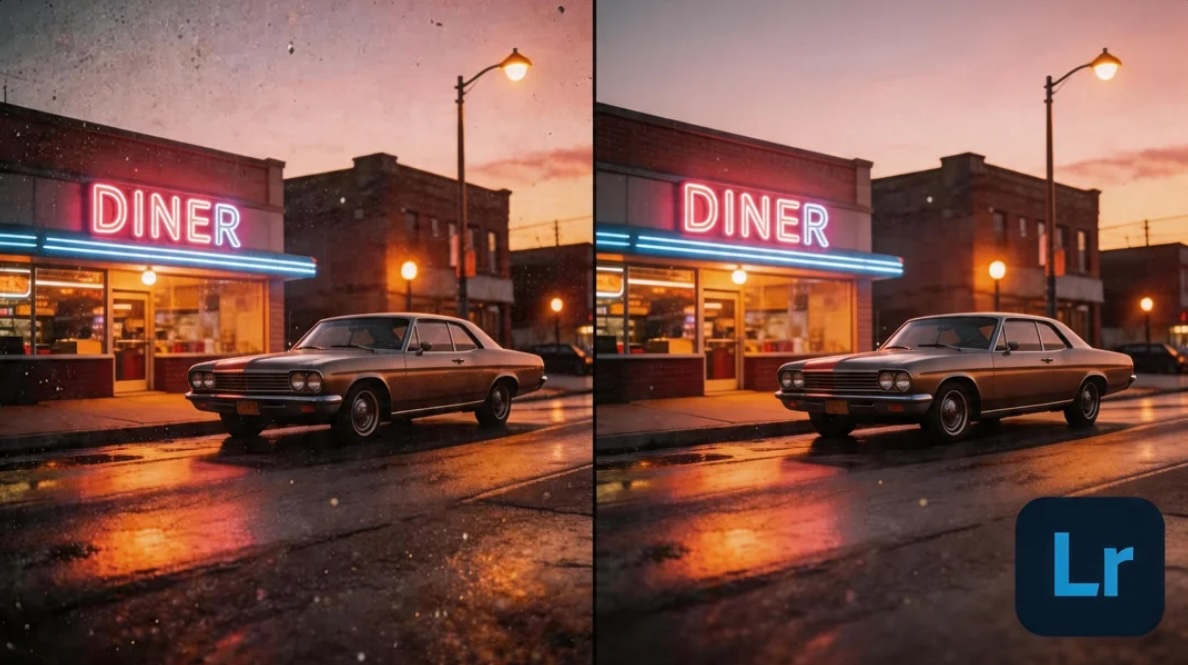
Follow these three simple methods to get the greatest results without making your picture look like a painting:
Step 1: Zoom in and find the "Detail" panel
Before you start moving sliders, zoom in on your photo (a 1:1 view is perfect) so you can actually see the grit you're trying to fix. In the "Develop" module, the Detail panel is where you'll manage both noise reduction and sharpening. Seeing the pixels up close helps you avoid overdoing it and turning your subject into a blurry mess.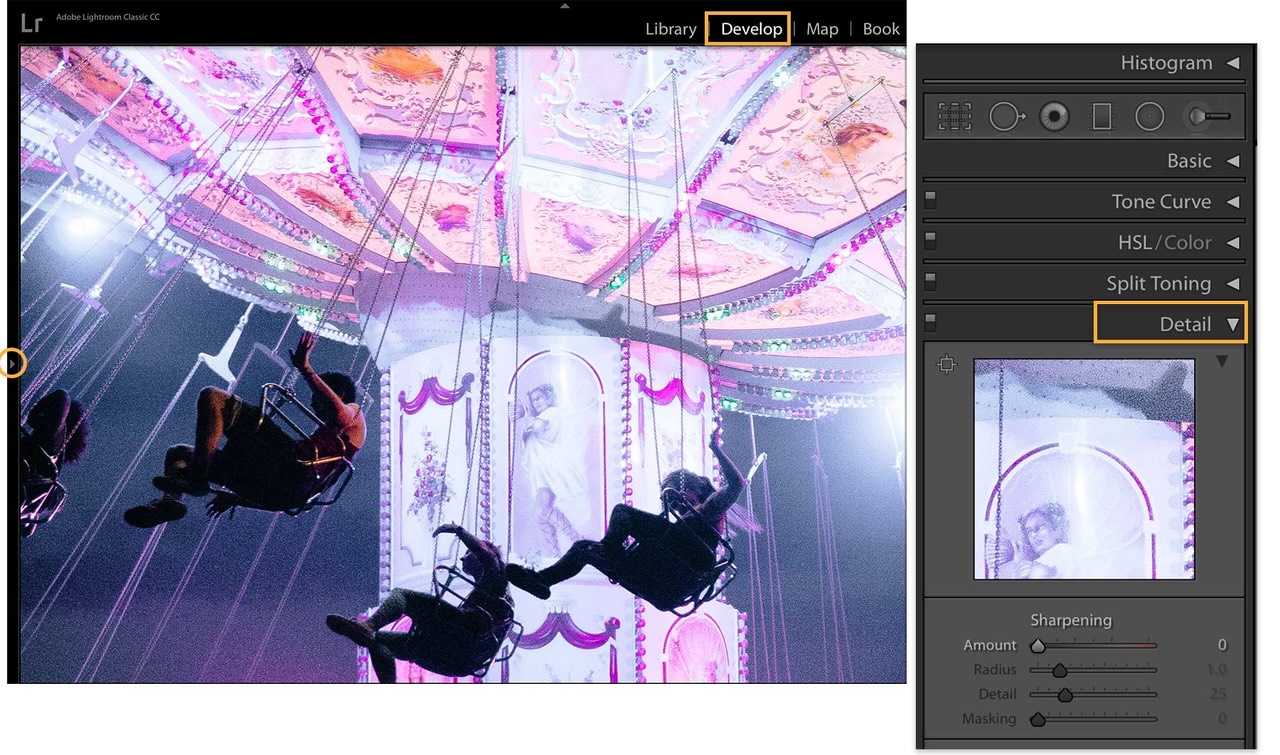
Step 2: Balance the Luminance and Color sliders
Start with the "Luminance" slider to smooth out that sandy, monochromatic grain. Be careful, pushing this too far can make visuals look plastic, so use the "Detail" and "Contrast" sliders to bring back some texture. Next, look for those weird purple or green blotches and nudge the "Color" slider. This cleans up the distracting color noise without affecting the overall brightness of your shot.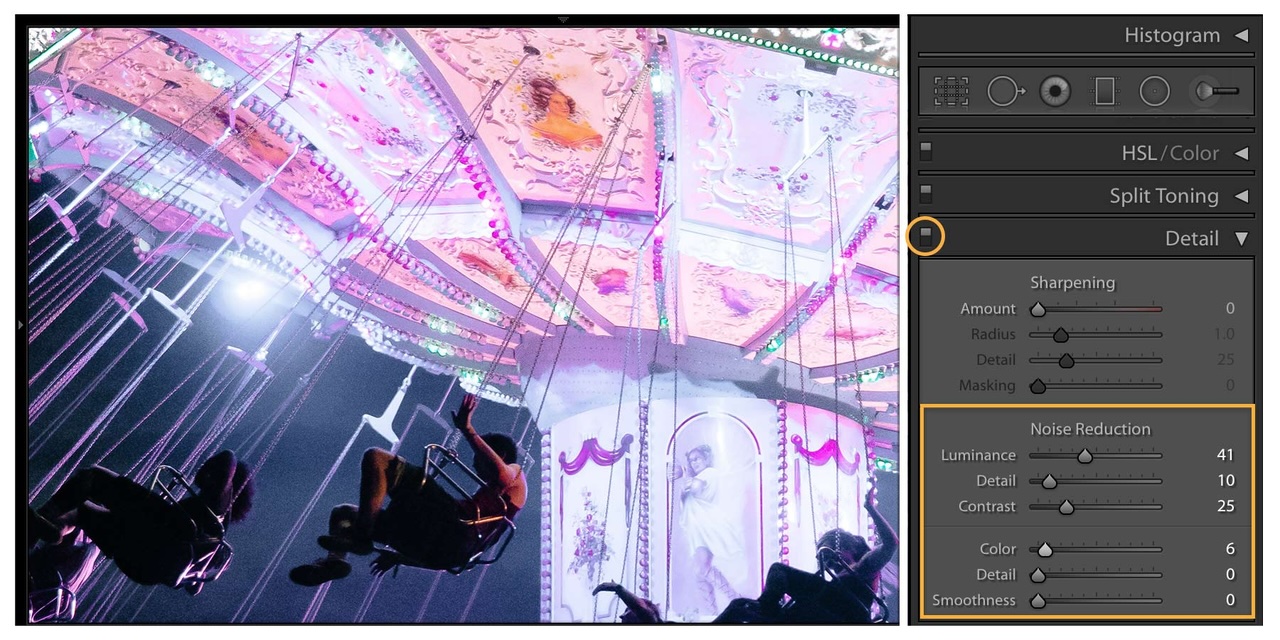
Step 3: Reintroduce sharpness and mask it
Removing grain often makes an image feel a bit "soft" or mushy. To fix this, use the "Sharpening" tools to bring the edges back to life. A pro tip is to use the "Masking" slider (hold 'Alt' or 'Option' while sliding) to make sure you're only sharpening the important details, like eyes or hair, while keeping the flat areas, like the sky or shadows, perfectly smooth and noise-free.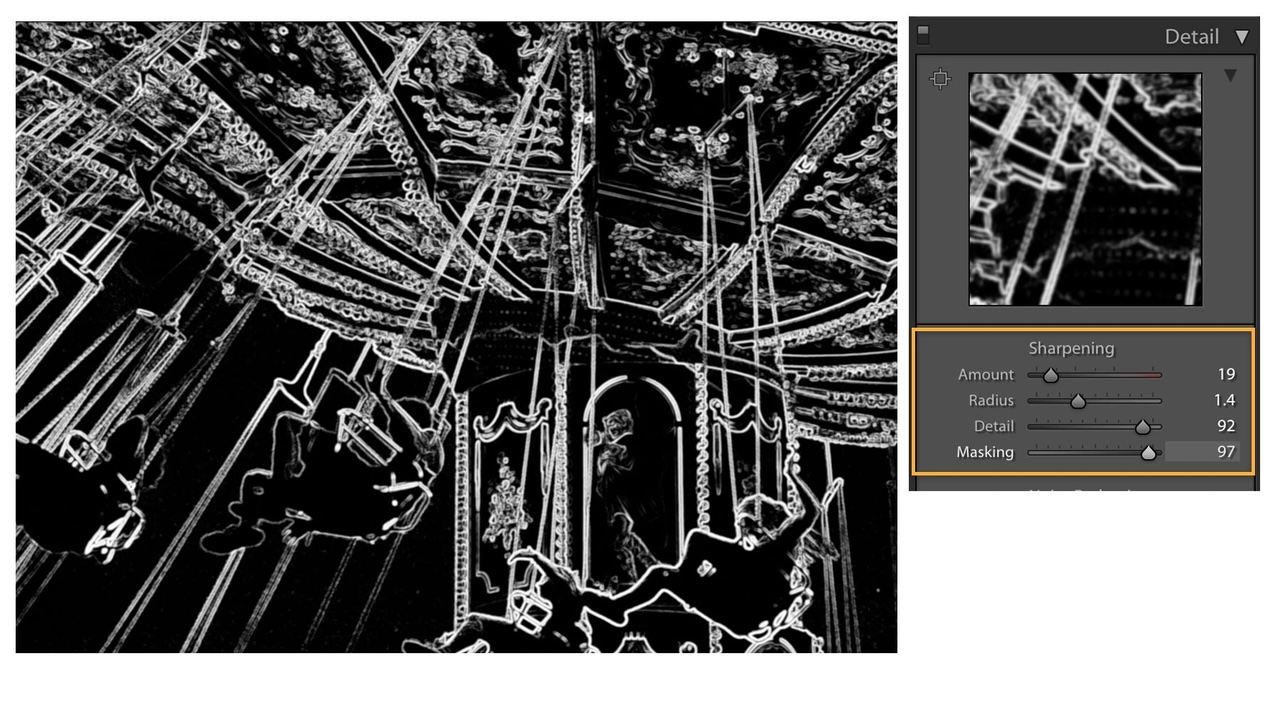
Best practices to prevent grainy images in the future
-
Use proper lighting equipment: Poor lighting often causes visible grain in photos. To fill in dark shadows and reduce graininess, use softboxes, LED panels, or reflectors. Open the windows to let in natural light, or add more bulbs to brighten the picture if you are shooting inside.
-
Upgrade your camera when needed: Low light is easier to deal with better equipment. If your existing setup can't handle any more, consider getting a camera with a larger sensor. Meanwhile, use a tripod and a remote timer to take longer exposures without raising your ISO.
-
Keep your camera and lenses clean: Dust and smudges on your lens can catch light in odd ways, making it look like noise. Also, buying "fast" lenses with wide apertures like f/1.8 or f/2.8 can help you capture much more light in low-light situations.
-
Shoot in well-lit conditions: Whenever possible, choose places with ample natural light. Always use a tripod for night photographs or landscapes, so you can utilize a slower shutter speed. This combination of settings keeps the picture bright and the noise levels low without making it less clear.
Conclusion
Dealing with a grainy photo can be a real headache, especially when it’s a shot you truly care about. The good news is that a bit of digital "fuzz" doesn't have to ruin your memory. Once you realize that things like high ISO or low light are usually the cause, you're already one step ahead for your next shoot.
In the meantime, you've got some great tools to save your photos. Whether you're tweaking your camera settings, using Zawa for a quick, easy fix, or diving into the fine details in Lightroom, you can always bring back that clarity. Just try to find a bit lighter or keep a steady hand next time. Now that you know how to fix grainy photos, you can easily turn those speckled snapshots into clean, professional masterpieces.
FAQs
Can grainy pictures be fixed?
Yes, you can improve grainy photographs by using digital noise-reduction methods to smooth out the rough textures. You can make manual changes with professional software like Lightroom, but Zawa is often better because its AI automatically fills in missing information, making things clearer.
How to fix grainy iPhone photos?
You can reduce grain in iPhone images using the "Noise Reduction" slider in the phone's built-in editing tools or by installing dedicated software. For example, if a sunset photo looks blurry, uploading it to Zawa can quickly sharpen the edges and remove the digital grit that iPhone sensors often introduce in low light.
Why do low-light and night images often turn out grainy?
When there isn't enough light, the camera sensor can't get enough information to make a clear picture. Instead, it has to "guess" the details, which causes digital noise. This is why many photographers use Zawa to clean up artifacts that appear when they push the camera's ISO to its limit after a night session.
How can I prevent grainy pictures while taking photos?
Using a wider aperture or a slower shutter speed with a tripod will give your camera as much light as possible, which is the greatest technique to avoid grain. If you still have noise after trying everything, running the grainy images through Zawa can help you get a professional, grain-free finish.
How to enhance an old grainy photo?
You need to use an AI-powered upscaler to restore old photos, filling the gaps in grainy shots caused by aging or low-resolution film. Zawa, for instance, is designed to analyze old textures and improve overall quality, turning faded, speckled memories into digital files with excellent definition.
You May Be Interested

The Best Times to Post Reels on Instagram for Every Creator

10 Best Selling Items on Etsy: What to Sell and How to Stand Out in 2025

30 Best Restaurant Logos We've Ever Seen and How to Create Yours

4 Solutions to Add a Background in Photos
How Big Is An 8x8 Photo