How to Fix Unfocused Pictures and Improve Overall Image Clarity
Unfocused pictures weaken visual impact and clarity, often caused by motion or poor capture. To fix unfocused pictures and restore sharpness without quality loss, tools like Zawa provide precise adjustments to refine details and enhance overall image quality instantly.


Modern digital tools can save soft photos. You can actually recover a lot of hidden details. Figuring out how to fix out of focus pictures takes a clear strategy. You cannot just slap a heavy contrast filter over a file and expect magic. Your phone's basic editor handles minor fixes. For deeper problems, dedicated tools like Zawa step in. This guide shows you exactly how to restore those compromised shots.
What Causes Unfocused Pictures?
Soft photos usually come from lens limits, bad lighting, or tiny hand movements. You need to know exactly what went wrong before you try to fix it.
-
Autofocus Errors: Camera sensors get confused. They often lock onto a bright background object instead of your subject's eye.
-
Low Light and Motion Blur: Dark rooms force your camera to use a slower shutter speed. This keeps the lens open longer to gather light. During that extra time, the sensor picks up tiny hand tremors. Dark scenes also impede the camera's ability to find sharp edges.
-
Depth of Field Limits: Shooting with a wide-open lens (like f/1.8) shrinks your focus zone to a few millimeters. Just taking a breath can push your subject right out of focus.
You have to figure out the root cause. An image out of focus from motion blur needs a different fix than one compromised by low resolution. Knowing the cause tells you exactly how to fix unfocused pictures.
How to Fix Unfocused Pictures?
Software only works with the pixels you actually captured. It cannot invent details that are not there. Pushing your editing sliders to the maximum limit is a bad idea. It just creates ugly digital noise. Subtle edits always work best. Before searching for how to fix unfocused pictures, check your file. A slightly soft RAW file needs a very different fix than a heavily compressed text message photo.
Use Built-In Sharpening and Clarity Features in Your Phone Album App
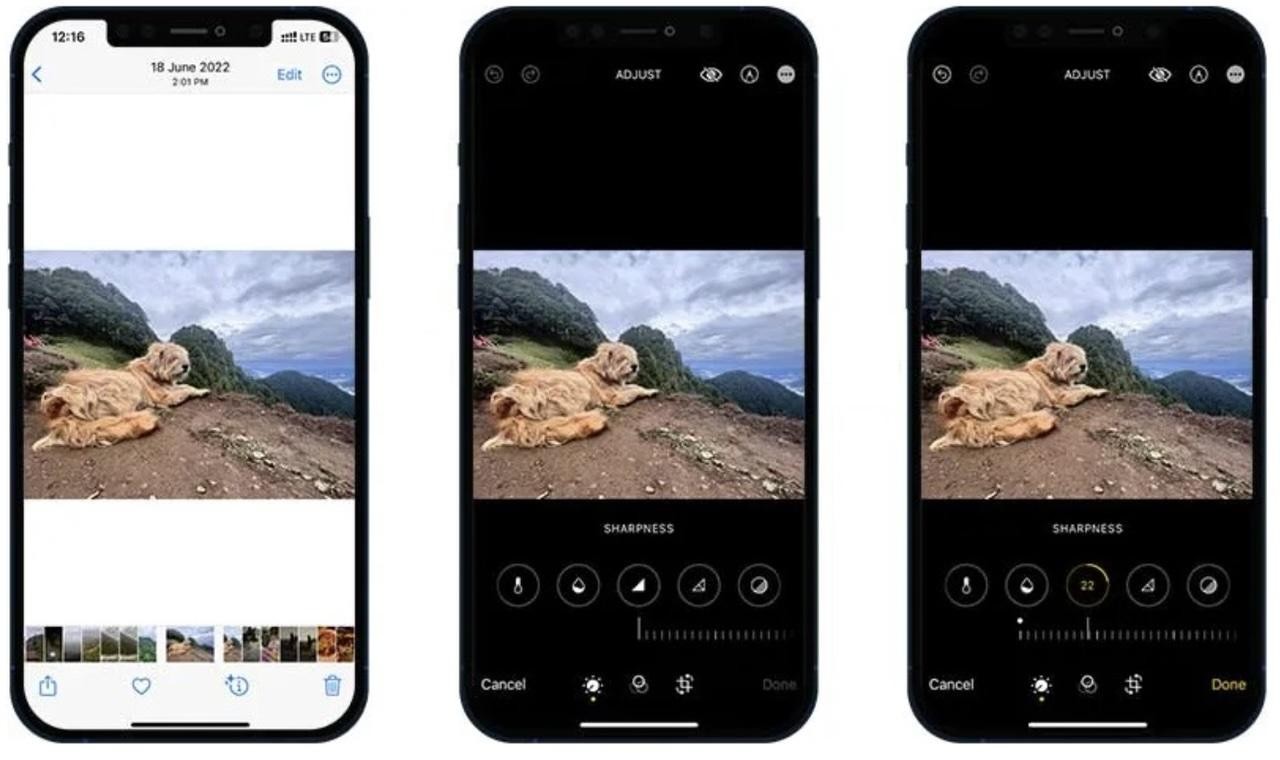
Your phone's native editor handles basic fixes nicely. When you spot an image out of focus, start with the Sharpness tool. This slider tricks your eyes. It adds harsh contrast right along the edges of your subject.
The clarity slider acts differently. It targets your midtones. Pushing it up makes your subject look heavier and more solid. But be careful. Too much clarity quickly destroys soft details like human skin.
Pushing either slider too hard creates glowing white halos around your subject. It looks cheap. A tiny sharpness bump mixed with a little contrast works best for minor issues.
Use Zawa for Automatic Image Enhancement
General AI bots degrade blurry photos. They get stuck on missing pixels and smear the details until your subject doesn't get a good finish. This creates a greater struggle for digital restoration. Specialized enhancers win because they focus strictly on algorithmic pixel repair.
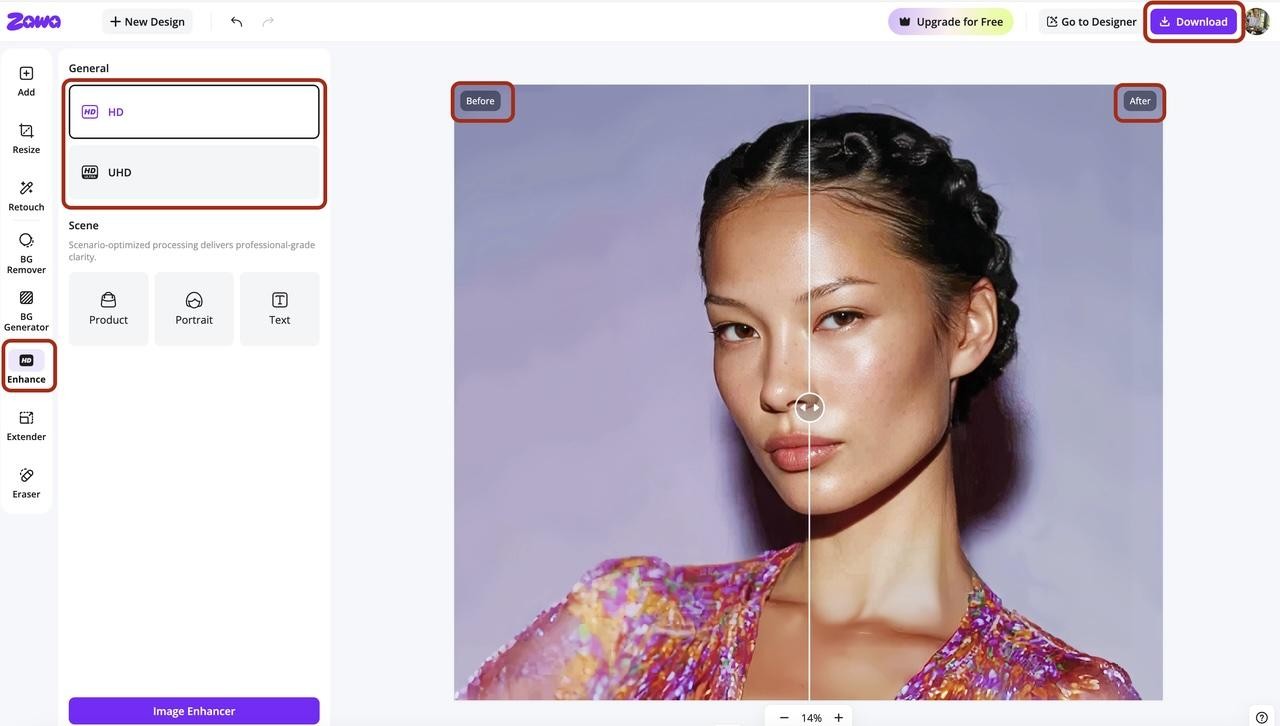
Zawa AI image enhancer sits right at the top of that specialized list. It doesn't bother with lazy contrast tricks. The system actively tracks down shattered pixel groupings to rebuild your file from scratch. You actually get your lost textures back. The export jumps straight into HD or UHD resolution, and it manages absolute nightmare details—like woven fabrics—beautifully.
You skip managing layers completely with this workflow.
-
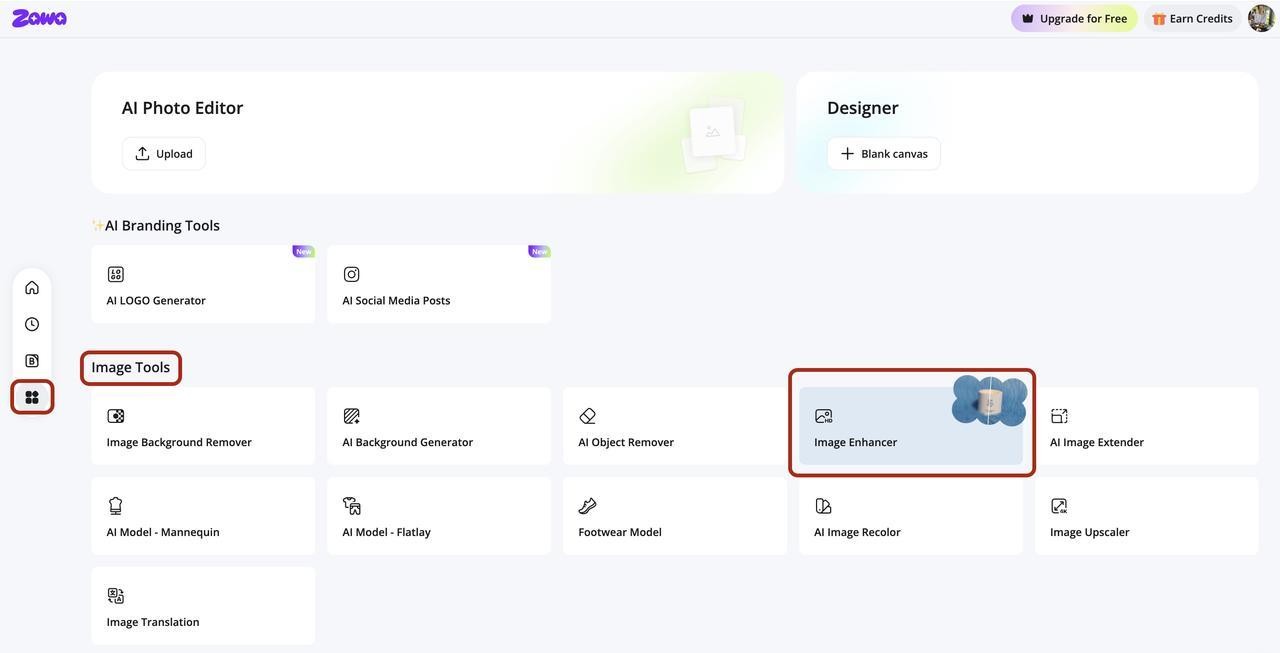
Step 1: Get onto the Zawa platform. Follow this navigation to achieve the end result in one click: AI tools > Image Tools > Image Enhancer.
-
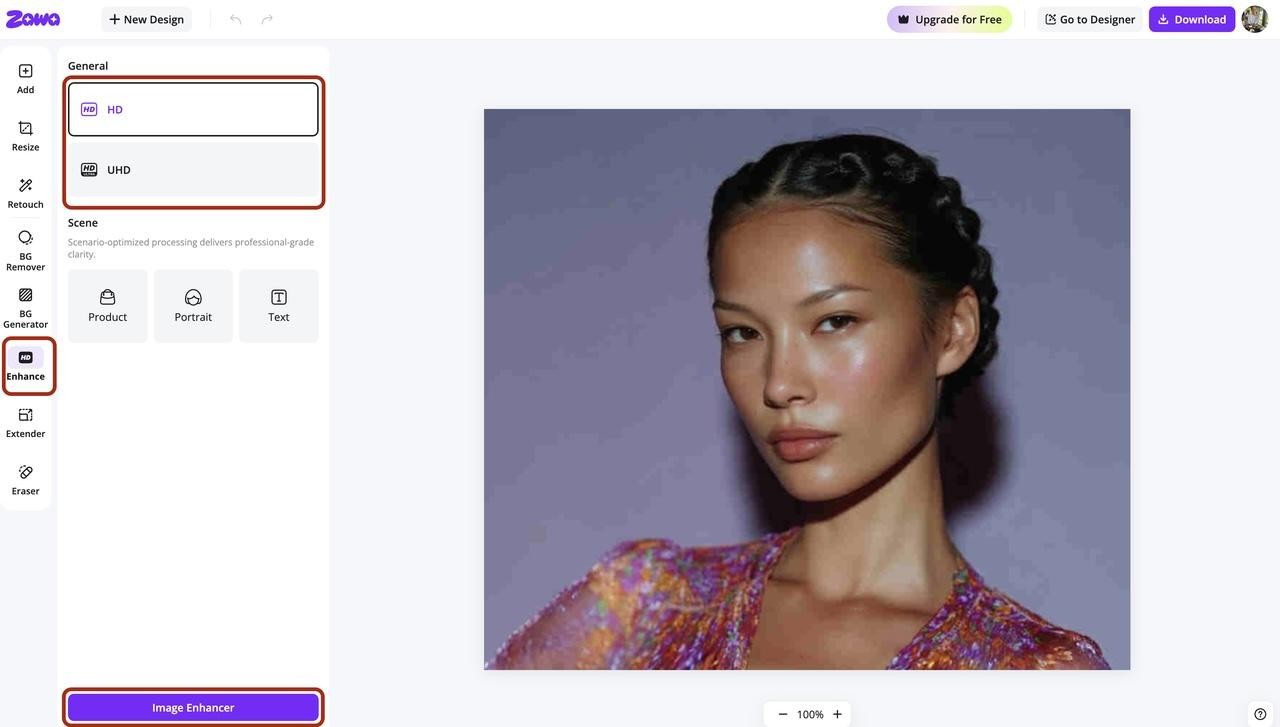
Step 2: Add the selected picture directly into the workspace. Select your target resolution. Pick HD or UHD depending on your final display size.
-
Step 3: Run the automated engine. Review those restored edges and download your high-resolution asset.
Use Photoshop for Advanced Editing
Photoshop is still the heavy hitter. It gives you absolute control over every single pixel. This is exactly where automated apps stumble, because sometimes you just need a human eye to make the call.
The Unsharp Mask is old school. It still works beautifully. You dial in the exact amount, radius, and threshold yourself. Smart Sharpen takes it a step further by letting you fight specific optical failures like lens blur or directional motion.
Step 1: Force the contrast:
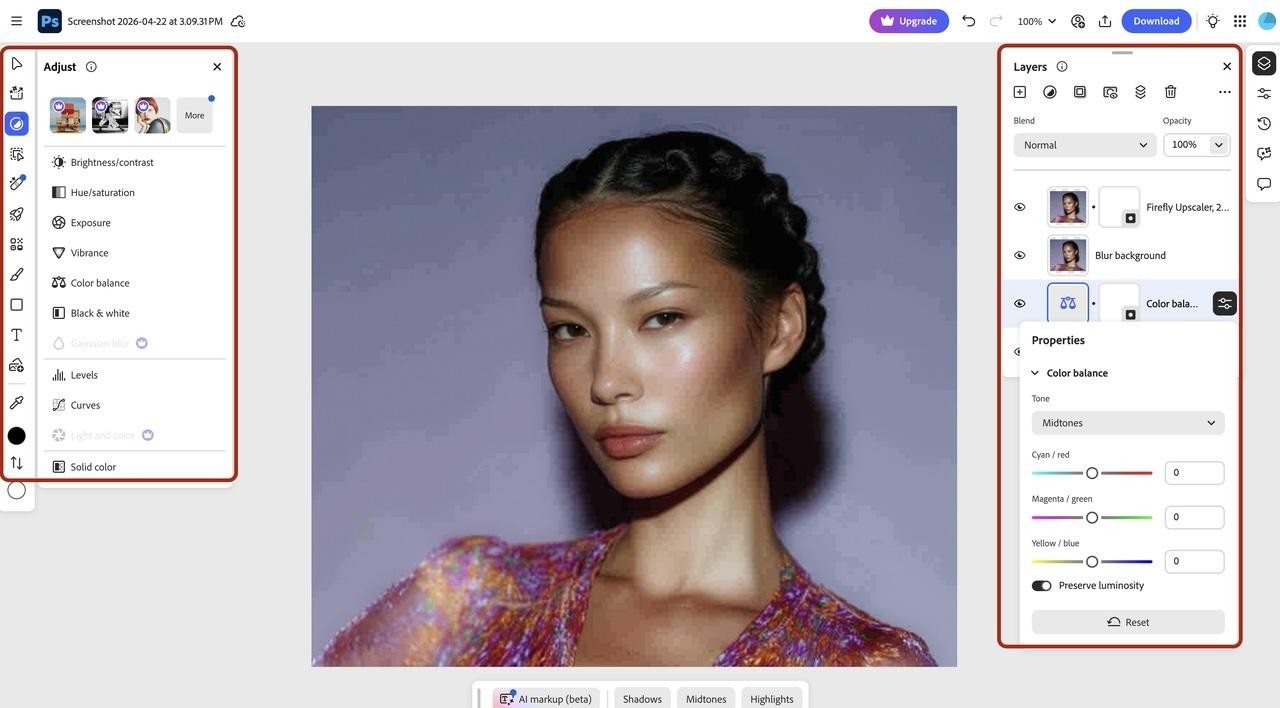
Adobe hides its online menus exceptionally well. Nudging your Clarity and Texture sliders up slowly pushes your midtones and fakes a sharper edge beautifully.
-
Look at the absolute far right edge of your screen. Find the narrow vertical strip of icons.
-
Click the third one down. It looks like three tiny horizontal sliders.
-
Wait for the Adjustments panel to pop open.
-
Scroll down to the Effects or Light and color sections to find your sliders.
Step 2: Try the AI rebuild:
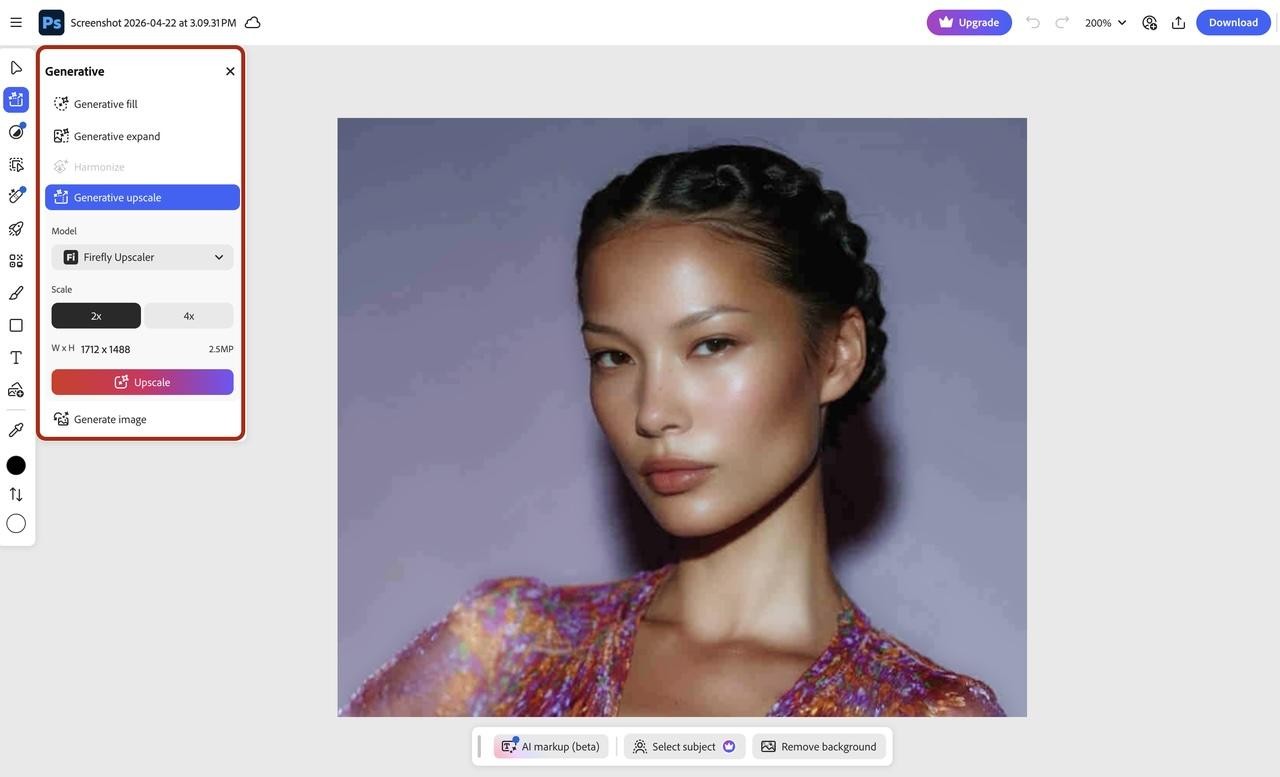
Sometimes manual tweaks just fail. This tool literally forces the system to invent missing details from scratch. It works absolute wonders on organic textures like human faces. Keep a close eye on the export, though. If your original file is a total blurry disaster, the AI frequently hallucinates weird, unnatural shapes in the background.
-
Check your main horizontal toolbar sitting just above the canvas.
-
Hit the button labeled "Generative".
-
Select "Generative upscale" from the drop-down menu.
Step 3: Mask the background
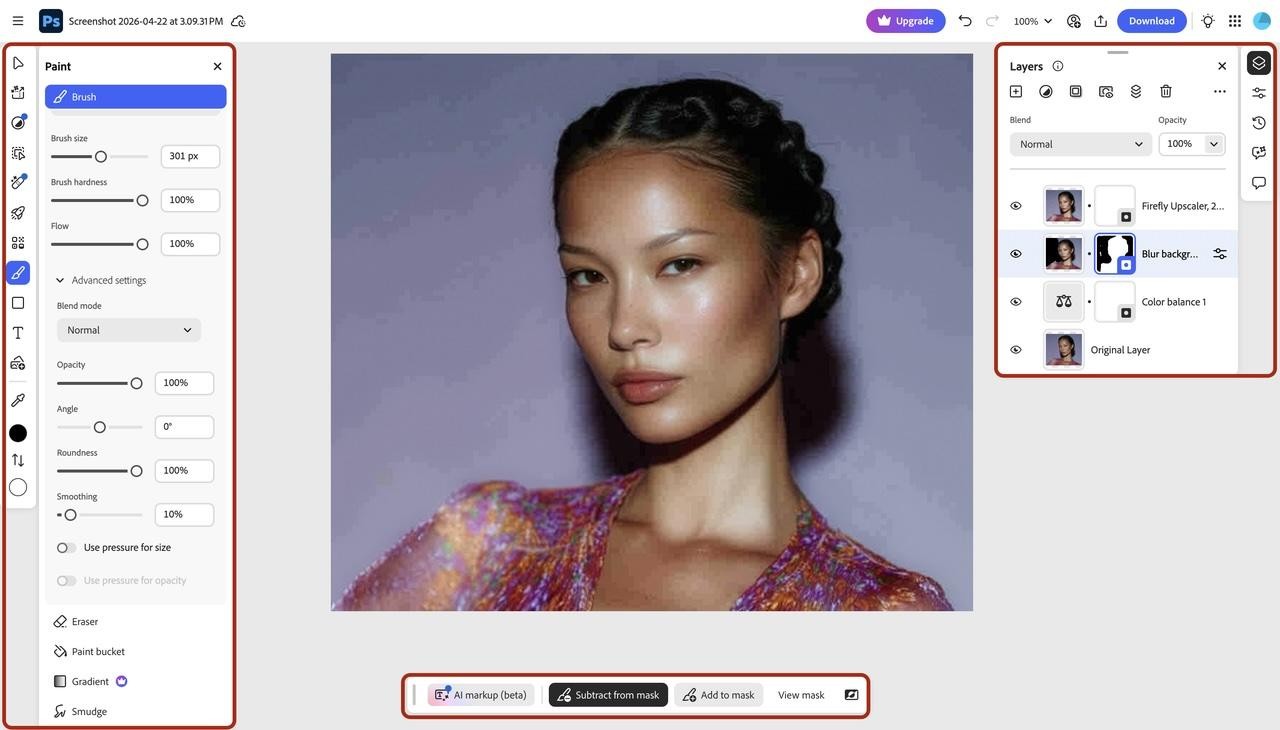
Global edits still destroy photos on the web. If you skip this part, your background gets exactly as crunchy as your subject. You have to hide those heavy adjustments from the areas that should stay naturally out of focus.
-
Go to the bottom of your Adjustments panel.
-
Click the tiny icon resembling a rectangle with a dark circle punched out. That drops a white Layer Mask onto your file.
-
Grab your brush tool from the far left sidebar. You can also just hit "B" on your keyboard.
-
Check your color swatches. Make sure your top color square is completely black.
-
Now just paint over your background. You'll watch that heavy, ugly contrast disappear instantly.
Navigating web-based editing interfaces with a standard mouse requires patience. Occasional latency is normal. If you accidentally apply the mask over the primary subject, simply switch your brush color to white and paint the sharpness back into the targeted area.
Common Mistakes That Weaken Image Clarity
Editing mistakes frequently compromise a flawed photograph further. When amateur editors search for how to fix out of focus pictures, the desire for immediate results often leads to pushing adjustment values beyond acceptable limits.
-
Over-sharpening creates unnatural edges: Too much contrast makes a photo look deeply processed. Your subjects get outlined by harsh white borders. This instantly shows viewers that you heavily edited the file. It flattens all the natural depth.
-
Ignoring noise while increasing clarity: Sharpening algorithms do not differentiate between a subject's soft edge and digital grain hidden within the shadow regions. Increasing sharpness inherently amplifies existing background noise. Without applying a balanced noise reduction filter alongside the sharpening, the final file will appear heavily pixelated. Balancing these opposing technical forces is often the most demanding aspect of manual retouching.
-
Using low-resolution source images: Trying to fix out of focus photo errors on a tiny, compressed image rarely works. The software simply lacks the pixel data it needs to rebuild fine details.
Tips to Avoid Unfocused Pictures in the Future
Post-processing corrections rarely match the quality of capturing it correctly in-camera. Attempting to fix unfocused pictures demands significant time. Implementing preventive measures is a far more efficient professional practice.
-
Use stable shooting and proper focus techniques: Eliminating camera movement resolves the majority of clarity issues. Tucking your elbows tightly against your body or bracing against a solid structure provides vital stability during the exposure. Proper physical posture is generally more reliable than digital stabilization features.
-
Shoot in good lighting with optimized camera settings: Dimly lit environments force lenses to hunt for contrast, leading directly to focal errors. Sufficient lighting allows the camera to utilize a much faster shutter speed. Increased shutter speed effectively freezes motion and minimizes the risk of hand-induced blur. Elevating the ISO to achieve that faster shutter speed introduces digital grain, but a sharp, grainy photo is consistently preferable to a clean, soft one.
-
Capture and retain high-resolution images: Shoot in RAW or the biggest JPEG setting you have. Big files hold massive amounts of detail. Texting photos compresses them and throws that data away. You need those details for editing later.
-
Control depth of field: Wide lenses (like f/1.4) look beautiful. But the focus zone is tiny. Moving just one inch blurs the shot. Changing the setting to f/2.8 or f/4 gives you much more room for error. It keeps the subject sharp while still blurring the background.
Conclusion
Learning how to fix unfocused pictures means picking the right tool for the job. Mobile apps handle quick contrast fixes nicely. For worse files, Zawa offers deep pixel repair. Photoshop gives advanced users exact manual control. The best digital repairs are completely invisible. If people can clearly see your edits, you pushed the sliders too far.
FAQs
-
Why is my photo out of focus?
Usually, it's because the camera grabbed the wrong subject or you moved while the shutter was open.
-
Is there a way to fix an unfocused picture?
Yes, but within limits. You can push AI tools like Zawa or standard sharpening algorithms to force those messy edges back into shape. They pull out details you'd swear were completely gone. Just remember that heavily smeared shots stay unrecoverable forever.
-
What is the difference between blur and focus issues?
Blur is often motion—something moved. Focus issues mean the lens was physically set to the wrong distance.
-
Does increasing sharpness always fix focus problems?
No. If the focus is off by a mile, sharpening will just make the blur look grainy and digital.
-
Why do my photos look blurry even when they are focused?
It's probably digital noise, a dirty lens, or heavy file compression that's eating your details. Clean your lens first next time.
You May Be Interested

4 Solutions to Add a Background in Photos
How Big Is An 8x8 Photo

How Big Is a Wallet-Size Photo? Complete Size Guide

How to Remove People From Pictures

35 AI Image Prompt Examples: How to Get Outstanding AI Images