How to Upscale an Image in Photoshop: Step-by-Step Guide for 2026
Want to upscale an image in Photoshop without losing quality? This step-by-step guide covers the best methods, settings, and tips for upscaling images in Photoshop, plus a powerful AI alternative to achieve sharper, high-resolution images effortlessly.


Whether you're prepping a print, listing a product online, or just trying to make your Instagram post pop, knowing how to upscale an image in Photoshop is a real game-changer. Adobe Photoshop has a built-in photo enlarger that does heavy lifting for you.
With the right tools, you can blow up pictures and still keep them looking crisp. But here's the thing: settings matter. Use the wrong ones, and your image ends up looking worse than before. This guide outlines the steps to upscale an image in Photoshop. Furthermore, it provides pro tips and an alternative for efficient image upscaling.
What does it mean to upscale an image in Photoshop?
So what's actually happening when you upscale an image? In simple terms, Photoshop increases the number of pixels through resampling. It uses smart algorithms to guess where extra detail should go. The whole point is to make the image bigger without turning it into a blurry mess. That's the heart of any solid high-end upscale Photoshop workflow.
Now, resizing and upscaling aren't quite the same thing. Resizing just means changing dimensions, smaller or larger. Upscaling is when you go bigger and add new pixels to fill the gap. Shrinking an image? Usually safe. Blowing it up? That's where things get tricky. One wrong click can lead to a washed-up photo. This is exactly why upscale image in Photoshop methods are built to protect detail as the file grows.
You'll want to upscale images for prints or posters that need to look sharp on a bigger screen. It also gives older or low-res photos a second life. That said, if you're after something faster, you might want to look into upscaling images without using Photoshop.
How to upscale an image in Photoshop in steps
When you upscale an image in Adobe Photoshop, you tap into built-in tools like Image Size and resampling to enlarge the image without compromising its quality. Let's break it down.
Method 1: Using image size
Step 1: Open the Image Size settings
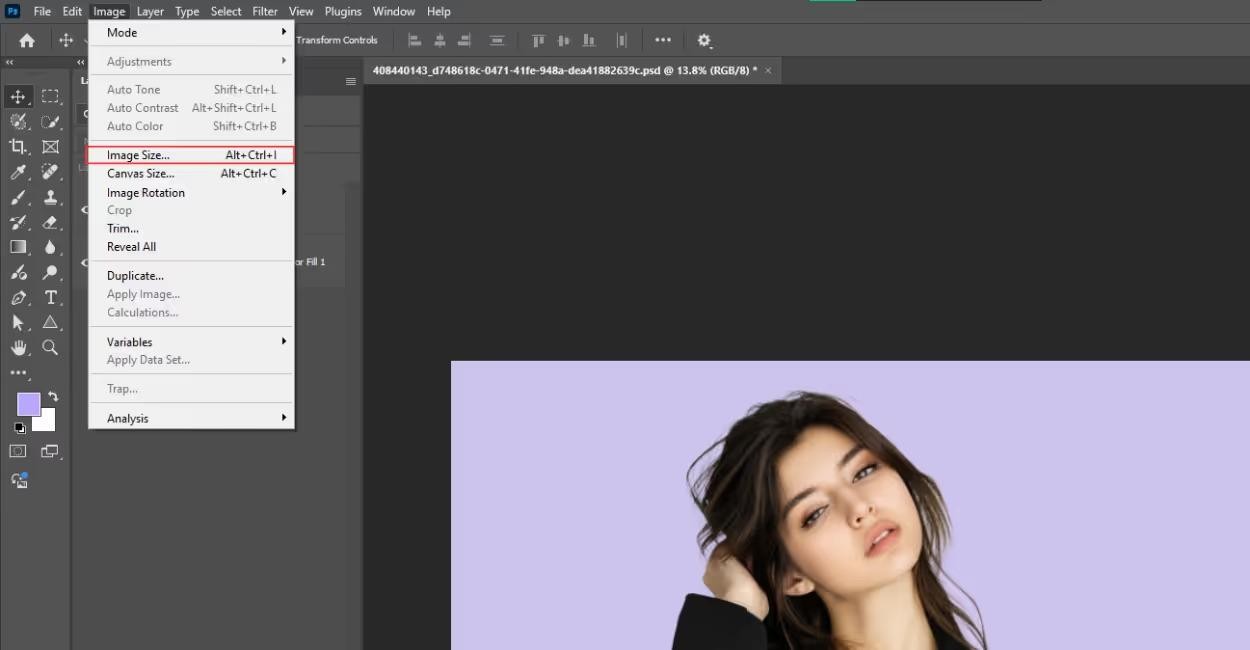
First things first, open up your photo in Photoshop. Then click "Image" in the top menu and pick "Image Size." Easy enough.
Step 2: Turn on resampling and change the size
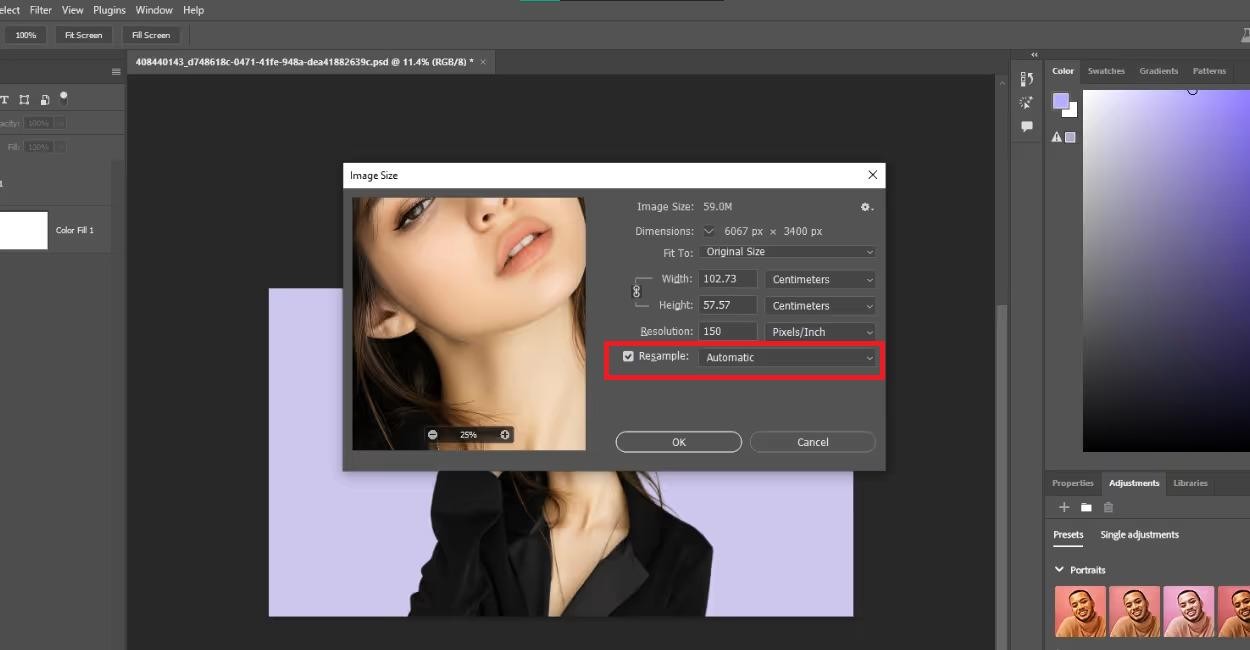
Tick the resample box. Now you can adjust the width, height, or resolution however you like. For high-quality printing, set the resolution to 300 PPI; for digital use, 72 PPI is the standard. When you enlarge an image in Photoshop, the program builds new pixels on the fly to fill in the gaps.
Step 3: Pick a method for interpolation
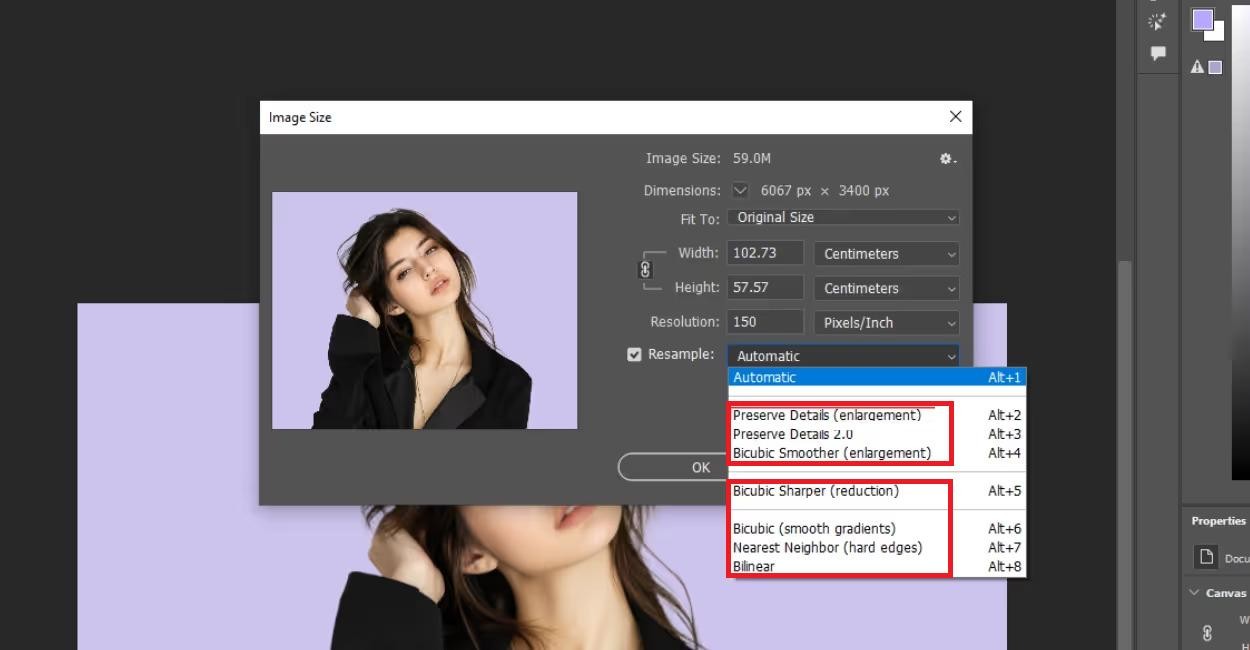
Here's where most people slip up. Choose "Bicubic Smoother (enlargement)" for the cleanest result. It keeps transitions smooth and cuts down on those weird blocky artifacts that show up when you enlarge a photo in Photoshop.
Method 2: Using Preserve Details 2.0
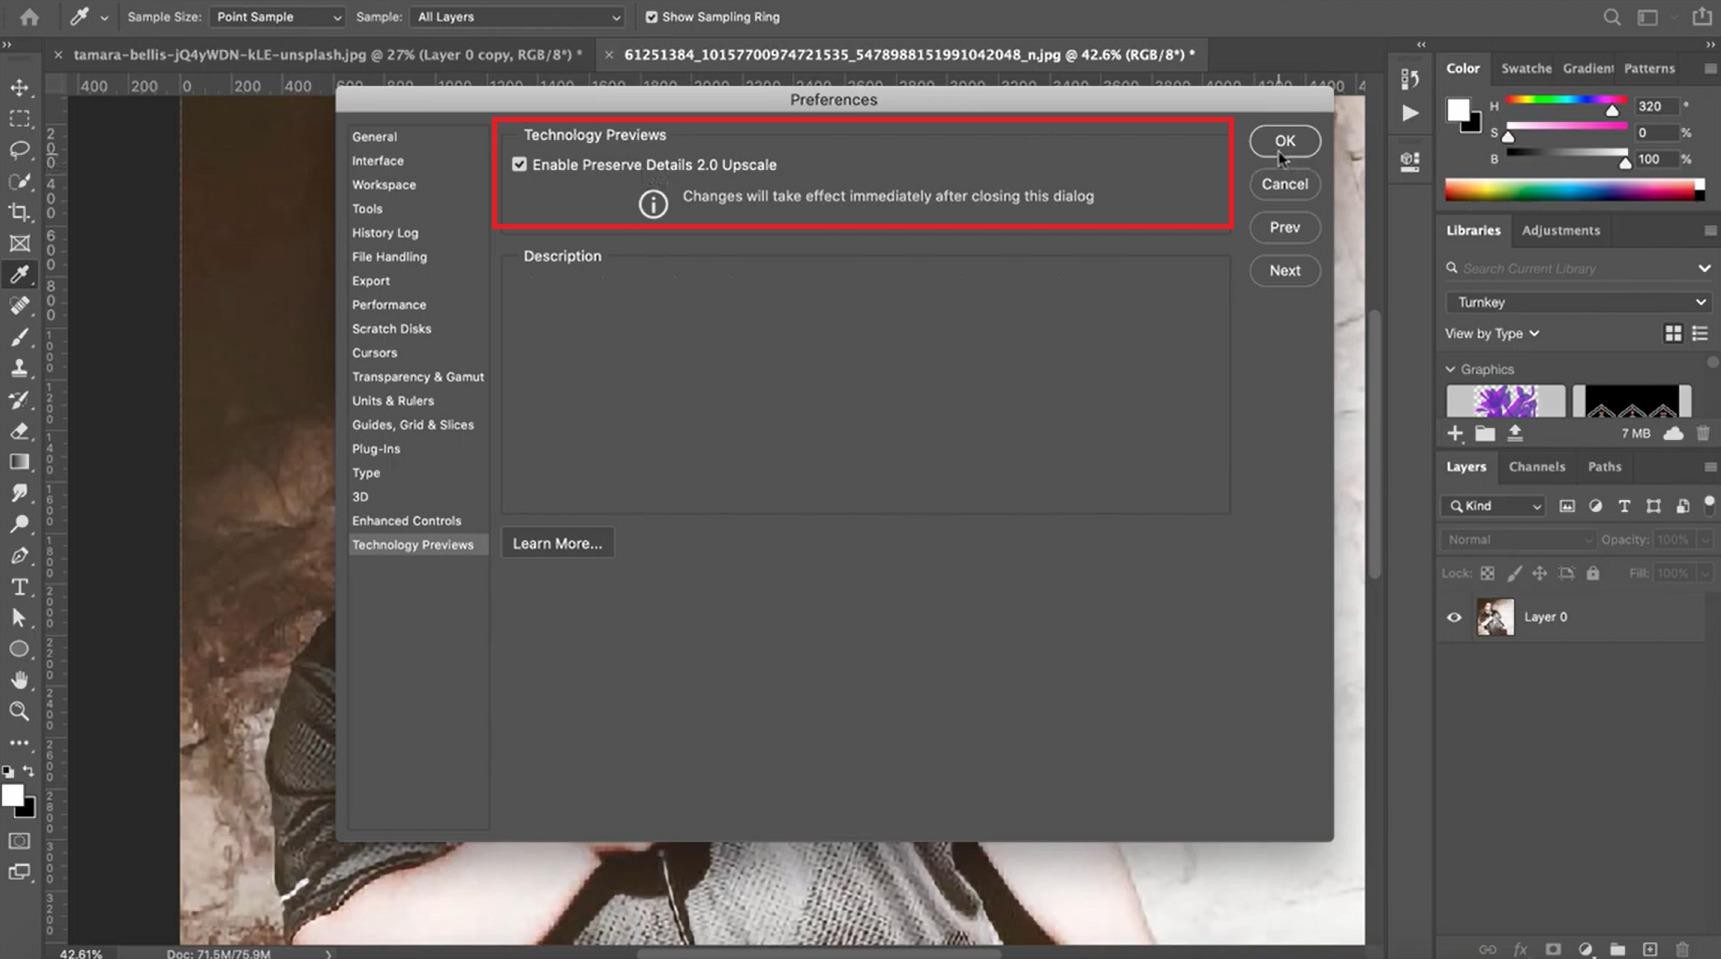
Step 1: Turn on Preserve Details 2.0 in preferences
Head to Image Size and select Preserve Details 2.0 from the dropdown. This unlocks a smarter, more refined way to upscale Photoshop projects.
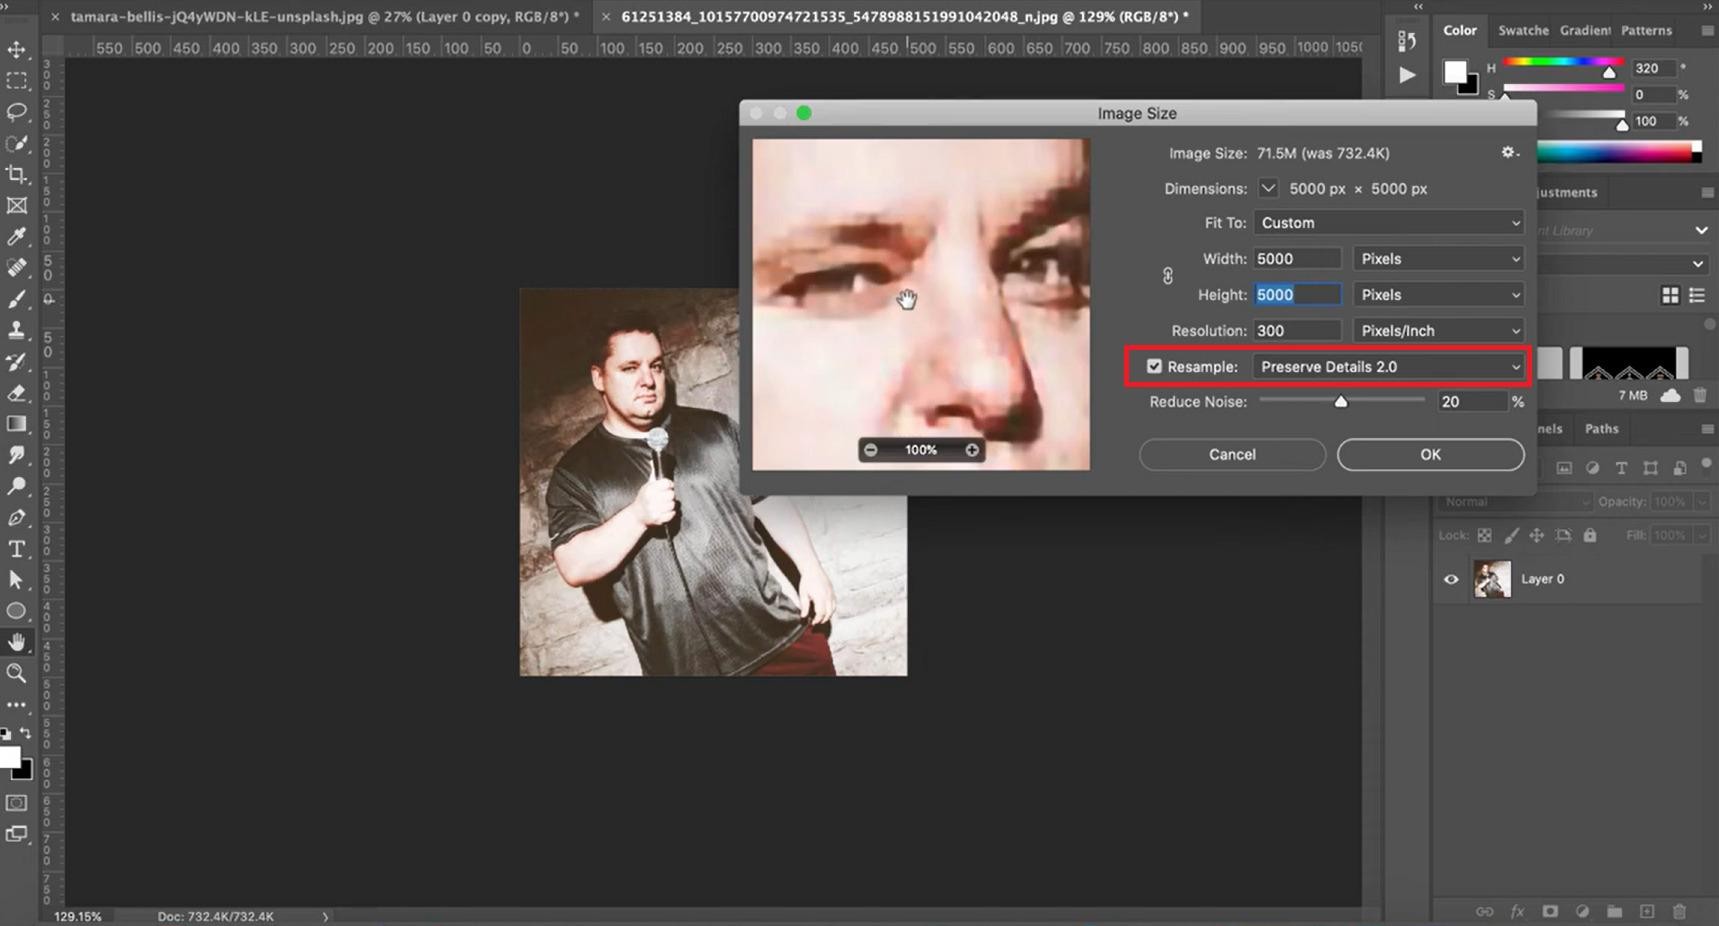
Step 2: Slide the noise reduction
You'll see a slider labeled "Reduce Noise." Drag it to smooth out the grain that pops up after enlargement. The logic here is a trade-off: higher noise reduction removes grain but can blur fine textures. It's a small tweak, but it makes a big difference.
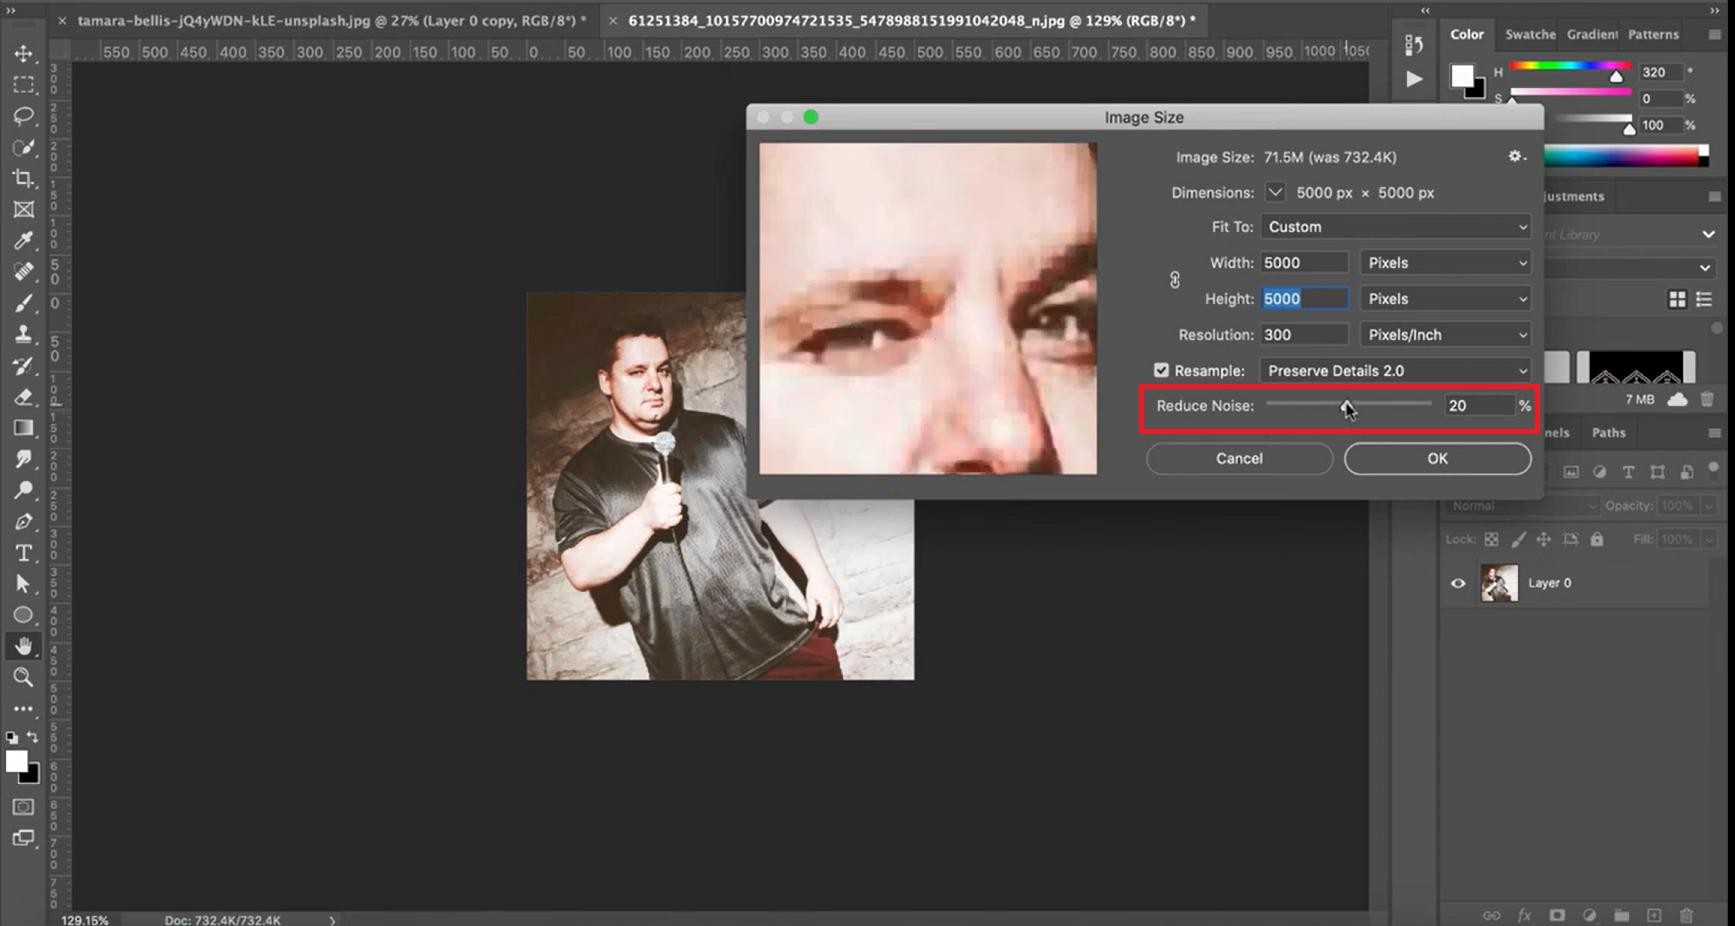
Step 3: Dial in the right settings
For most photos, resample to Preserve Details 2.0 and keep noise reduction somewhere between 10% and 30%. To find your specific sweet spot, look at high-contrast areas like hair or text: if the edges look jagged, increase the slider; if skin textures start looking like plastic, back it off toward 10%. This balance keeps things sharp during upscaling in Photoshop.
Method 3: Using Camera Raw Enhancement
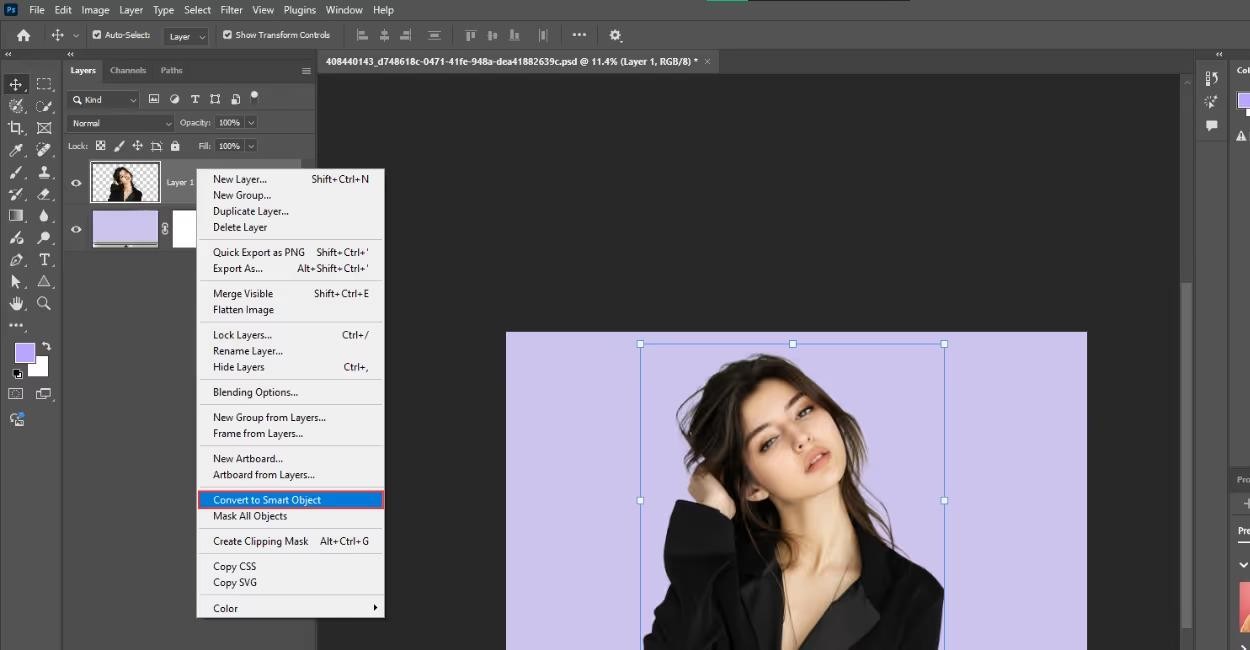
Step 1: Convert to a Smart Object
Right-click your image layer and pick "Convert to Smart Object." This step is a lifesaver. It protects your original file and unlocks a more powerful set of editing tools.
Step 2: Open Camera Raw and grab Super Resolution
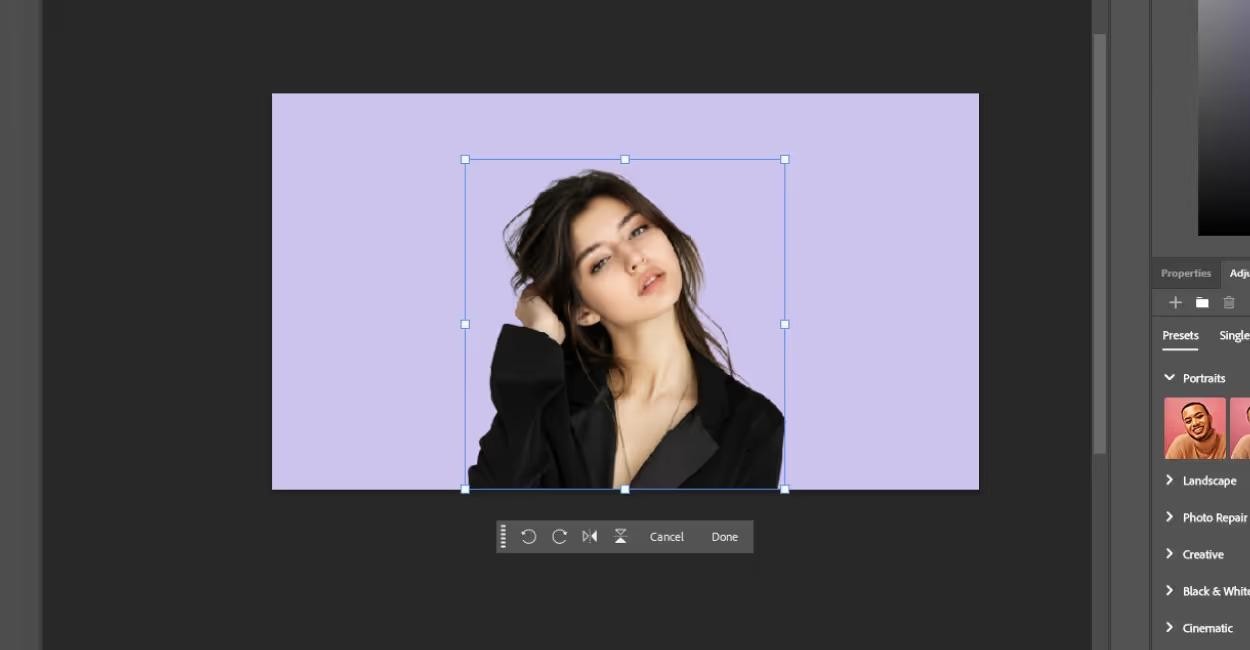
Go to Filter, then Camera Raw Filter. Once it opens, right-click the image and select Enhance > Super Resolution. This tool uses a machine-learning model to double the pixel count while intelligently reconstructing missing textures. Photoshop does its magic, bumping up the resolution.
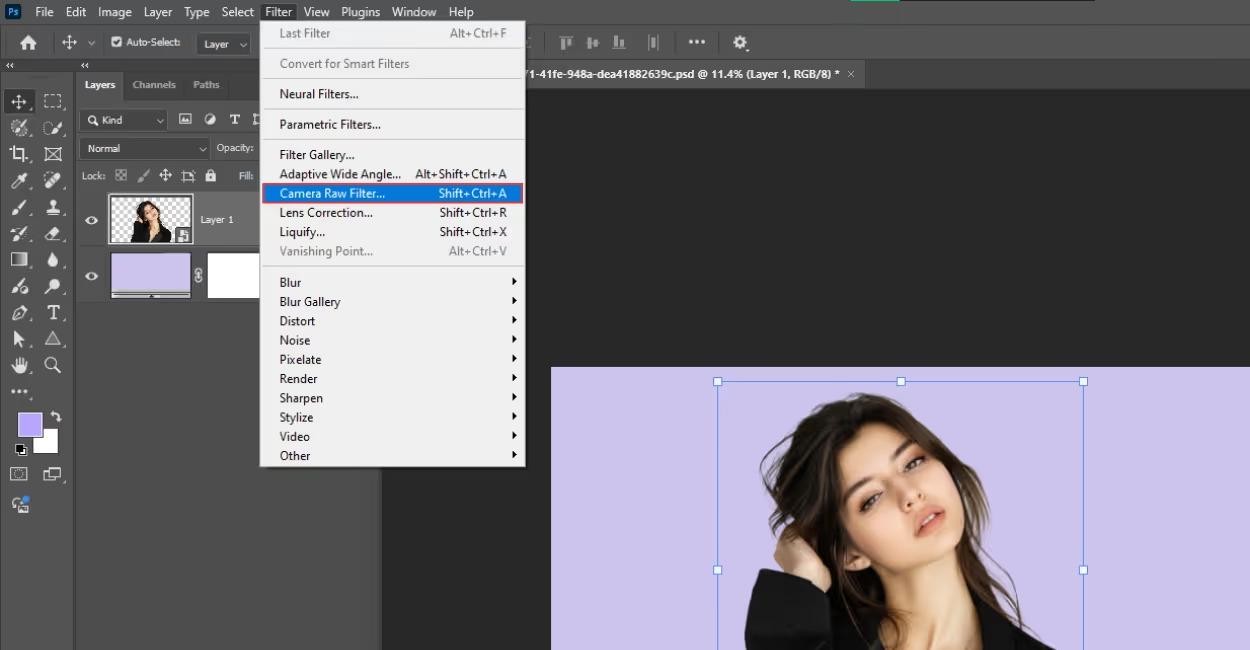
Step 3: Compare the before and after
Once it's done, Photoshop spits out a high-res copy of your photo. Take a moment to flip between the two and see the difference. Check the edges and fine patterns. You'll spot the boost in sharpness right away.
Alternative: Upscale images using Zawa AI image upscaler
Honestly, if you want results without the fuss, Zawa is hard to beat. The AI image upscaler from Zawa pushes your image up to 8X or even 4K resolution, and it does it without sacrificing clarity. Instead of guessing, it uses AI technology to fill in missing details automatically. That's what sets it apart from old-school editing tools. The entire process is fully automated, so you can get professional-level enhancements with just a single click.
Step 1: Open the image upscaler
Launch the Zawa image upscaler tool. This one uses AI to enlarge your photos with surprising accuracy.
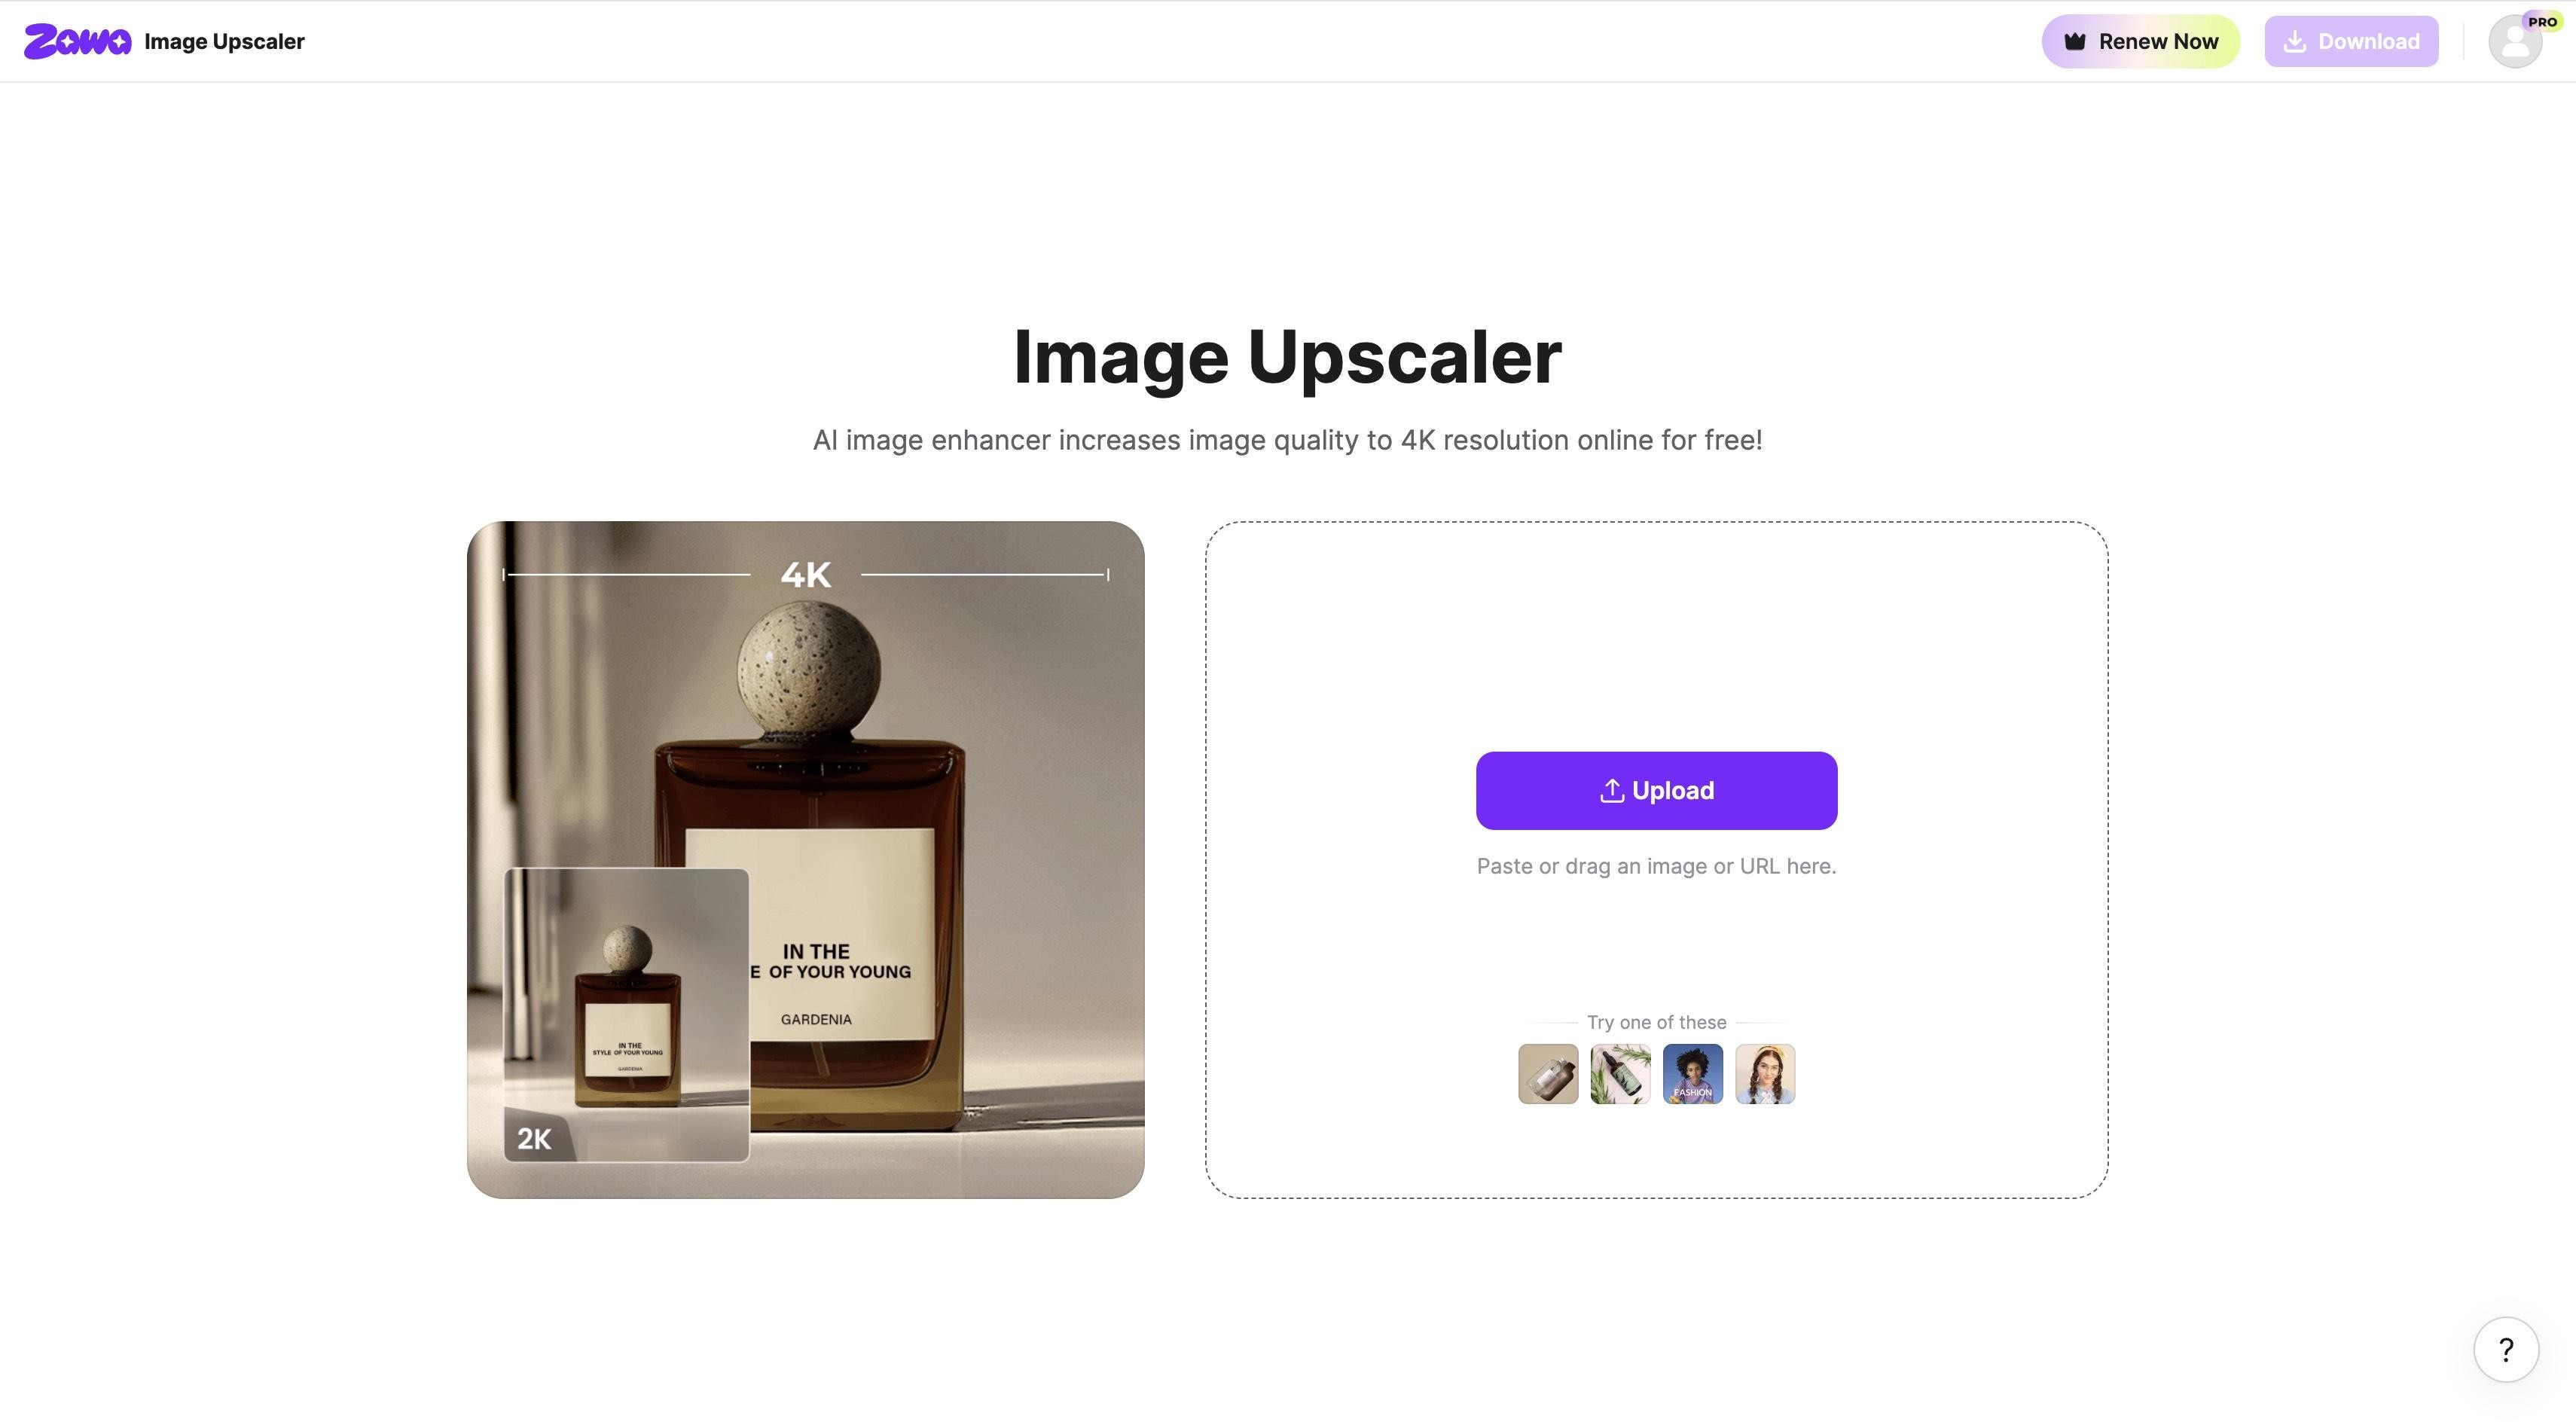
Step 2: Upload and upscale
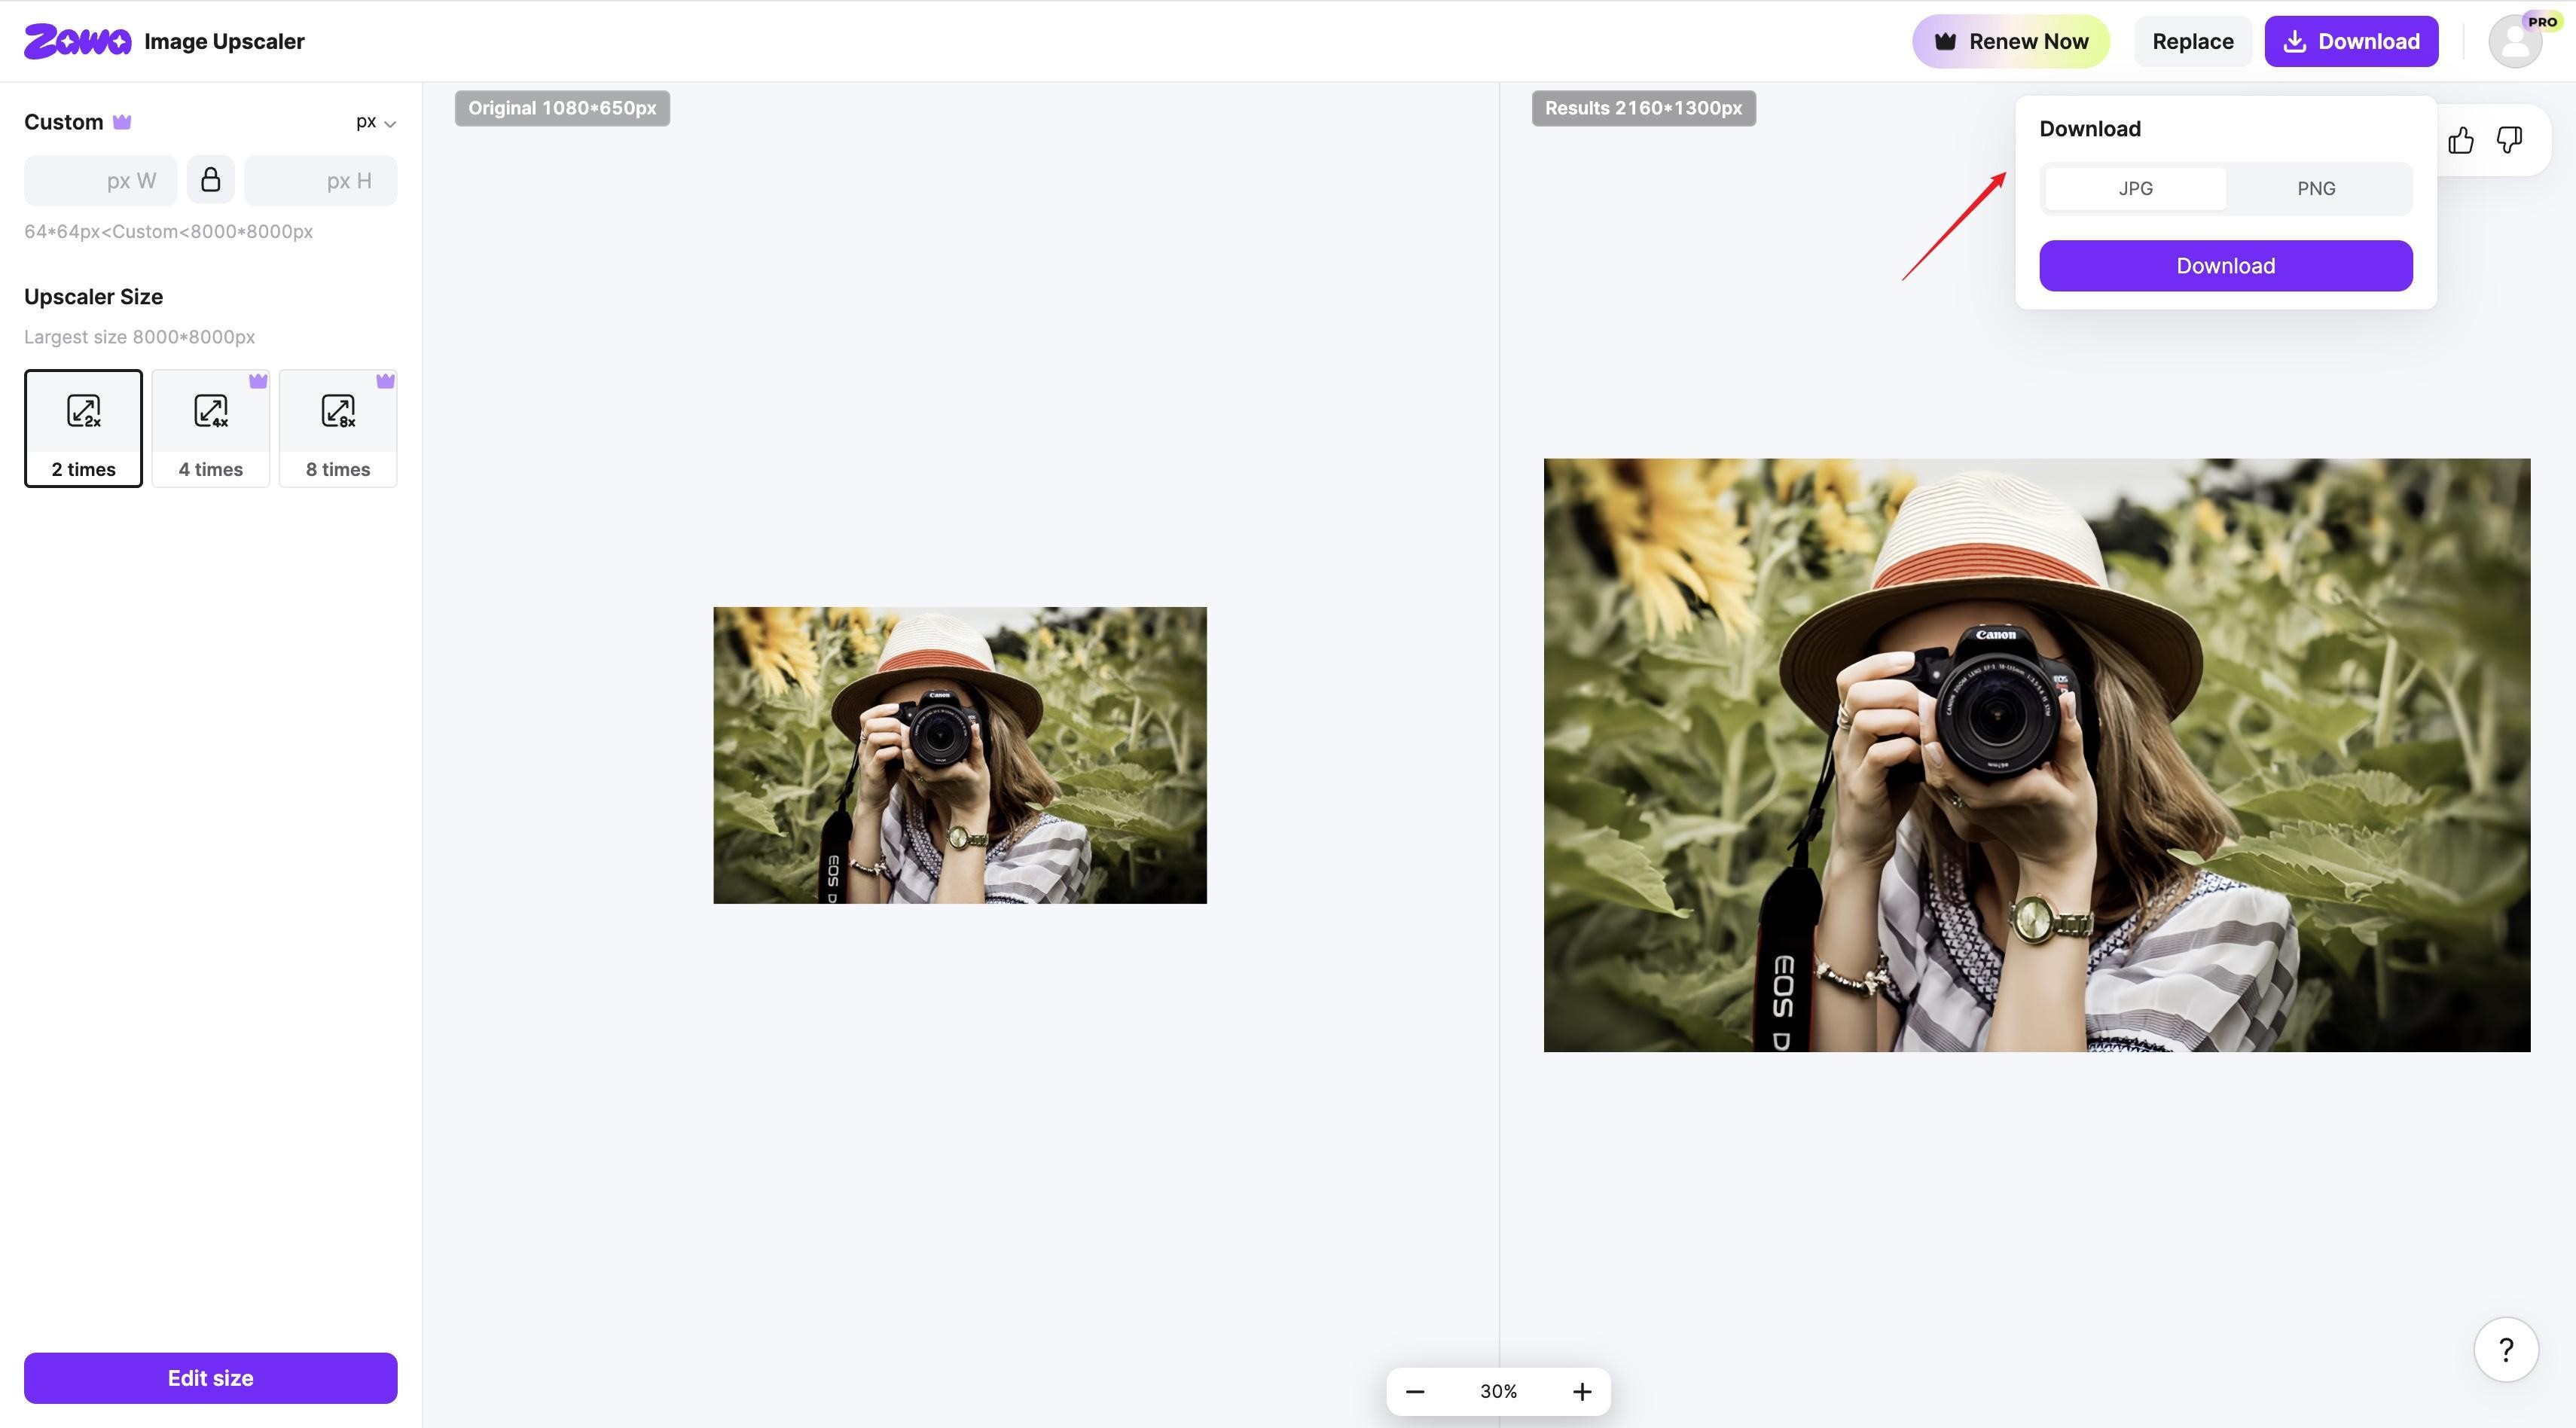
Now upload your photo. Pick the resolution you want, 2x, 4x, or higher. The tool sharpens up the details and gives you a clean, high-res output in seconds.
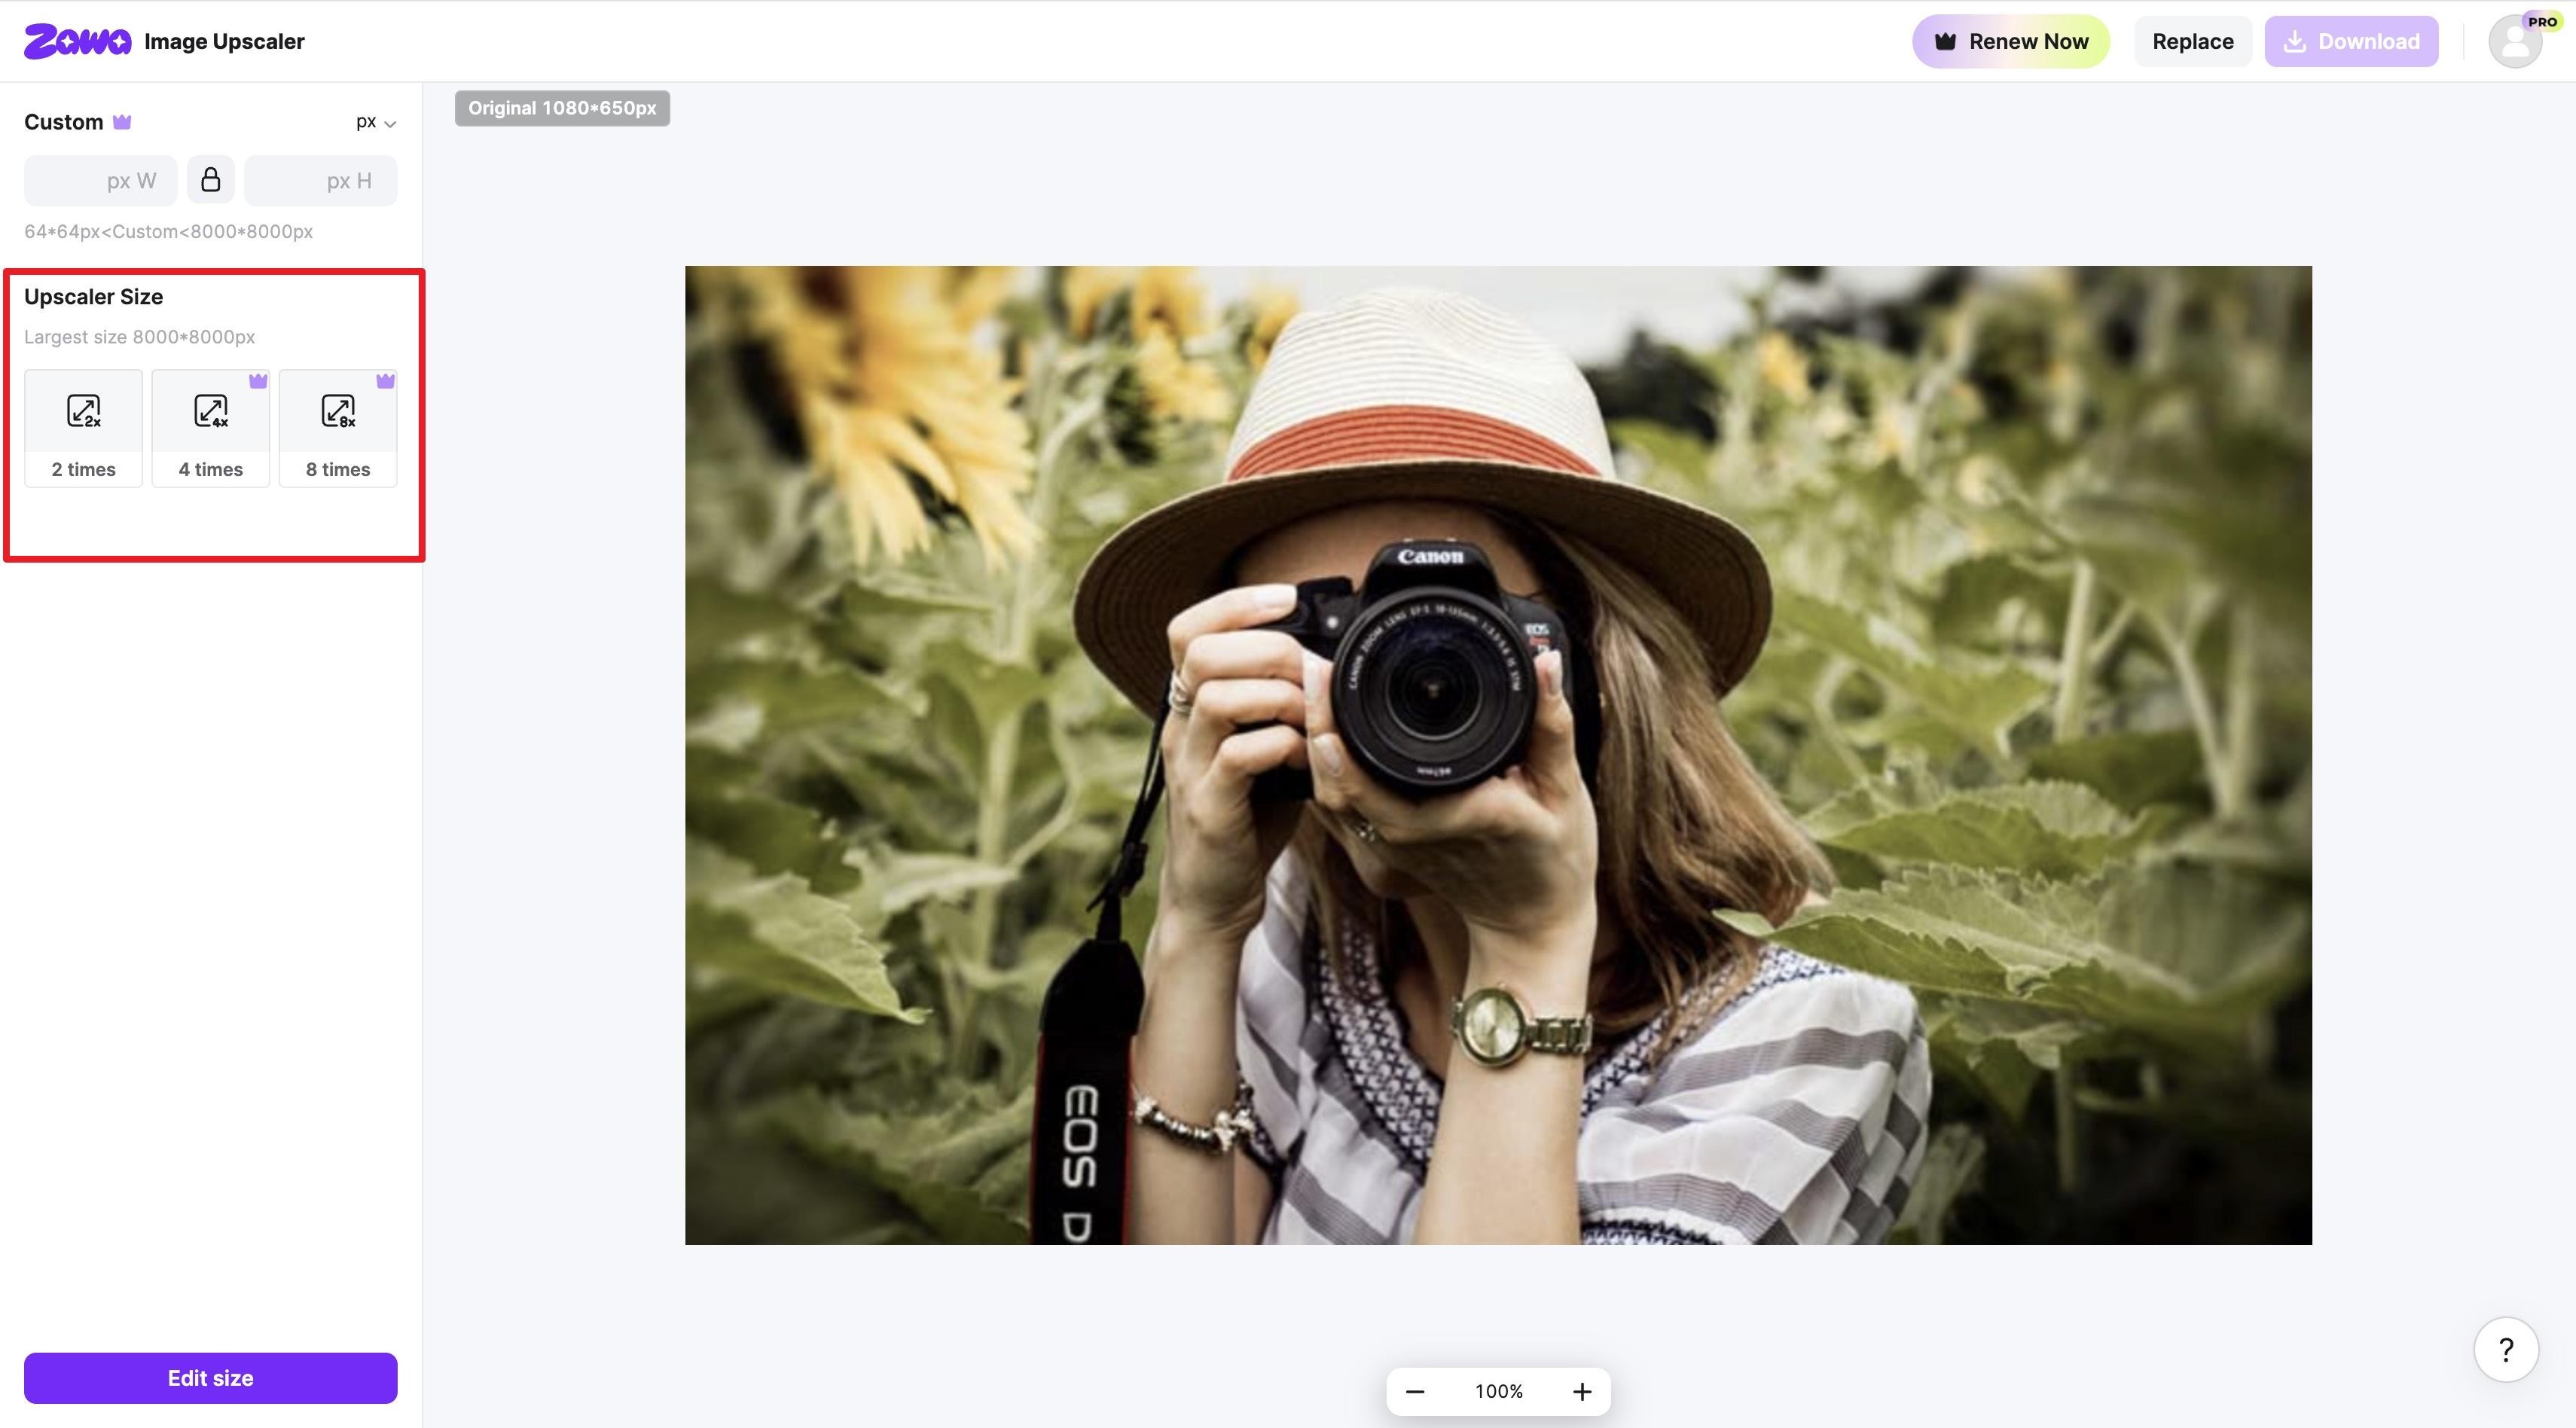
Step 3. Download the final image
Compare the before-and-after results. Next, click the "Download" button to save the image.
When should you upscale an image?
Upscaling makes sense when your photo just isn't cutting it for the job. Maybe it's too small for the screen. Maybe it's too soft for print. The right time to upscale really depends on what you're working on, whether you're using AI tools or upscaling in Photoshop.
-
Low-resolution images: If the photo looks fuzzy, upscaling can give it a fresh lift. Photoshop or Zawa can boost the resolution while keeping the original details mostly intact. It's a quick win for anything pulled off the web.
-
Printing requirements: Prints are picky. They usually need around 300 DPI to look sharp. Once you know how to use Photoshop or Zawa to enlarge images properly, you can scale them up without losing too much detail. The result? Clean prints, no stretching, no blur.
-
Social media and marketing: Different platforms need different image sizes. Instead of making fresh files from scratch, you can upscale once in Photoshop or Zawa and adjust as needed. It keeps your brand looking sharp across the board.
-
Old photo restoration: Old or scanned photos often don't hold up to today's standards. Photoshop or Zawa can restore photos and give them a much-needed glow-up. It's one of the best ways to bring faded memories back to life.
Pro tips to get the best upscale results
How you upscale matters just as much as the tool you pick. These tips help you squeeze the most clarity and sharpness from your images, whether you're using Photoshop image upscaling or an AI tool.
-
Start with a high-quality source: The cleaner the original, the better the result. No matter how strong the image upscaler is, it can't recover details that were never there. Always grab the highest-resolution file you can find before you start.
-
Upscale gradually: Don't jump from 1000px to 5000px in one shot. Bump up the size in smaller steps. This trick keeps tiny details intact when you upscale images using Photoshop. It also helps dodge that ugly blur most people end up with.
-
Pair it with sharpening tools: After upscaling, use a sharpening filter to bring back edge clarity. This step is huge when you use Photoshop for image upscaling. Tools like Smart Sharpen do the job, but go easy. Too much sharpening adds noise instead of clarity.
-
Mix AI with Photoshop: A lot of folks ask, "Can Photoshop upscale images on its own?" Sure, but pairing it with AI (such as Zawa) gets you sharper, faster results. This combo gives you both control and speed in one workflow.
Conclusion
Upscaling in Adobe Photoshop is totally doable with tools like Image Size, Preserve Details 2.0, and Camera Raw Super Resolution. Photoshop gives you fine control, but it has limits. Push too far, and it can't invent new details out of thin air. That's where AI tools step in. They're faster, smarter, and a lot less fussy. Zawa, for example, lets you upscale with a single click and still get clean, sharp results.
The mix of Photoshop and Zawa provides the best results. Use Photoshop when you need precision, and Zawa when you need speed.
FAQs
-
Does Photoshop support upscaling?
Yes, it does. Photoshop comes with Image Size, Preserve Details 2.0, and Super Resolution. How well it works mostly depends on the quality of your starting image.
-
How do I upscale an image in Photoshop to 300dpi?
Open your photo, then go to Image > Image Size. Make sure "Resample" is checked, and set the resolution to 300 DPI. Tweak the width and height carefully so the photo doesn't lose its quality.
-
How to Upscale without losing quality in Photoshop?
Stick with Preserve Details 2.0 and balanced noise reduction. Scale up little by little, then sharpen the result. Photoshop can do a solid job, but if your image is huge, expect some softness no matter what. If you want to avoid this manual effort, AI alternative (such as Zawa) automatically reconstruct lost details and handle 4K upscaling in one step.
-
Can beginners easily learn how to upscale an image in Photoshop?
For sure. Tools like Image Size are super beginner-friendly. The advanced features take a bit of practice, but once you get the hang of them, you'll wonder how you ever managed without them. With a little guidance, anyone can pull this off.
-
Can you upscale JPEG?
You can, but JPEGs are tricky. Heavy compression often leaves artifacts that appear when you enlarge the file. For the cleanest results, start with a higher-quality file or apply noise reduction after upscaling.
You May Be Interested
How to Sharpen an Image in Photoshop: 2026 Guide & Top AI Alternative

4 Ways to Remove Background in Photoshop
12 Best Free Photoshop Alternatives – AI Photo Editor Tools
10 Best Landscape Photography Tips That Every Beginner Should Know
Try the 10 Best Image Upscalers for Your Photos in 2025