
How to Sharpen a Blurry Image in Photoshop (Best Methods Explained)
Improve photo clarity with easy steps on how to sharpen images in Photoshop, or switch to Zawa — the best 2026 alternative to fix blur with AI.


Blurry or out-of-focus shots happen to everyone. Fixing them can quickly turn frustrating, especially when editing tools feel complex or hard to navigate. For creators, marketers, and brands, this often means losing valuable content.
Nevertheless, this problem of restoring such out-of-focus photos can be solved. Here's how to sharpen an image in Photoshop step by step. And if Photoshop feels too complex, we'll also look at a simpler alternative to Photoshop that requires no editing experience.
Why Images Look Blurry - 6 Reasons
Blurry images can happen for several reasons. Below, we have mentioned why your images become blurry:
-
Camera Shake: Even a tiny hand movement can blur the whole photo. It makes edges soft and small details disappear.
-
Low Resolution: Small images do not hold much detail to begin with. When you enlarge them, pixels stretch, and the picture looks rough.
-
Out of Focus: If the camera locks focus on the wrong spot, the main subject looks soft. Edges lack crisp lines and fine detail.
-
Compression Loss: Strong compression cuts data to shrink file size. This can smear textures and remove sharp edges from your image.
-
Poor Lighting: In dark settings, cameras boost ISO and add noise. That noise hides detail and makes pictures look less sharp.
-
Motion Blur: If the subject moves fast, it leaves a trail in the frame. Lines look stretched, and shapes lose clear borders.
Popular Methods to Sharpen a Picture in Photoshop
Blurry photos can be quickly fixed to a high standard in a few steps. Discover how to sharpen a photo in Photoshopusing a few simple methods.
Sharpen Image Photoshop with Unsharp Mask Tool
The Unsharp Mask tool in Photoshop is one of the easiest and most reliable ways to enhance an image. This is done by boosting the edge contrast. The method is great for defining details without going through a complicated process. So, let us follow the steps for using the Unsharp Mask tool:
Step 1. First, duplicate your image layer by pressing the "Ctrl + J" keys. Then, click the "Filter" tab, select "Sharpen" from the drop-down menu, and click the "Unsharp Mask" option.
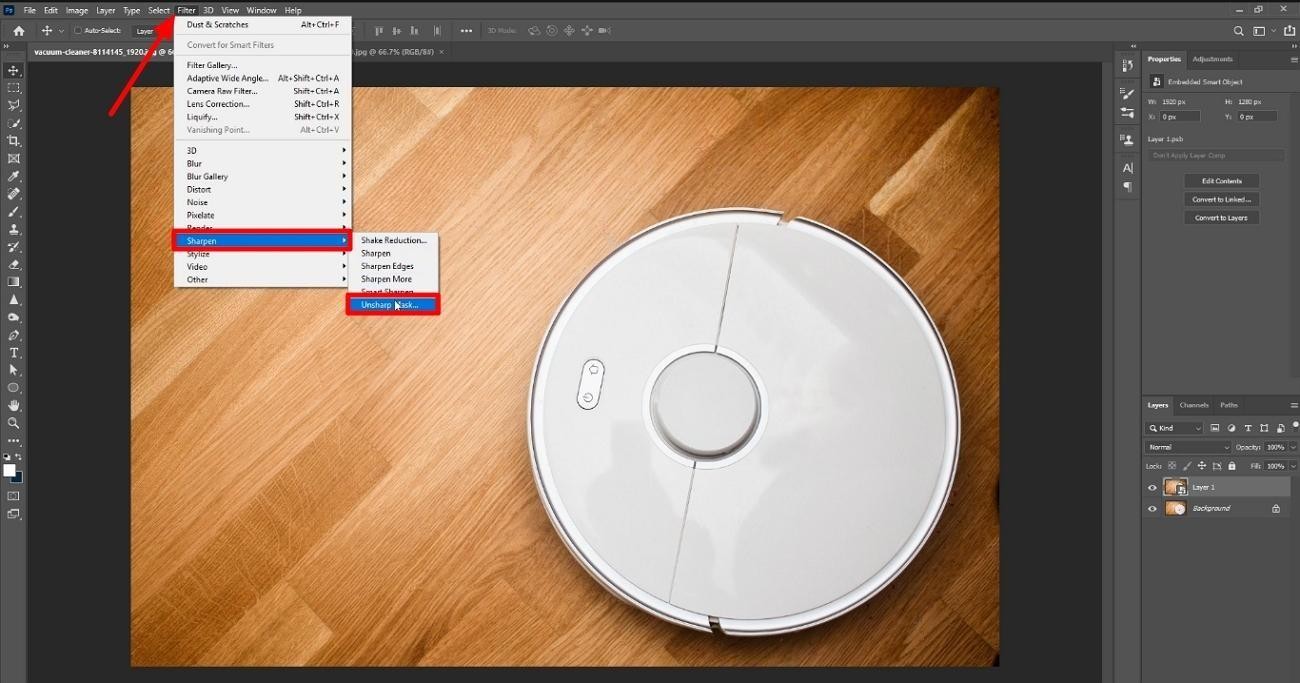
Step 2. Now, start with low "Amount" and "Radius" values and gradually increase the sliders while watching the Preview.
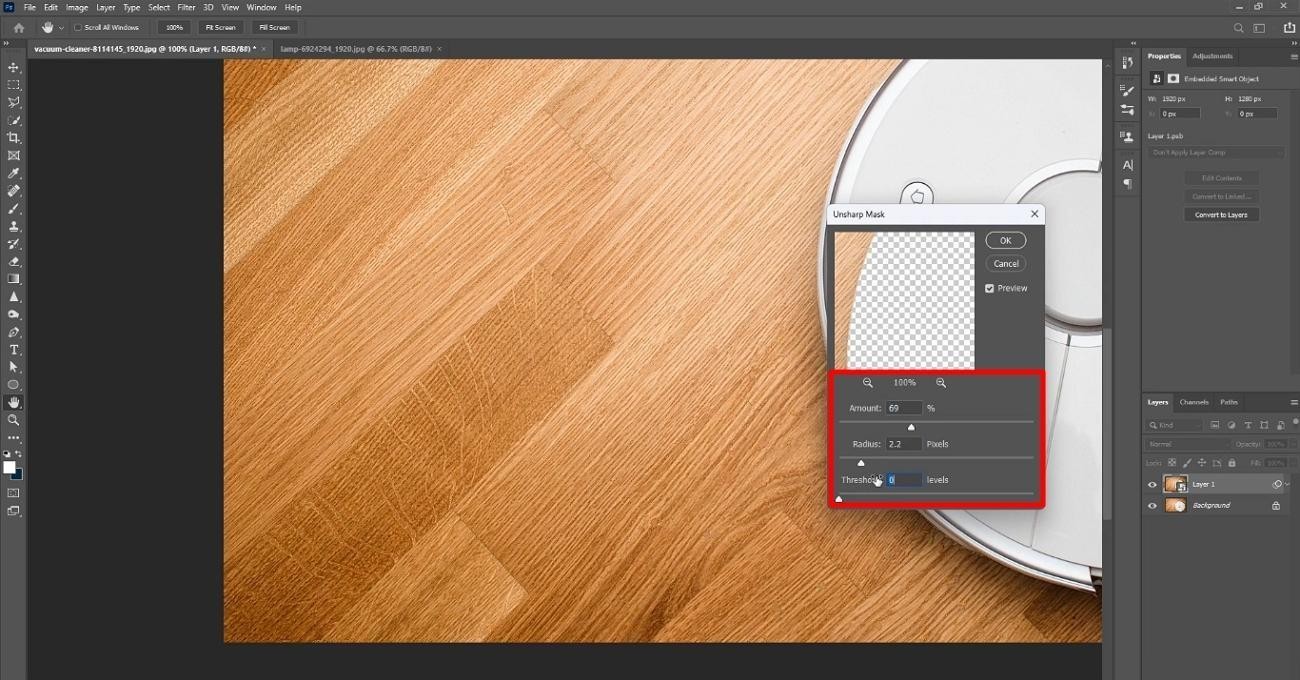
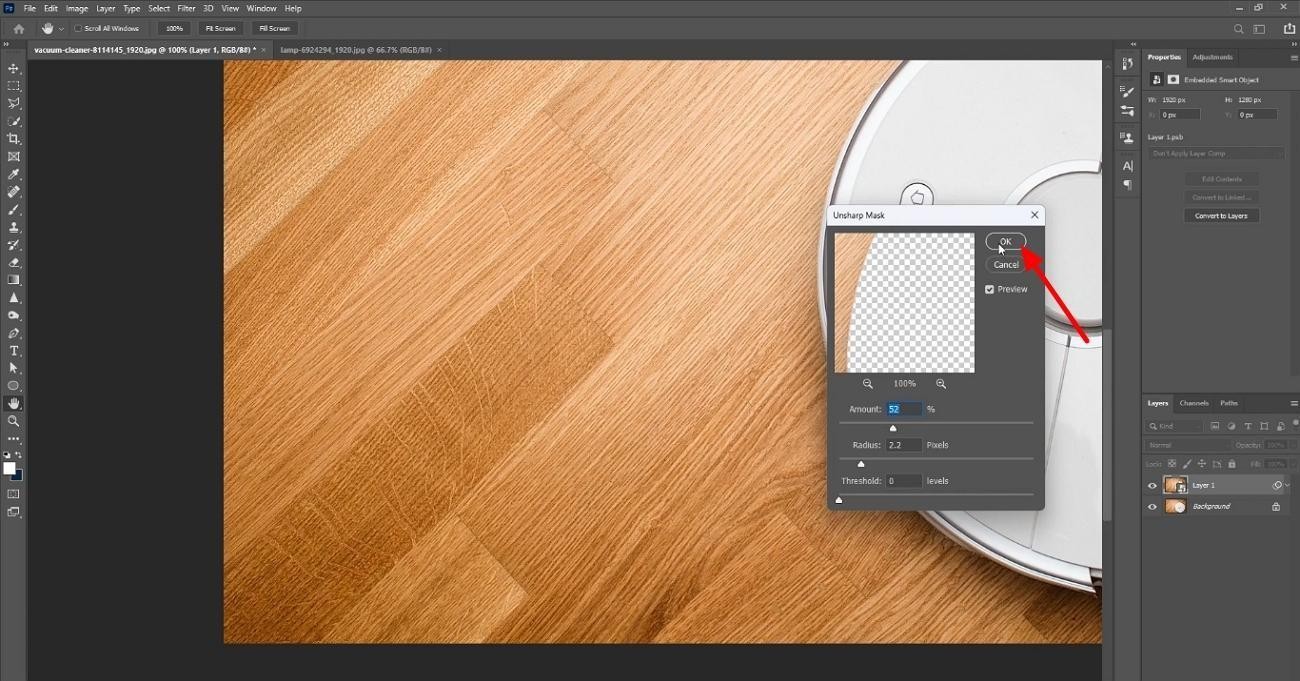
Step 3. Finally, stop when the edges look clearer but still natural and click the "Ok" option.
Photoshop Smart Sharpen Explained Step-by-Step
To reduce blur while sharpening details, especially in photos with focus issues, you can use the Smart Sharpen tool. It allows you to refine shadows and highlights, making the results look more natural. This easy method can be completed in just a few steps, which are given below:
Step 1. Begin by accessing the "Filter" tab and then selecting the "Smart Sharpen" option after duplicating the image layer.
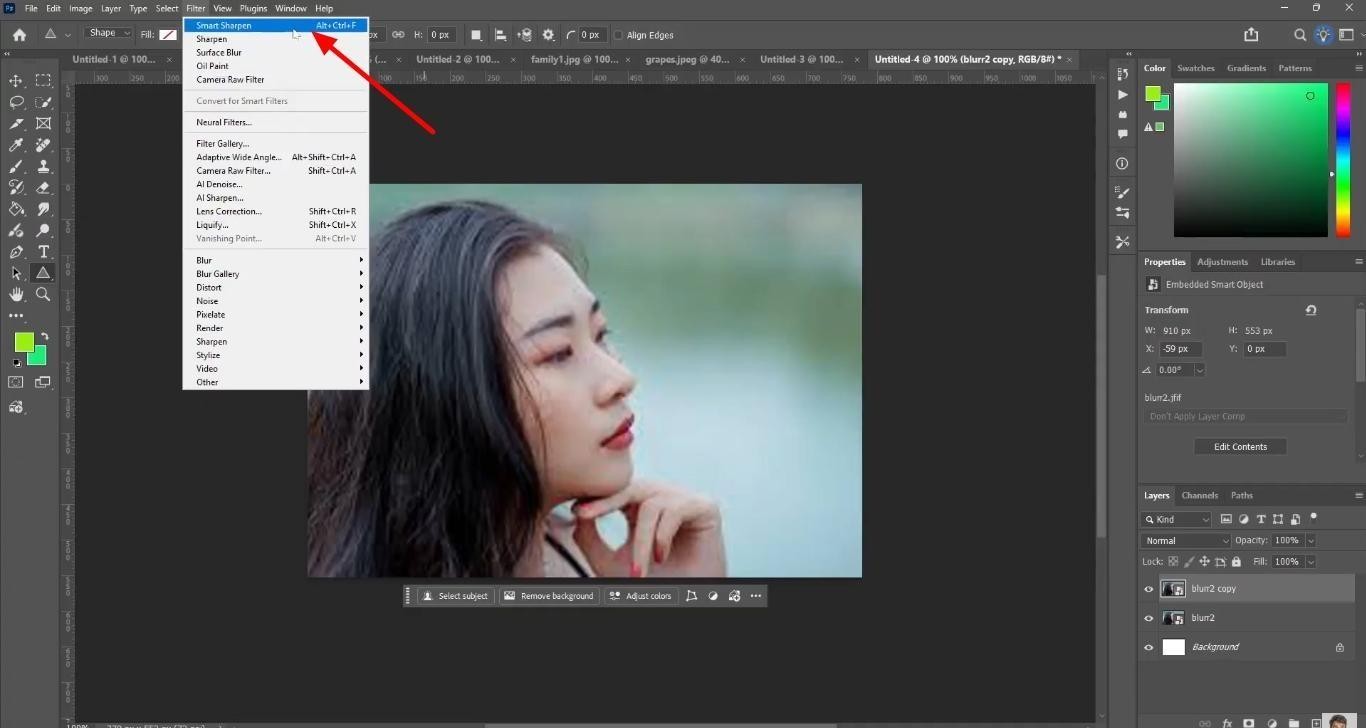
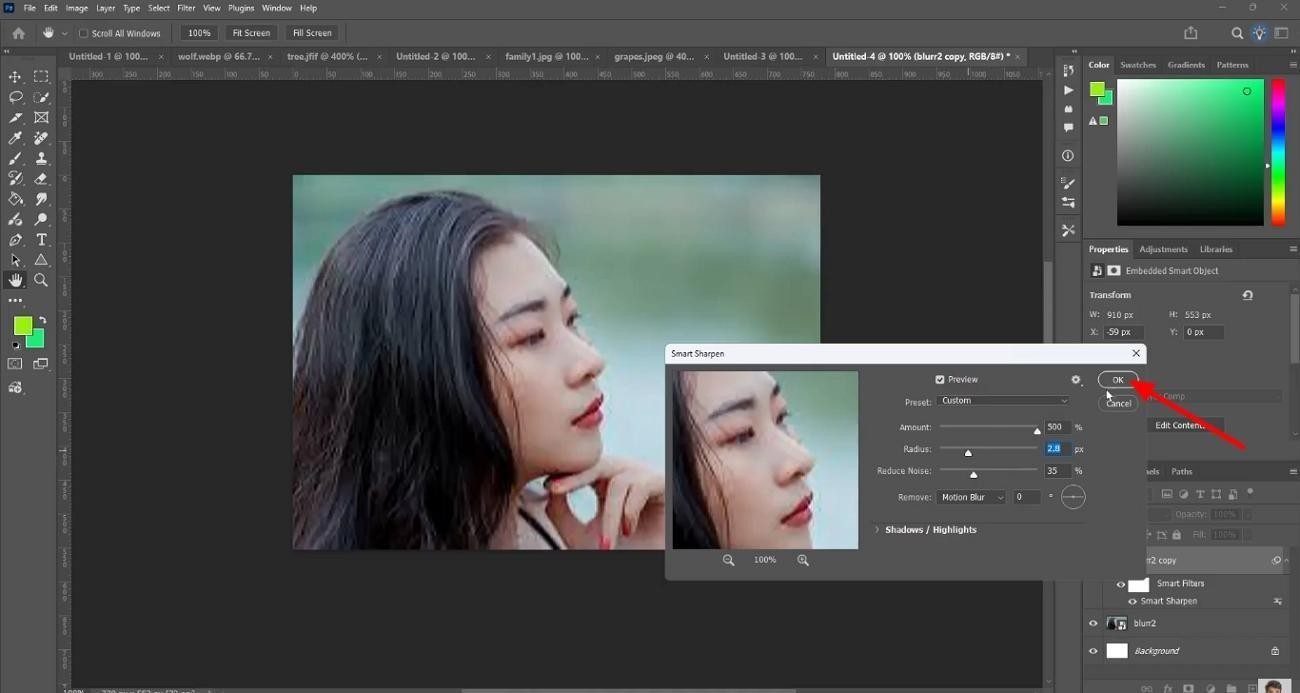
Step 2. Next, in the "Smart Sharpen" dialog, choose a blur type like "Motion Blur" from the "Remove" menu.
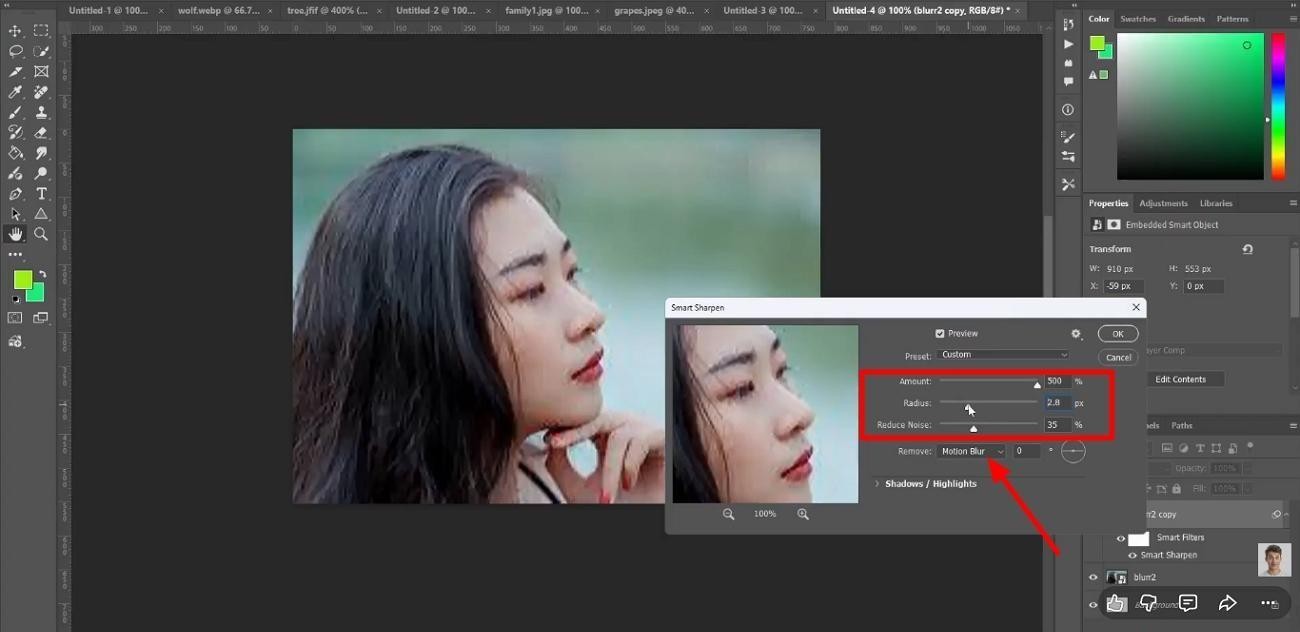
Step 3. Afterward, increase "Amount" and Radius" slowly and use the "Reduce Noise" slider if needed. Finally, click "OK" when the image looks sharp.
Advanced Sharpening with High Pass in Photoshop
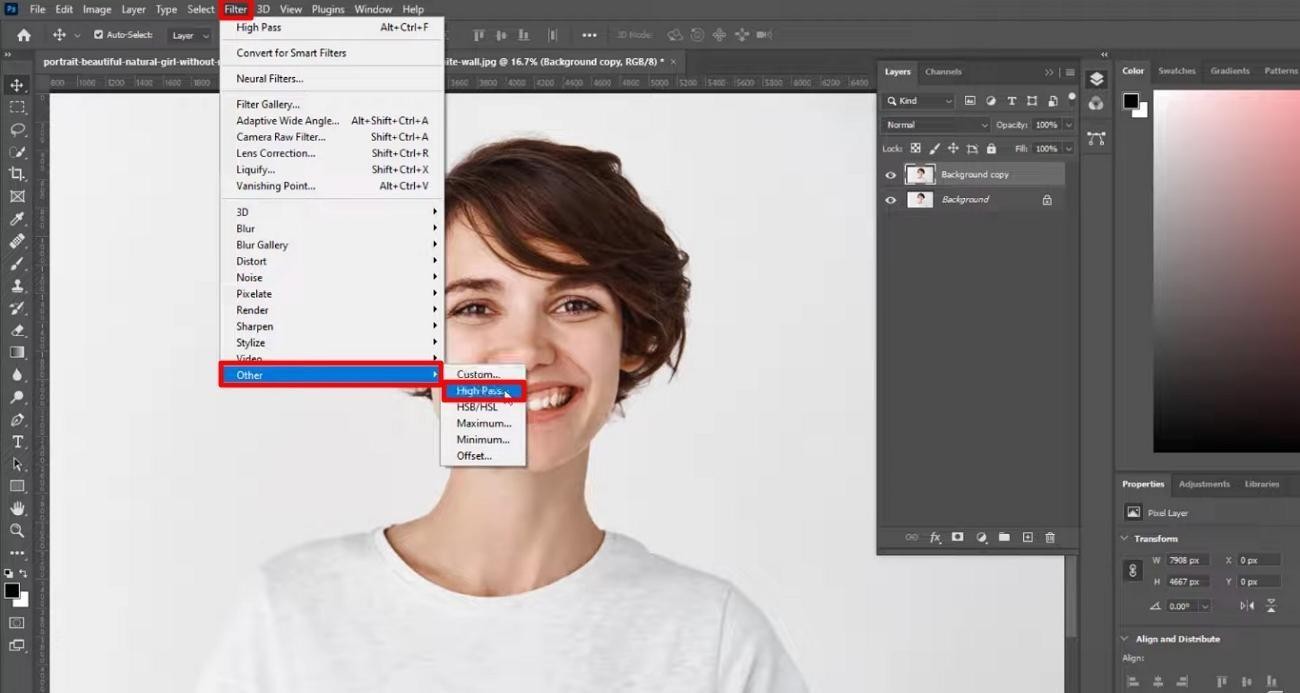
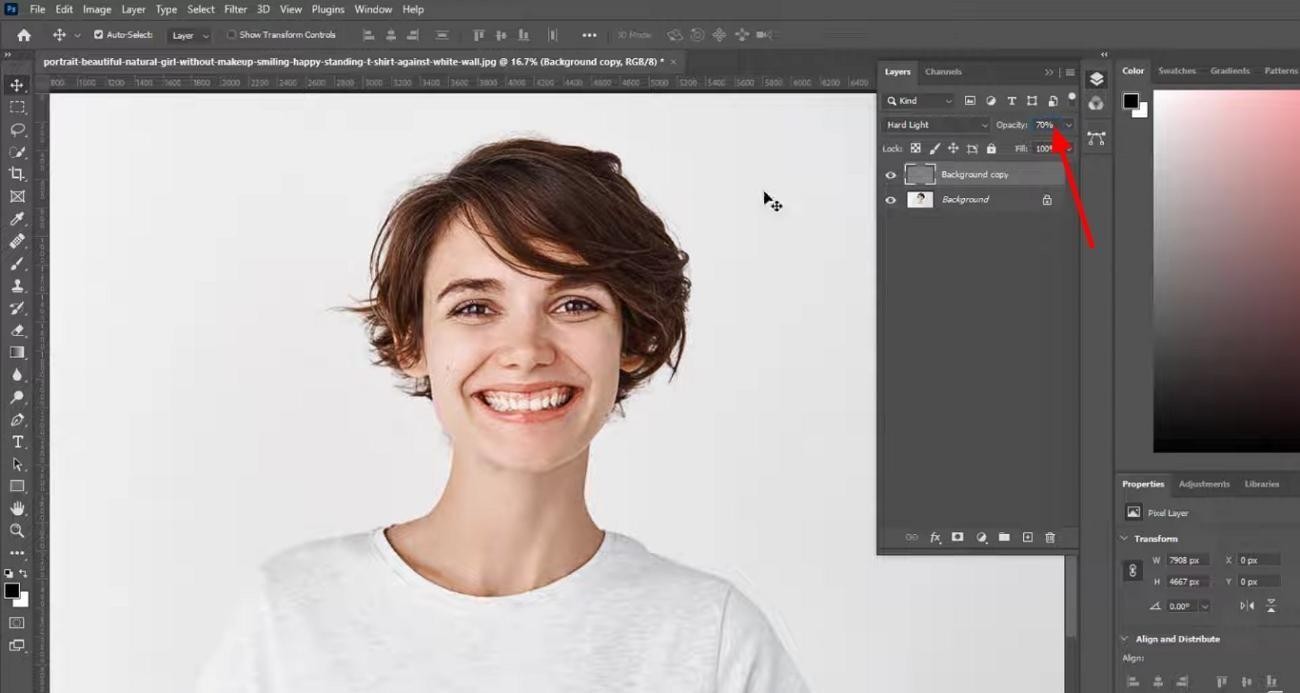
High Pass sharpening is a more advanced method to sharpen photos in Photoshop. Using this technique, edges are isolated and refined without affecting the whole picture. This method produces a crisp, professional result. Here, we have provided the steps to apply this method quickly:
Step 1. Firstly, go to the "Filter" tab and click on "High Pass" after duplicating your image layer.
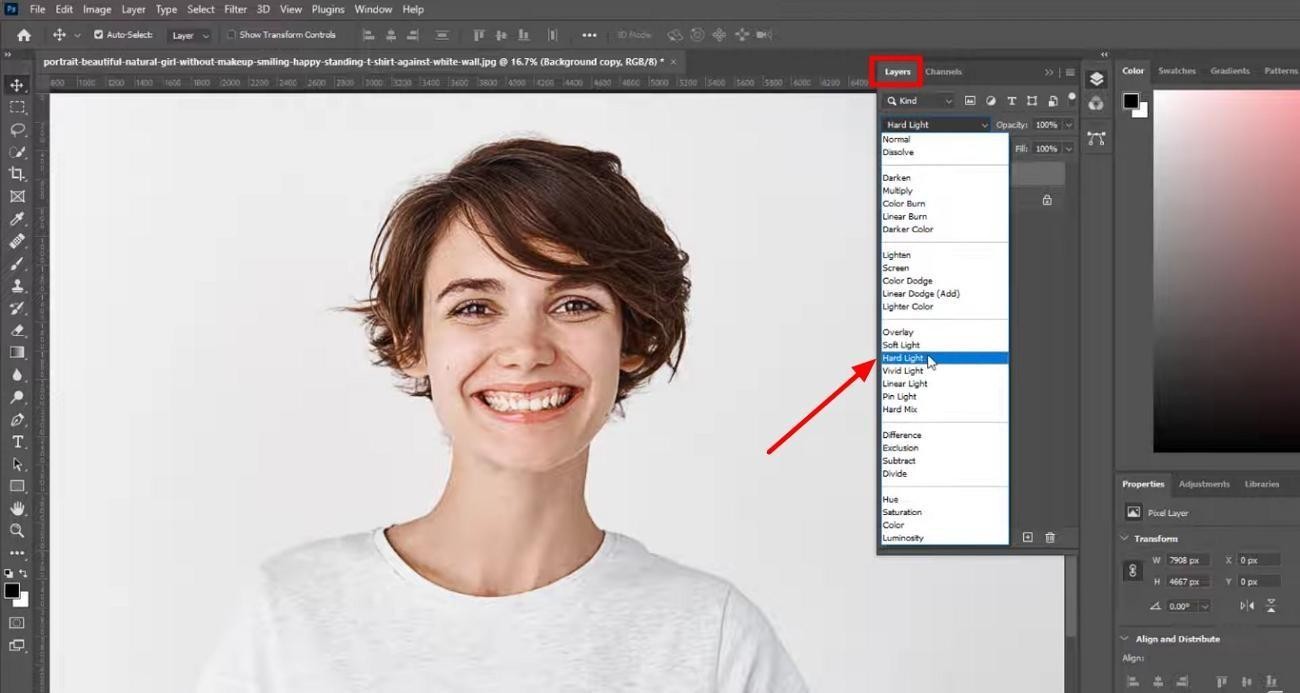
Step 2. Then, from the "Layer Blend Mode" choose an option such as "Hard light" or "Overlay".
Step 3. Finally, lower the "Layer Opacity" if the effect is too strong.
Selective Sharpening in Photoshop Made Easy
This method helps maintain a natural balance and prevents unwanted noise in softer areas like the background. Selective Sharpening lets you sharpen a certain area, like the eyes or the nose of a portrait, without touching anything else. Take a look at the procedure for how to sharpen your image selectively:
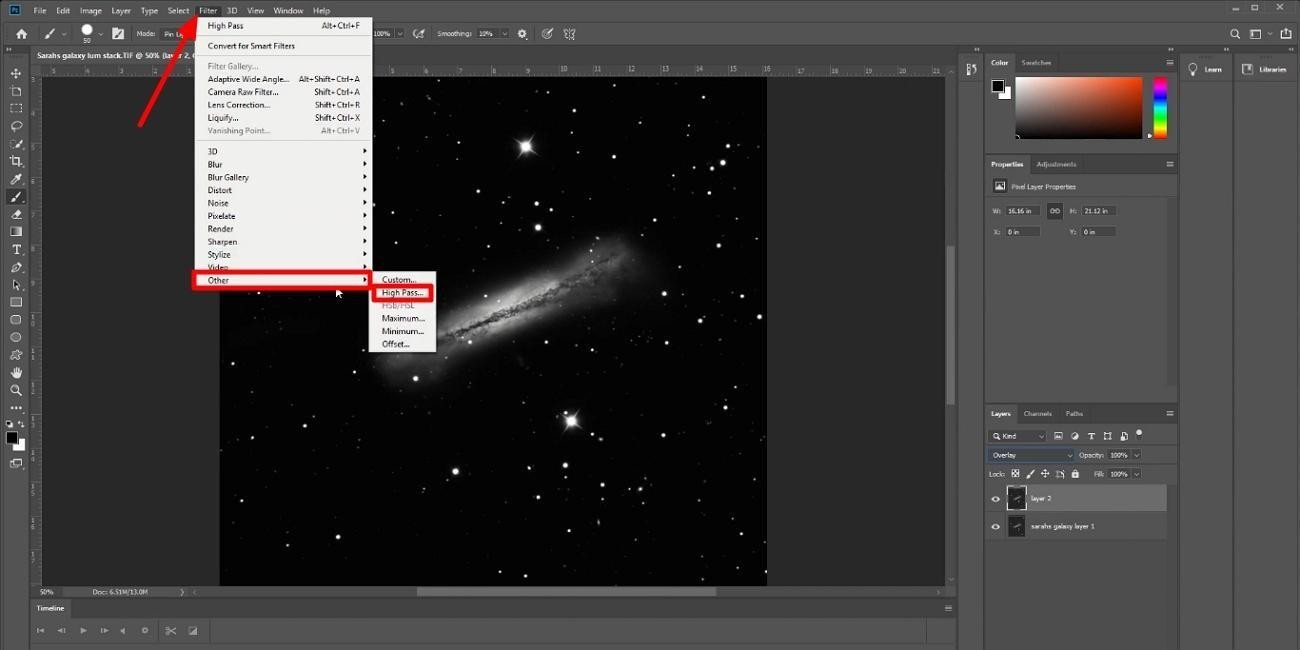
Step 1. To begin, duplicate the image layer and select Layer 1, and go to the "Filter" tab. From there, choose the "Other" option and click on the "High Pass" option.
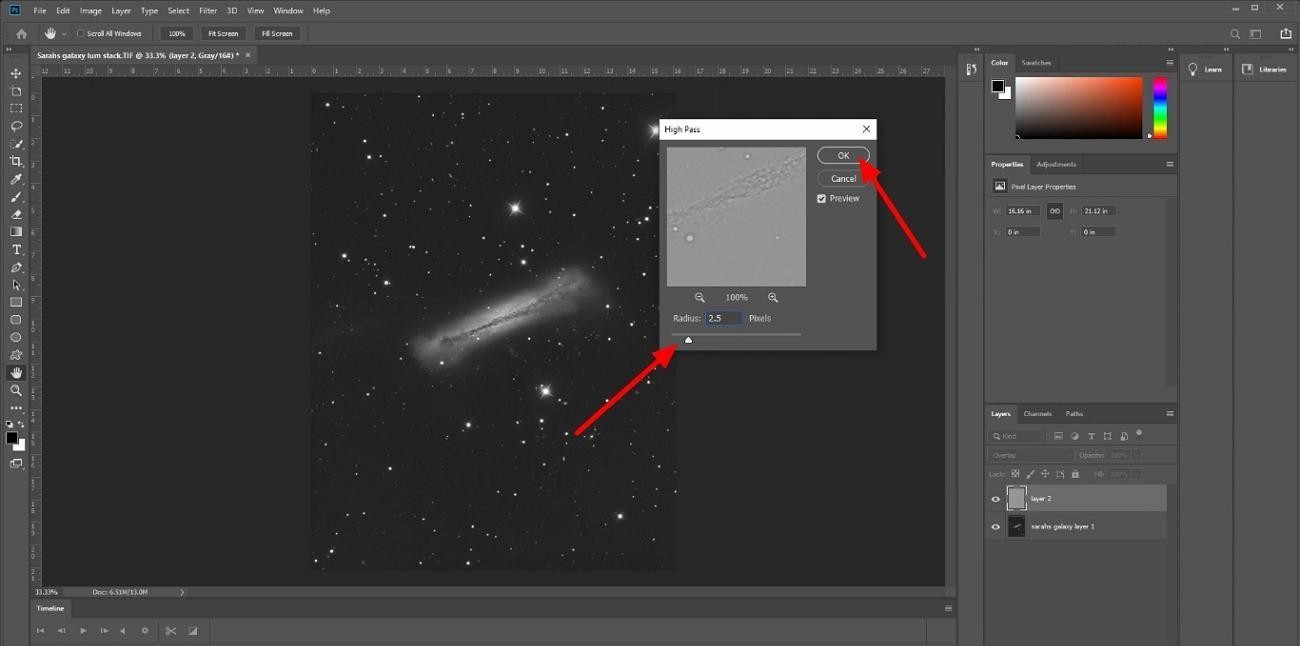
Step 2. Adjust the "Radius" slider until you can clearly see the edges you want to affect. Once finished, click on the "OK" button.
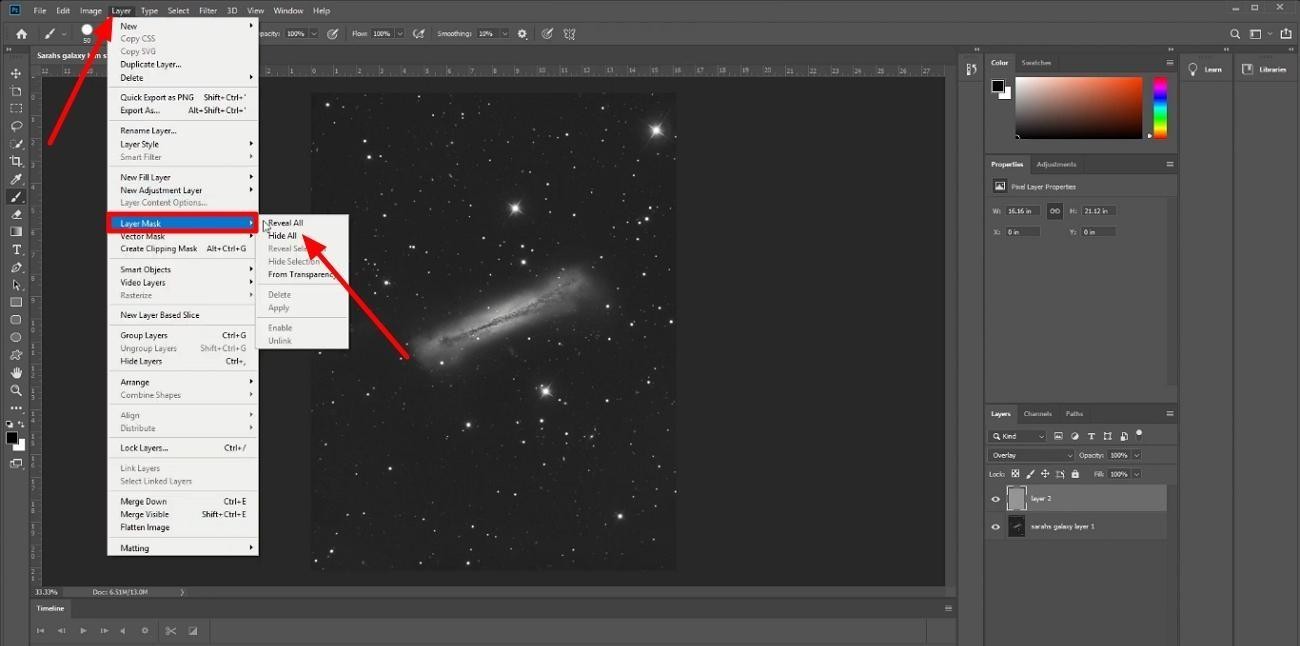
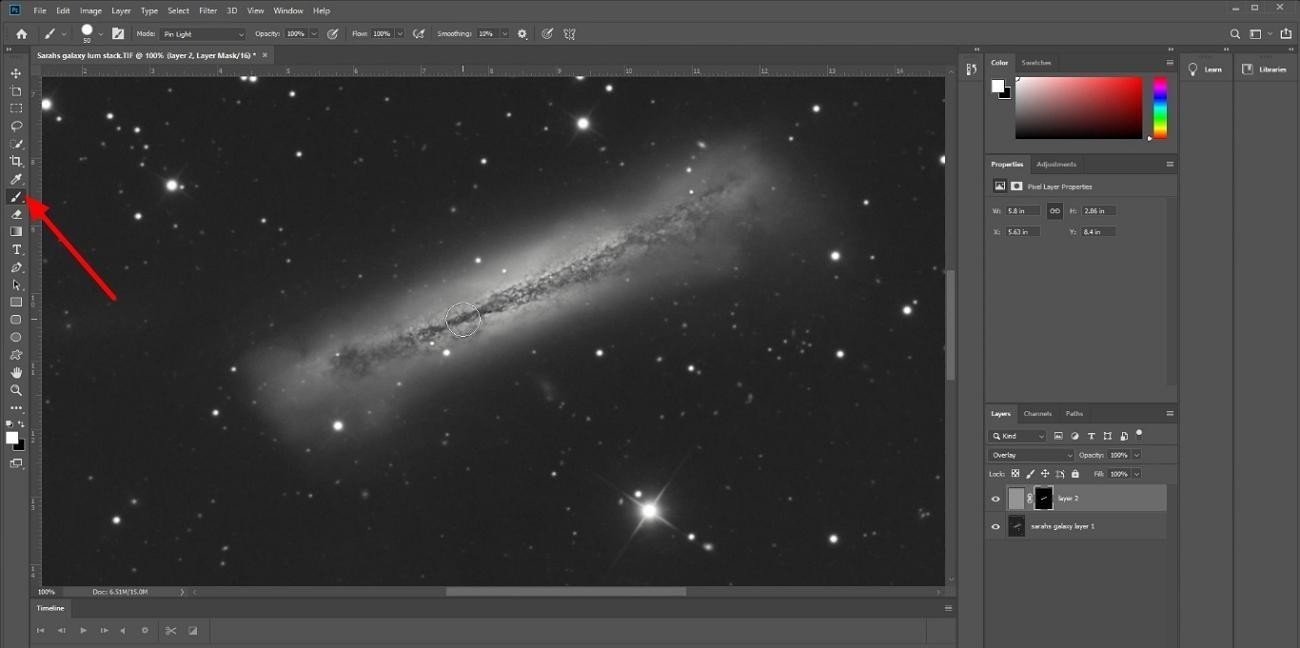
Step 3. Add a "Layer Mask" to Layer 1 by clicking on the option in the "Layer" tab. Now, choose the "Hide All" option from the drop-down menu.
Step 4. Finally, choose a soft white brush and paint on the mask only where you want sharpening to appear.
Why Your Image Looks Worse After Sharpening
At times, the software that we use to sharpen images in Photoshop can do more harm than good. In this section, let's explore why the picture may look worse after sharpening.
-
Over‑Sharpening Causes Halos: Sharpening too much creates bright outlines around edges. These halos make faces, text, and objects look fake instead of clean and sharp.
-
Ignoring Noise: Sharpening increases both detail and noise in the picture. If you ignore the noise first, the grain becomes stronger, and the whole image looks rough and messy.
-
Applying Sharpening Multiple Times: The image loses quality when sharpening is done many times. Details break down, and skin, fabric, or skies start to look awkward.
-
Not Using Layers: Sharpening directly on the only layer locks in every change. Without extra layers, you cannot lower the strength, mask areas, or safely undo changes.
Photoshop Sharpening Failed? Switch to Zawa AI Image Enhancer
You try to sharpen an image in Photoshop again and again, but the result feels fake. The edges glow, faces look rough, and you lose time testing menus and settings. Photoshop can be complicated for new users.
Rather than using Photoshop, try a simpler option like Zawa. This is an AI image enhancer that can sharpen and upscale blurry and low‑quality images. All you have to do is upload a picture. The AI will upscale and sharpen the image, and you will have a clearer image.
How Zawa AI Image Enhancer is Better than Photoshop
Beginners can use Zawa to enhance images easily without complex timelines. In case you try to sharpen a photo in Photoshop and get stuck, Zawa can help you out.
-
One‑Click 4K Enhancement: Turn blurry or low‑res photos into sharp 4K images in seconds. It restores details, fixes blur, and keeps pictures natural without complex settings.
-
HD and Ultra HD Ready: Export images to HD or Ultra HD with one tool. It improves textures and auto‑corrects colors, so every detail looks clear and ready to share.
-
Fast Bulk Editing: Upload and enhance up to 20 photos at once, online and for free. This saves time compared to manual editing in Photoshop.
-
Natural Portrait and Detail Boost: Enhance faces, skin, and hair without the "plastic" look. The AI reduces grain, sharpens features, and keeps portraits realistic and lifelike.
-
All‑in‑One Online Studio: Use one browser tool for upscaling, background removal, text, and templates. No installation required, just upload, edit, and download.
-
Works for Any Image Type: Enhances selfies, products, screenshots, documents, and more. It improves text, eliminates artifacts, and improves images for the internet, printing, and social sharing.
Step-by-Step Guide to Zawa AI Image Enhancer
Sharpen images with Zawa in 3 simple steps, as mentioned below:
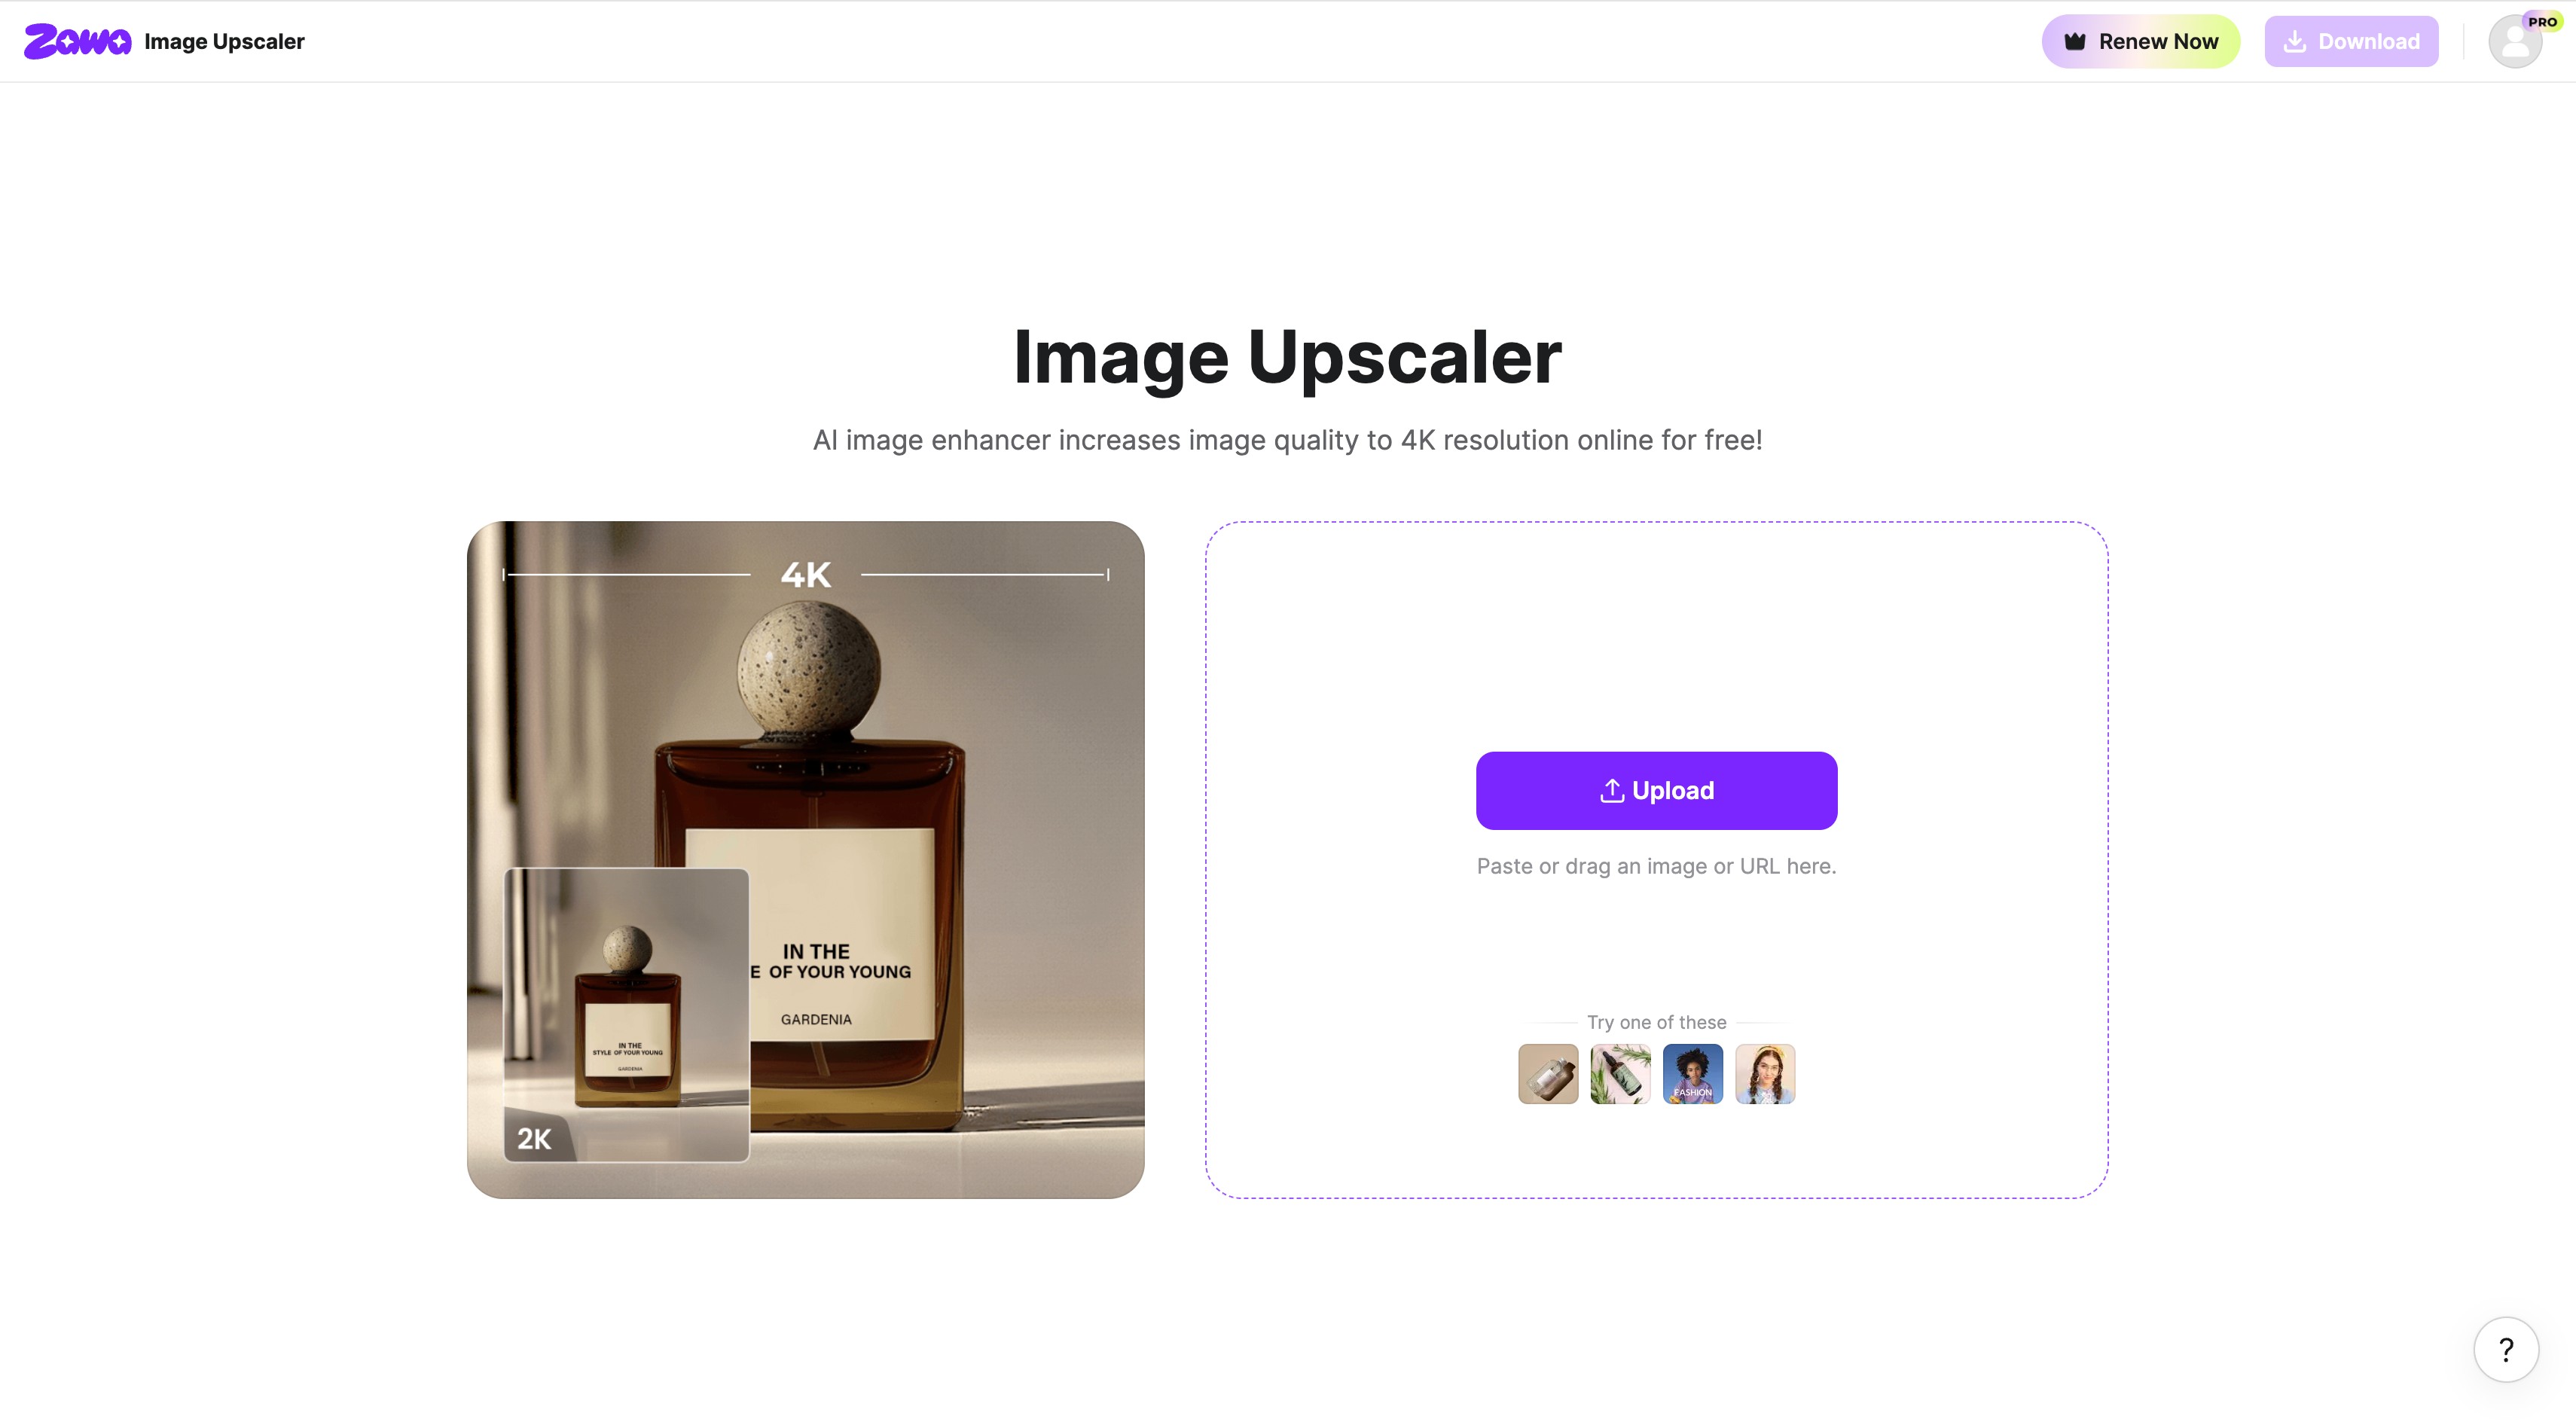
Step 1. Upload Your Image
To start, upload the blurry image from your device by clicking on the "Upload" button.
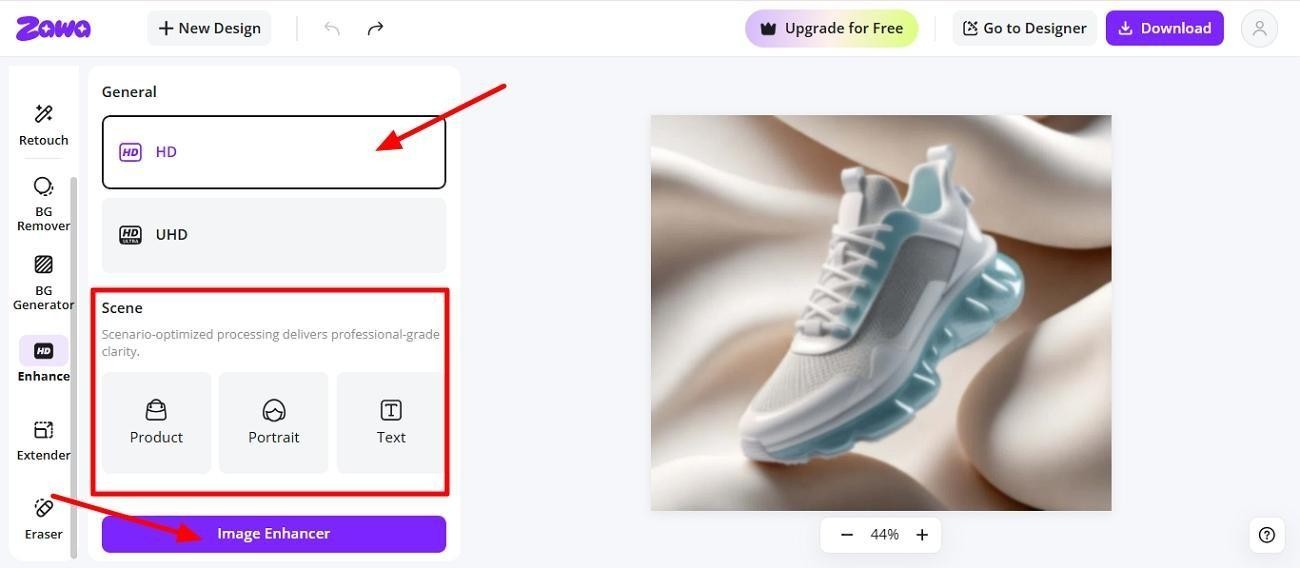
Step 2. Choose Output Quality and Scenario
Next, select either the "HD" or "UHD" options to pick the output quality of image, and then click one of the options, like "Portrait" or "Product," from the scene section and press the "Image Enhancer" button.
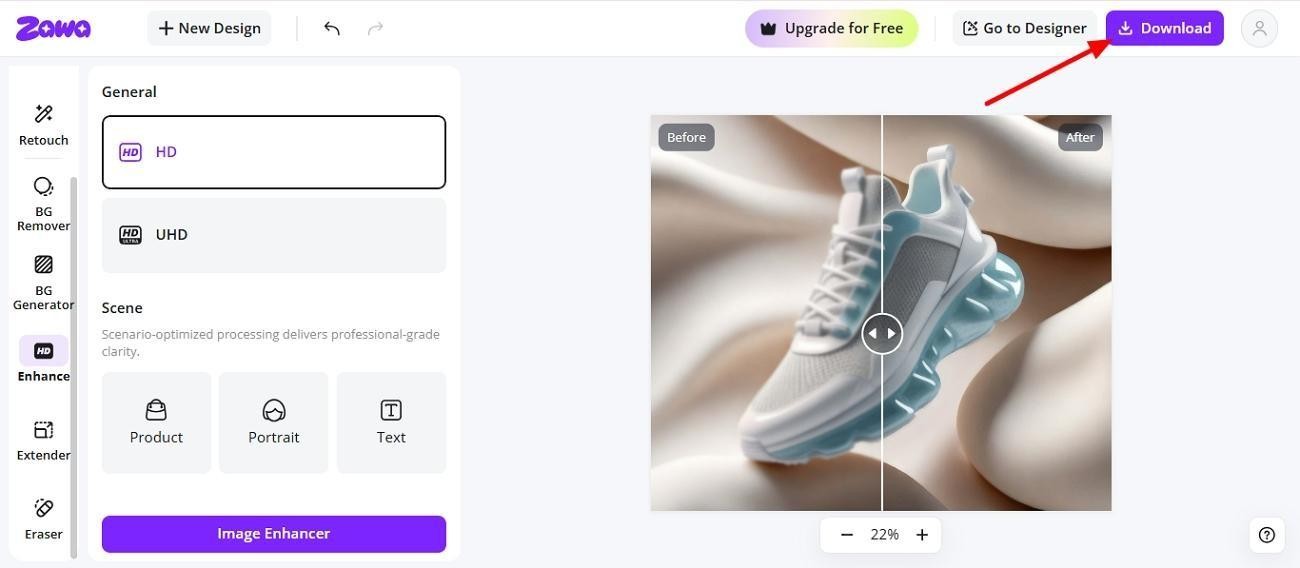
Step 3. Enhance and Download
Finally, once processing is complete, check the before and after views and then click on the "Download" option to save to your device.
Conclusion
In conclusion, this article discussed why photos turn blurry and how to fix them using Photoshop's sharpening tools. Users now have clear, step-by-step guidance on how to sharpen a photo in Photoshop with confidence. If this feels complicated, AI tools like Zawa offer a faster, simpler alternative. With just one click, even imperfect shots can look sharp and professional.
FAQs
-
Can I improve image quality in Photoshop?
Yes. In Photoshop, one can improve quality with sharpening and noise reduction. Otherwise, if you want to unblur images in one click, go for an AI image enhancer.
-
How to sharpen a blurry object in Photoshop?
To sharpen a blurry object in Photoshop, use one of the sharpen picture in Photoshop methods on a new layer. Then, mask and paint only over the object. An AI enhancer like Zawa can also do this with less manual work.
-
Can enhancers fix blurry photos?
Yes. AI enhancers can often fix mild to moderate blur, restoring edges and detail. A good example is Zawa, which is quick and effortless, so beginners have no trouble with it.
-
How do I convert a blurry picture to HD?
To convert a blurry picture to HD, upscale and sharpen in Photoshop, or use Zawa. In AI tools like Zawa, just upload your image and select the HD option before enhancing.
-
Is it better to sharpen RAW or JPEG?
It's best to sharpen RAW images because they have more detail. However, you can sharpen JPEGs, too, or use an AI image enhancer to improve either type of image with the click of a button.
You May Be Interested

5 Tools to Extract & Convert Images to Text
Standard Photo Print Size: A Guide to Choosing the Right Size

Product Photography-How to Take Product Photos
How to Photograph Jewelry Like a Professional
How to Make a Picture Less Blurry and Restore Sharpness

Gemini Images Too Blurry? Here’s How to Make Them Crystal Clear in Seconds
