How to Stabilize a Clip in Premiere Pro (Beginner to Advanced Guide)
Discover how to stabilize video in Premiere Pro using Warp Stabilizer, fix shaky clips, remove rolling shutter issues, and explore AI tools like Zawa Video Enhancer for smooth, professional footage.


Several users are trying to create content using different techniques and approaches. Videos on social media often turn out to be shaky without proper equipment. Modern video editing tools feature a video stabilization utility that lets creators remove the shakiness without any heavy investment.
Premiere Pro is one of the video editors that offers a video stabilization feature. This article is a detailed walkthrough of how to stabilize video in Premiere Pro.
Why Shaky Footage Affects Your Video Quality
There are many factors that affect to the quality of a video. The following section discusses how the shakiness can harm the quality of your footage:
-
Less Focus of viewers: Camera shake makes it hard for viewers to focus on the main subject. It pulls attention away from the story and creates distraction.
-
Unprofessional Appearance: Unstable footage often looks low quality, even if the content itself is strong. Excessive shaking can make videos appear rushed or amateur.
-
Broken Cinematic Flow: Smooth motion helps scenes feel natural and immersive. Shaky clips interrupt visual consistency and weaken the overall storytelling experience.
-
Limited Editing Flexibility: Footage with heavy movement is harder to crop, stabilize, or reuse in post-production. This can reduce creative options during editing.
Fixing Shake Inside Premiere Pro - Stepwise Method
Premiere Pro is considered among the professionals’ first choice for improving video quality. Fixing shake inside this tool becomes simple with the Warp Stabilizer feature, which smooths handheld footage and reduces unwanted motion. Editors can customize smoothness, cropping, and stabilization methods for better results. Combined with proper trimming and motion settings, it helps create polished, cinematic videos. The steps below will guide you on how to stabilize video in Premiere:
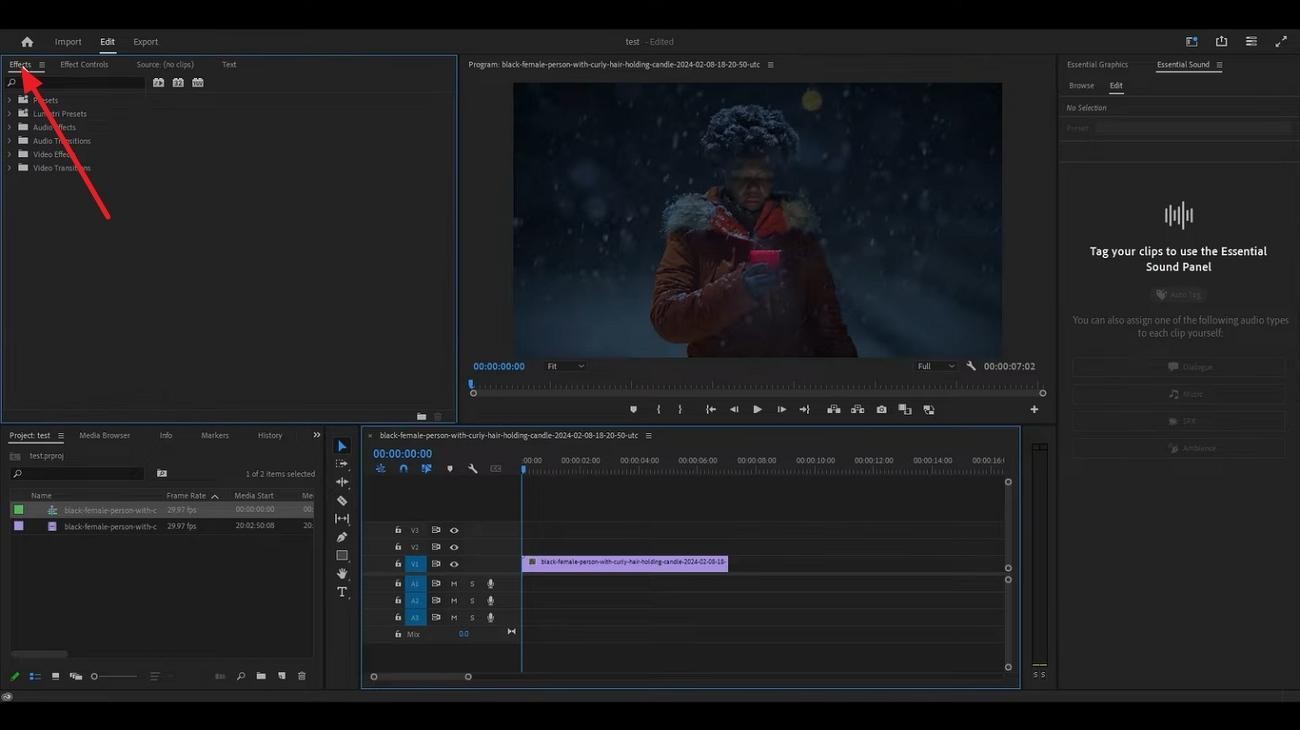
Step 1. Access the tool and import the shaky video to its interface. Next, head to the left side of the screen and expand the “Effects” menu.
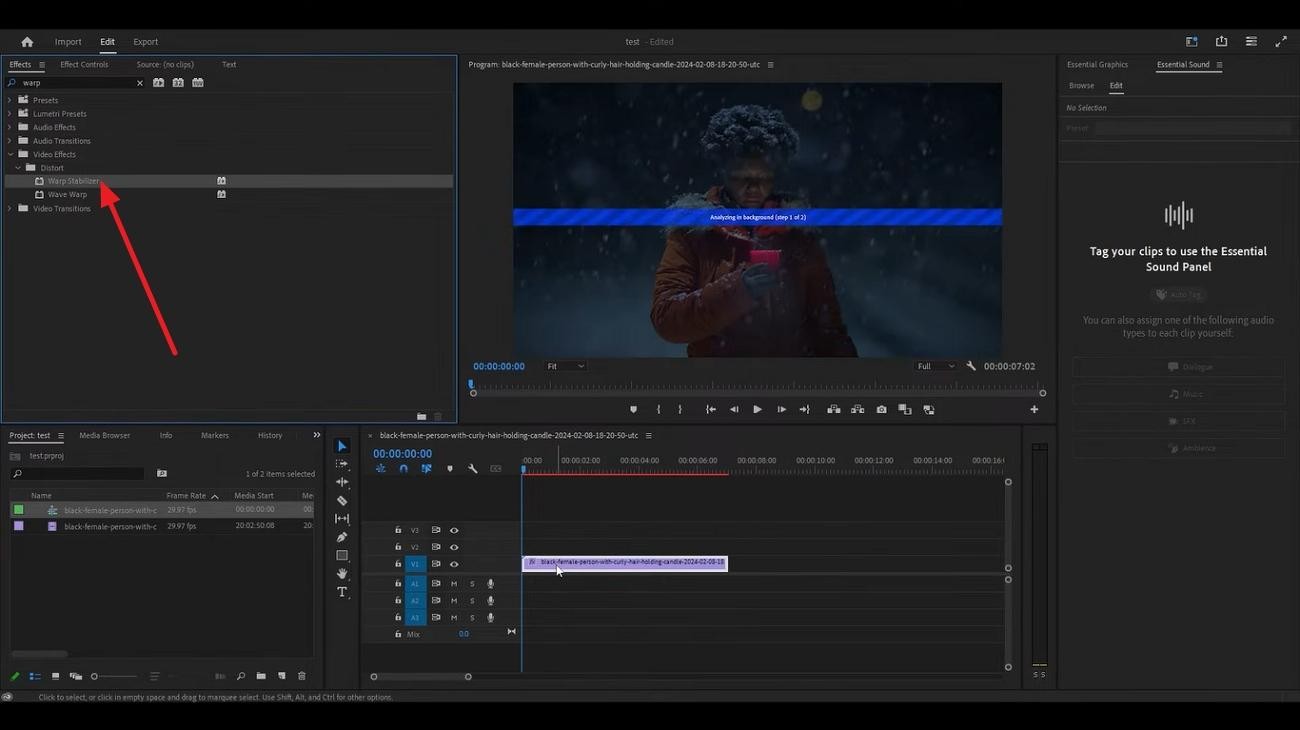
Step 2. Now, search for the “Warp Stabilizer” effect and drag it to the timeline to apply it to the video.
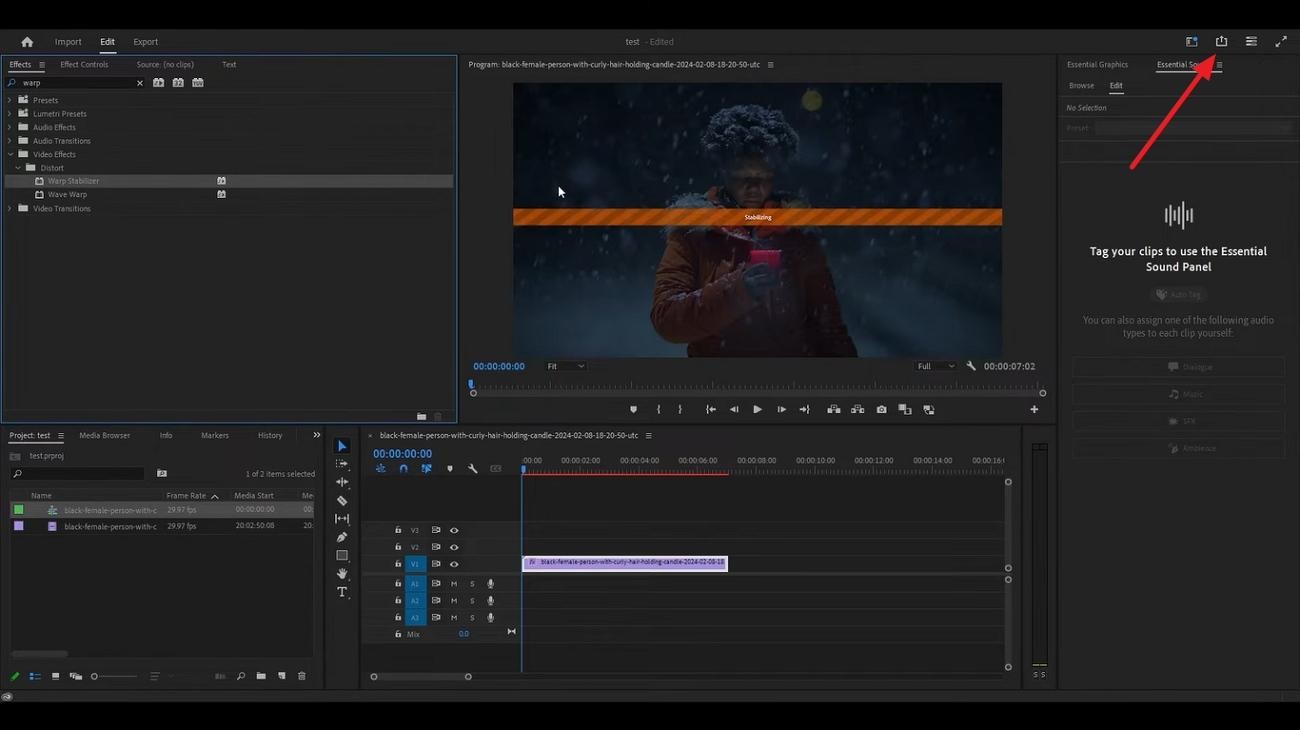
Step 3. The tool will start stabilizing the video as soon as the effect is applied. Once the results are generated, press the “Export” icon to save the results.
When Stabilization Gets Weird: Advanced Settings & Troubleshooting in Premiere Pro
When Premiere Pro stabilization starts looking weird, the issue is usually that Warp Stabilizer is over-analyzing motion. Mentioned below are some of the troubleshooting settings that can help users who wonder “how to stabilize a video in Premiere” resolve this issue:
-
Subspace Warp: Switch to “Position” or “Scale” to stop unwanted warping and distortion.
-
Decrease Smoothness: Reduce the smoothness to 2 to 0% instead of the regular 50% to avoid over-stabilization.
-
Advanced Analysis: Use the “Advanced” submenu for more detailed motion analysis on very shaky or complex footage.
-
Match Sequence: Verify sequence settings exactly match clip settings to prevent the stabilization from getting weird.
-
Split the Clip: Cut the clip into multiple sections with less motion per section and analyze each separately.
Try The Best AI Video Stabilizers That Don’t Crop
Adobe Premiere Pro stabilize video is known to be an advanced video editing tool with effective video enhancement features. However, the manual process can get tedious and error-prone at times. To make up for that,After stabilization, Warp Stabilizer crops the frame — sometimes noticeably. Zawa Video Enhancer can restore edge detail and upscale the cropped output to 1K, 2K, or 4K, recovering sharpness that the crop removed. This platform eases the video enhancement process by offering a simple drag-and-drop upload.
Zawa Video Enhancer runs in the browser — free to try with new-user credits, no desktop install required. The interface of the tool is pretty simple as compared to other tools, which offer complicated user interfaces. In addition to video enhancement, it offers features such as AI background removal, AI watermark removal, and AI-generated trending videos. Both beginners and professionals can use Zawa to create and enhance content efficiently.
Why AI Is Changing Video Stabilization?
-
File Format Support: Supports MP4, M4V, MOV, AVI, and 3PT formats — upload directly, in bulk, or paste a social media link.
-
Batch Video Enhancements: This platform enables batch video enhancements and saves time required for individual quality upgrades.
-
Social Media Video URL Support: Besides uploading a video from their device, users can paste a video URL of TikTok, Instagram, and YouTube videos for quick enhancements.
-
Video Result Previews: After upgrading your video quality, you can take a look at the results before downloading them to your device
-
High Quality Video Upscale Options: Professionals looking for high-quality results can select the video quality as 4K and 30 FPS.
Step-by-Step Guide: Stabilizing Video With Zawa
Zawa AI Video Enhancer is a quick fix to shaky, handheld videos. Follow the guide below and learn how to stabilize a shaky video using this tool:
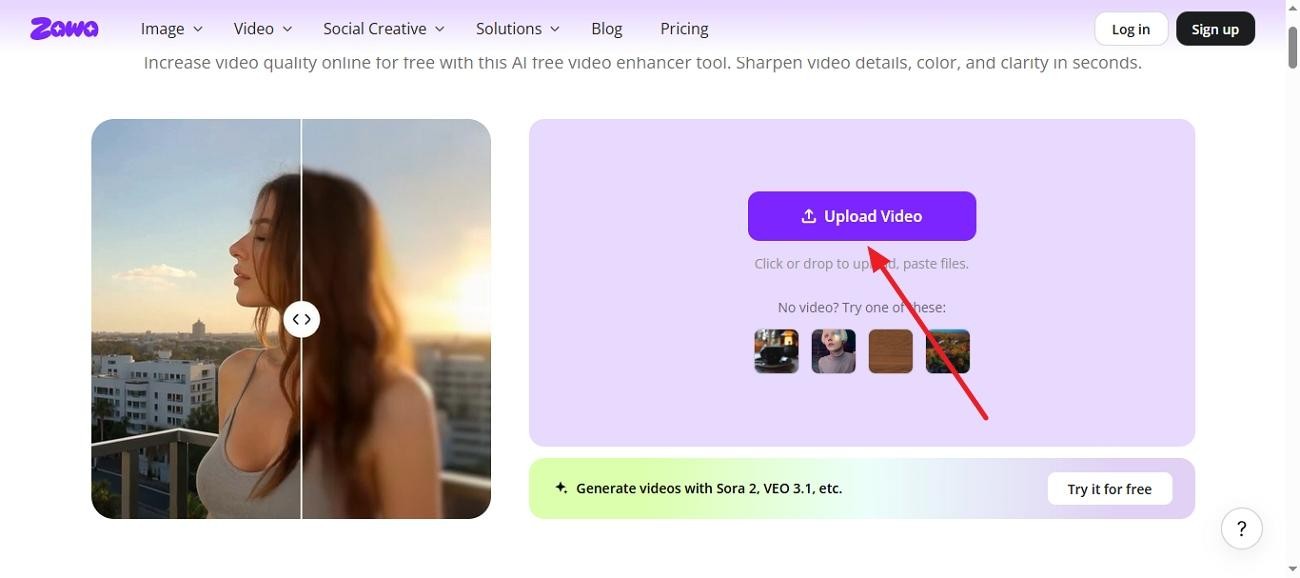
Step 1. Upload the Video for Upscale
To start the process, click the “Upload” button and select the shaky videos from your device. You can also upload batch videos or paste an online video URL for enhancement.
Step 2. Select target resolution and enhance
In the output panel, select 1K, 2K, or 4K as your target resolution. Click Enhance — the tool processes each frame and reconstructs detail at the higher resolution, outputting at 30FPS.
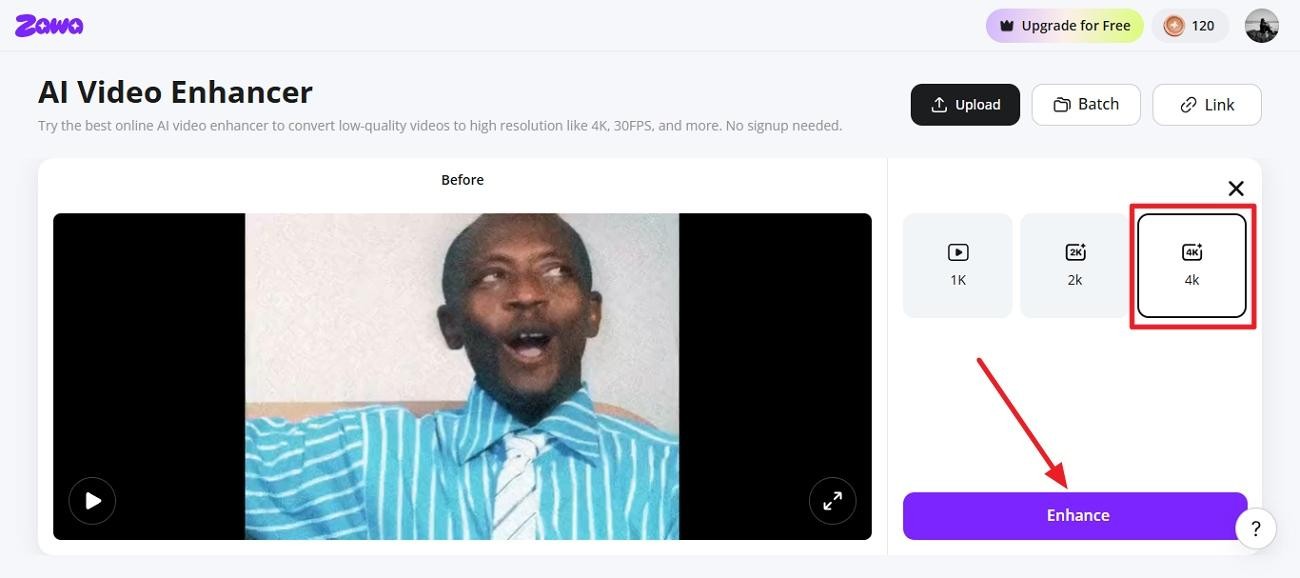
Step 3. Preview and Download the Video
Once the video is stabilized, preview it on the next page and click the “Download Full video” button to save it on your PC.
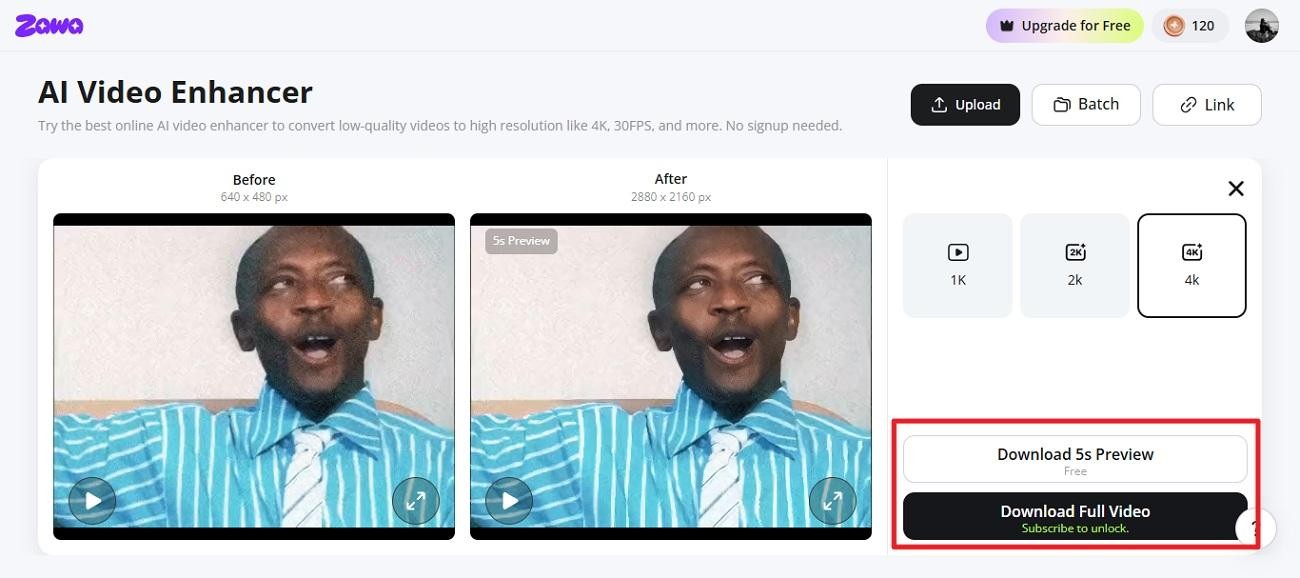
4 Tips & Common Mistakes: How to Avoid Shaky Footage
It can be seen that removing a video’s shakiness can be a time-consuming process. Users can successfully avoid shaky footage in the future by following the tips below:
Use Tripods and Gimbals Instead of Relying Solely on Software Stabilization
Physical stabilization tools help prevent shaky footage before recording begins. Tripods are ideal for static shots of videos. Gimbals create smoother motion during movement. Hold the camera firmly and move slowly to reduce unwanted vibrations if the tools are not available.
Keep Camera Movements Smooth and Avoid Over-Stabilization
Controlled camera movements create a polished appearance. Fast or sudden motions can make footage feel distracting and harder to stabilize. Avoid too much software stabilization because it can make videos look unnatural or overly processed.
Use the Right Camera Settings
Proper camera settings improve motion quality and reduce visual issues during stabilization. Following the 180-degree shutter rule helps maintain natural-looking motion blur and smoother playback. Incorrect shutter settings may cause footage to look choppy or jittery after stabilization
Stabilize Early and Check Your Composition
Applying stabilization early in the editing process helps maintain consistent quality throughout your workflow. Since stabilization often crops the frame, always review your composition after making adjustments.
Conclusion
All in all, video shakiness is common in footage recorded by phones and GoPros. This article explained how to stabilize video in Premiere Pro and the significance of video stabilization. Premiere Pro offers a manual feature for enhancing video quality by removing unnecessary motion. However, Zawa provides its users with an AI feature of video enhancement that eliminates the need for manual input.
FAQs
-
Why does Adobe Premiere Pro crop video after stabilization?
The tool crops footage because the effect shifts frames to smooth camera movement. This creates empty edges around the video. The software zooms in slightly and adjusts framing to hide these gaps.
-
Why is Warp Stabilizer taking so long?
This effect can be slow because it analyzes every frame to detect movement and apply corrections. This is great for high-resolution or long videos. The processing time may increase if your computer has limited resources or the footage contains heavy camera shake.
-
Can Warp Stabilizer fix extremely shaky footage?
The effect can improve mild to moderate shakes in your video. Severely unstable clips may still look distorted or warped after processing. Recording again or using a video enhancer like Zawa can sometimes deliver better stabilization results.
-
Can AI stabilize shaky videos?
Video tools can reduce camera shake by intelligently analyzing motion and smoothing unstable frames. AI stabilization is especially useful for handheld footage and can often improve clips with minimal manual editing.
-
Does stabilization reduce video quality?
The feature can reduce quality because software often crops or stretches parts of the frame to smooth movement. However, the final video usually looks much cleaner and more professional despite minor quality loss.
You May Be Interested

10 Best AI Video Enhancers to Upscale Your Videos

15 Best AI Video Generators in 2025
10 Best AI Video Enhancers to Upscale Your Videos

10 Best AI Photo Enhancers to Try in 2026

Gemini Images Too Blurry? Here’s How to Make Them Crystal Clear in Seconds
How to Resize an Image Without Losing Quality: A Beginner’s Guide