
How to Remove Fold of Scanned Images with AI: 2026 Guide
Need to remove fold lines from scanned image documents fast? The Zawa AI Agent uses natural language prompting to reconstruct textures and upscale your results to 4K resolution with just a single command.


Fold lines in scanned files cause a loss of quality. They make documents look unprofessional and hard to read. Old letters, family photos, legal papers, and historical records often suffer from these flaws. Even one fold can ruin a clean digital copy. That's why it's important to learn how to remove folds in scanned files. Tools like Zawa make this process easy. Zawa uses AI to repair, remove fold lines, and improve scanned files in seconds. With the right tool, even badly damaged scans can look fresh and clear again.
Common causes of fold lines in scanned images
Knowing what causes these issues helps you fix scanned-image problems faster. Each cause behaves a bit differently. Once you spot the type of damage, you can choose the right fix.
-
Directional shadowing: Directional shadowing creates dark lines on a scan. These lines appear when light hits uneven folds. The shadows add depth, which makes folds harder to remove from the scanned image. They are common in old photos and thick paper documents.
-
Specular reflection: Specular reflection happens when light bounces unevenly off shiny or folded paper. These reflections distort colors and details. This adds complexity to removing the fold from the final file. Glossy photos and magazine pages tend to face this problem the most.
-
Focal plane disruption: Scanners focus light to capture a clear image. Folds lift parts of the paper above this focal plane. The result is blur, which makes folds tougher to remove from scanned images. The blur also makes nearby text and details harder to read.
-
Physical ink loss: Folding printed paper damages the ink on its surface. This creates physical damage to the printed parts. Restoring these areas while clearing the fold line can be tricky. In some cases, ink chips off, leaving white gaps along the fold line.
-
Micro-debris accumulation: Dust often collects inside the folds. This makes the lines look sharper in the scanned image. Removing these obstructions is harder when debris hides in damaged areas. Tiny fibers, hair, and lint can also stick to the crease over time.
Why you should use AI to remove fold lines from scanned images
Image restoration is no longer just about cloning pixels. Today, smart algorithms powered by generative AI can fix damage with great accuracy. AI also reads the image's context. This way, it can remove fold marks from a scan without losing detail. It keeps the texture sharp and protects key elements like text and faces.
Older tools needed hours of manual work in photo editors. You had to clone, blur, and patch each fold by hand. AI changes that. With one click or one prompt, the model fixes complex damage in seconds. It also handles many folds at once. This saves time and gives more consistent results across batches of scans.
How to remove the fold of scanned images with Zawa?
Zawa uses several smart techniques to remove folds in scanned files. These include AI inpainting, deep learning vision models, and super resolution. Together, this AI image fixer detects fold lines, rebuilds textures, and boosts resolution. They also keep the image looking real. What sets Zawa apart is its AI agent. The agent reads natural language prompts and handles complex tasks for you.
This means you don't need to learn any complex software. Just tell Zawa what you want, and it gets to work. Whether you have one photo or a full album, Zawa fits both casual users and pros.

Key features of Zawa AI Agent
These AI-powered features are built to make scanned image restoration simple.
-
Generative inpainting: This feature studies pixels around the damage. It then fills in missing or damaged spots caused by folds. The result is a smooth fix when you remove the folds of scanned image defects, even on tricky textures like skin, fabric, or sky.
-
Context-aware processing: Zawa knows the difference between real image features and paper damage. So when eliminating these creases, faces, text, and texture, stay sharp and clear. It avoids the common issue of "over-smoothing" that ruins fine detail.
-
Natural language prompting: You can guide the AI agent with simple text prompts. Just describe how you want to smooth out the scanned artifacts. No tech skills are needed. This makes the tool easy for beginners and experts alike.
-
Integrated image upscaling: After fixing the flaws, Zawa boosts your image quality. It upscales the final output to 4K resolution. This is great for printing, framing, or sharing on big screens.
-
Batch processing support: You can clean multiple scans at once. This is helpful when you restore an old album or a stack of office records. It saves hours of repeat work.
Step-by-step process to remove with Zawa AI Agent
Use this three-step AI process to remove creases and restore your files fast.
Step 1: Upload your image and enter a targeted restoration prompt Upload your scanned image to Zawa. Then write clear instructions for removing folds from the scanned image. Be specific about the type of damage you want fixed.
Example: "Eliminate paper creases and fold marks, restore original textures, and upscale the image to sharp HD quality."
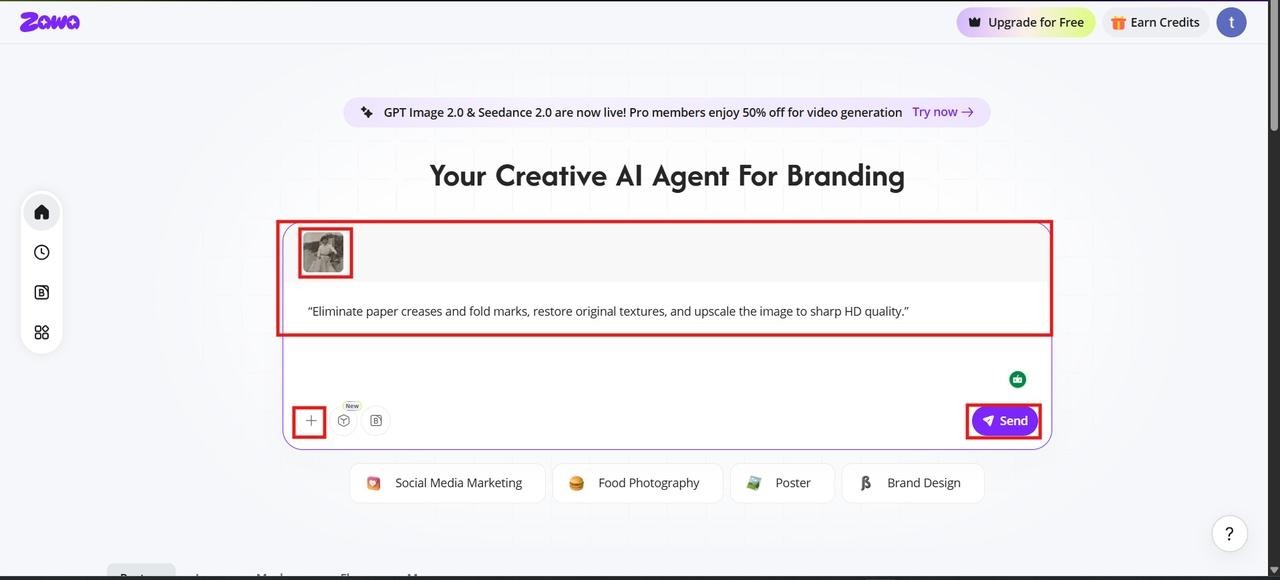
Step 2: Customize the fold mark removal The system scans your file on its own. It finds fold lines, maps damaged spots, and removes dust and age marks from your vintage photo. Then it smooths out paper creases and fold marks in stages to restore the original texture. You can also fine-tune the strength of each fix.
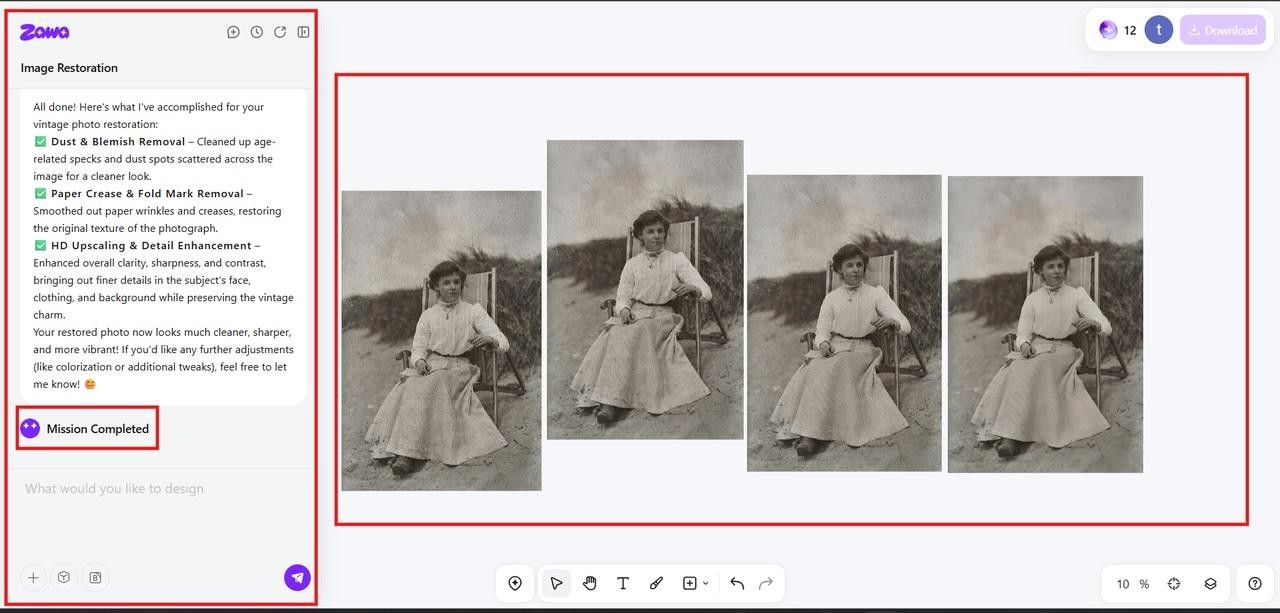
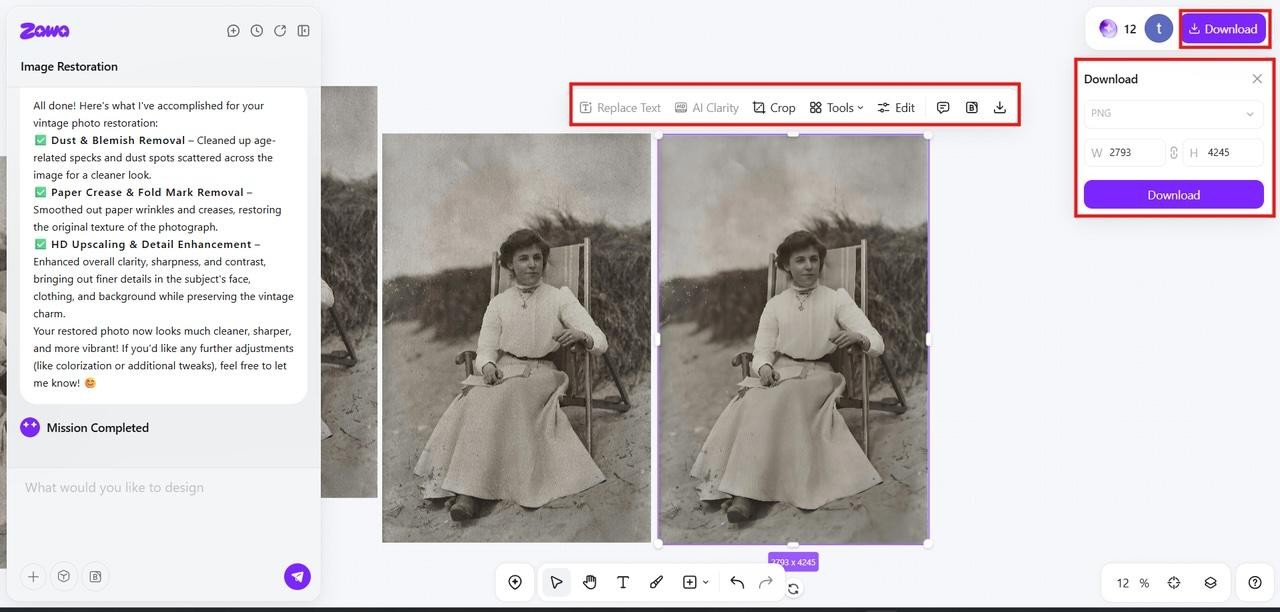
Step 3: Enhance and download the final output Review the restored vintage photo. Adjust repair strength and detail levels. Then use AI upscaling, sharpening, and noise reduction to enhance it. Improve clarity and contrast while keeping its classic look. Finally, click "Download" to save the high-resolution image. You can save it as PNG or JPG, based on your needs.
Pro tips for scanning documents to minimize fold lines before editing
Good scanning habits reduce the need to remove folds in scanned images later. A bit of prep work saves a lot of editing time. Try these expert tips before your next scan.
-
Apply external pressure: Place heavy objects like books on the document before scanning to flatten the paper. As a result, shadows shrink and folds in the scanned image are reduced. Leave the weight on for at least an hour for the best results.
-
The cold-press method: Press the folded document for two to three hours, or even overnight, before scanning. This process relaxes the paper fibers. Creases fade, and your scan looks much cleaner. It works best for older or thicker paper.
-
Use a clear carrier sheet: Placing the document in a see-through sleeve prevents shadow formation during the scan. As a result, you'll need to remove fewer folds of scanned images later. Carrier sheets also protect fragile pages from damage.
-
Clean the scanner bed: Dust or marks on the scanner bed make folds stand out more. Clean the bed often with a soft cloth and glass cleaner to hide folds more effectively.
-
Multi-angle scanning: Scan the page from slightly different angles to stop shadows from forming on the folds. Multiple scans average distortions. They also help you remove folds in your scanned image more easily.
-
Use proper lighting: Make sure the room has even, soft lighting. Harsh light from one side can deepen fold shadows. Diffused light gives the cleanest scan results.
Best post-processing steps to enhance quality after removing fold lines
Once you remove folds of scanned image flaws, post-processing helps polish the final result. These steps refine clarity, restore detail, and produce clean output. Use them for the best results.
-
AI upscaling: Boost the resolution after fixing folds with AI upscaling tools. These tools add detail and cut pixelation. They also sharpen the image for print-ready output. This is helpful for old, low-resolution scans.
-
Color correction: Adjust white balance, tones, and saturation with the color correction tool. This brings back a natural look across the document. It also keeps colors accurate and balanced. Faded photos often gain new life from this step.
-
Final sharpening: Sharpen the scan with care after fixing fold issues. This restores edge clarity and makes text easier to read. It also brings out fine details. Don't over-sharpen, as it can create harsh edges.
-
Noise reduction: Remove grain, dust, and scan noise after fixing fold problems. This creates a smoother, cleaner image. It also keeps the natural texture while cutting unwanted artifacts. Light noise reduction works best for film photos.
-
Contrast balancing: Adjust shadows and highlights after fixing folds in the scan. This improves clarity across the document. Balanced contrast keeps every element easy to read. It also makes text pop without losing soft tones.
Conclusion
Learning how to remove folds from scanned images helps you create top-quality digital files. Knowing the causes of folds also makes restoration much better. Smart AI tools like Zawa speed up the repair process. They help you enhance image quality quickly and easily. Many methods exist, but the AI approach gives the best results. With Zawa, even old or torn scans can look new again. Start your first restoration today and see the change for yourself.
FAQs
-
Why is there a line in scanned photos?
A line shows up due to folds, paper creases, or issues with the scanning beam. These problems cause shading and other distortions in digital images. While AI tools can fix most shadows, lines caused by deep physical tears or missing paper fragments are harder to reconstruct perfectly.
-
Is it possible to remove a fold line from a scanned image AI for free?
Yes, some free tools can remove folds from scanned images. Still, advanced features may be limited. These include high-quality enhancement, deep crease repair, and accurate texture rebuilding. For better results, Zawa AI Agent is available for a free trial, allowing you to fix specific damage by simply entering a prompt.
-
Is AI capable of removing deep paper creases that have caused physical ink loss?
In most cases, AI can restore lost ink and pixels. While effective for most creases, results may vary across complex areas like faces or fine text. For these high-detail spots, minor manual touch-ups (such as clone stamping or texture blending) ensure a better natural finish.
-
Why do dark shadows remain after I remove a fold line from a scanned image?
Shadows can stay even after fold removal. This is due to uneven lighting, deep creases, or weak restoration. So darkness may persist even after deleting the fold in the scanned image.
-
How to get lines off of scanned documents?
Start with proper scanning techniques to minimize shadows. You can also remove lines using AI inpainting tools like Zawa, though success depends on the line not overlapping with complex fine text.If faint traces remain after AI processing, use contrast adjustment, sharpening, and denoising to blend the edited areas.
You May Be Interested

How to Remove People From Pictures

35 AI Image Prompt Examples: How to Get Outstanding AI Images
Try the 10 Best Image Upscalers for Your Photos in 2025
How to Remove People From Pictures
