How to Increase the Resolution of Images: Easy Methods for High-Quality Results
Discover how to increase the resolution of images using practical methods that enhance clarity and detail. Get sharper visuals for print, web, and social media without distortion or quality loss.


A photo that looks fine on your phone can fall apart the moment you print it or view it on a larger screen. Resolution determines how much detail the file contains, and once that detail is gone, no tool can fully restore it. This guide walks through what resolution actually means, when it makes sense to increase it, and which method fits which situation.
What does image resolution mean?
Think of pixels as the individual dots that form every image. Pack more of them into a smaller area, and you get a sharper result. But more pixels alone do not guarantee quality. A poorly shot photo does not get better just because you force it into a higher resolution. PPI describes pixel density on screen; DPI describes the same concept for print. When you resize a photo, you either add new pixel data or compress the existing pixels into less space.
A 1920 x 1080 photo can look completely flat and muddy if it was captured badly. Meanwhile, a much smaller file shot in good light with a sharp lens can hold up at sizes you would not expect. Higher resolution gives you more to work with, but it cannot compensate for weak source material.
Why you may need to increase image resolution
Resolution requirements differ by output type. A file that works on screen may fail in print or at a large size. It is a big help. Sharp images hold up whether you're printing a poster, posting on social media, or sending it to a client.
-
Print requires at least 300 DPI at the final output size. A file with insufficient pixel density looks soft or blocky when enlarged. Pixel dimensions matter as much as DPI: a small file set to 300 DPI won't produce a sharp, large print without enough pixels to support the size.
-
Sharp product photos reduce ambiguity for buyers. Low-resolution images don't necessarily hurt conversions, but blurry visuals give a poor first impression that better images would avoid.
-
Social platforms compress uploads automatically. Starting with a higher-resolution file gives the compression algorithm more to work with, so the post holds up better than a file that was already marginal before upload.
-
Old or scanned images often have low pixel counts, fading, and compression from early digital formats. Upscaling can improve clarity enough for web use or moderate-sized prints. Details not captured in the original scan cannot be recovered.
-
Client work and marketing materials are viewed at sizes and distances where resolution issues become apparent. A file that passes on a laptop monitor can look noticeably soft on a printed banner or a large display. Over-sharpening to compensate tends to make things worse rather than better.
Tested Methods to increase the resolution of images
Four methods are covered below: an AI-powered online tool, Photoshop, built-in system editors, and mobile apps. They differ significantly in how much control they give you and what kind of results to expect.
Method 1: Using Zawa AI image enhancer (online tool)
Zawa AI image enhancer takes a different approach than basic resizing tools. Instead of stretching existing pixels to fill a larger canvas, it analyzes the image and rebuilds edges and textures based on the surrounding details. The output tends to hold up better at closer viewing, particularly on portraits and product images.
For files that are already heavily compressed or very low-resolution, reconstruction has less to work with. Edges can come out looking too clean, almost painted, which is a sign that the tool ran out of real detail to reference.
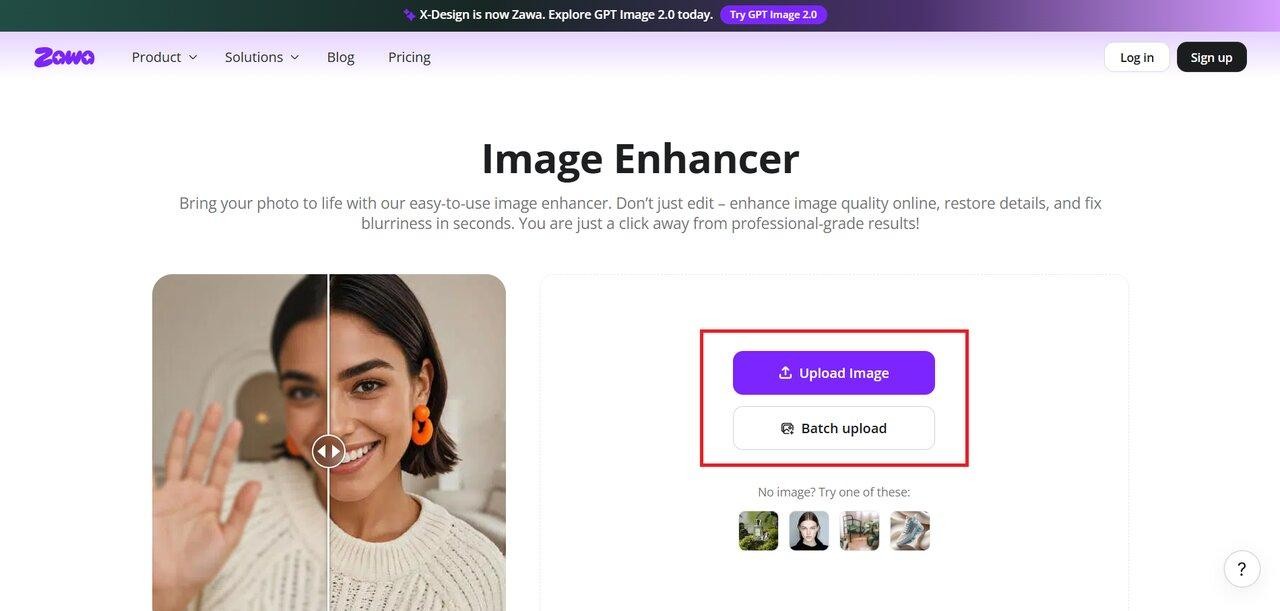
Step 1: Upload your image
Head to the Zawa image enhancer in your browser. Drag your file in or use the upload button. JPG, PNG, and HEIC all work.
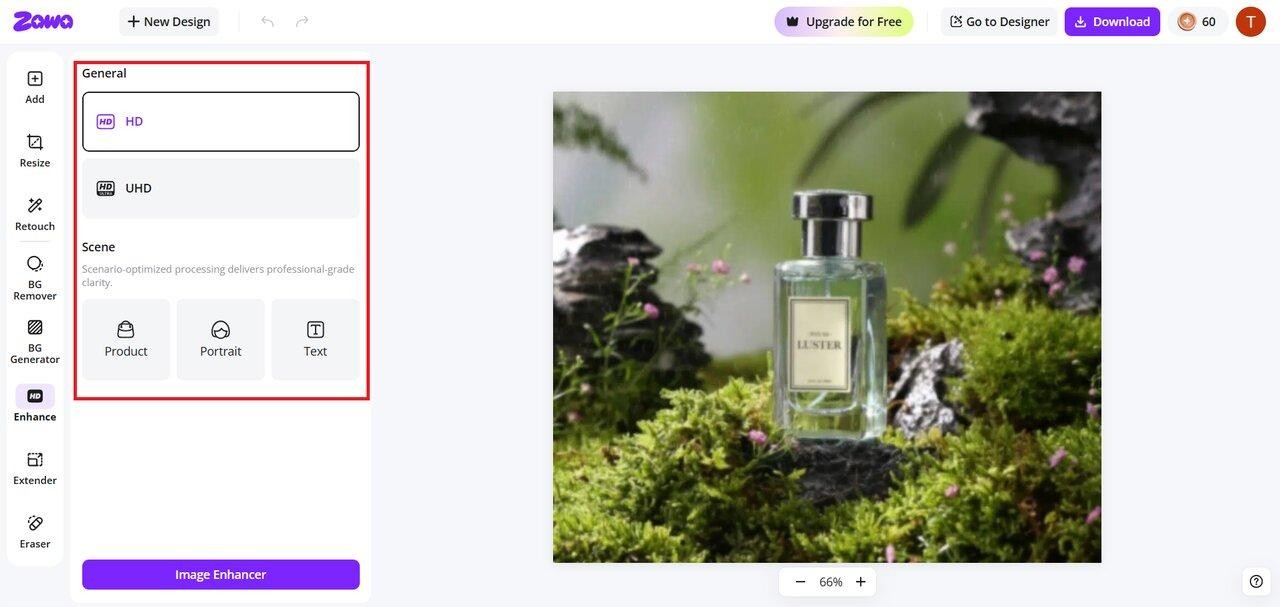
Step 2: Choose enhancement level
Select the desired enhancement level, such as HD or UHD resolution, or choose a specialized mode for portraits, products, or text to optimize results based on your image type.
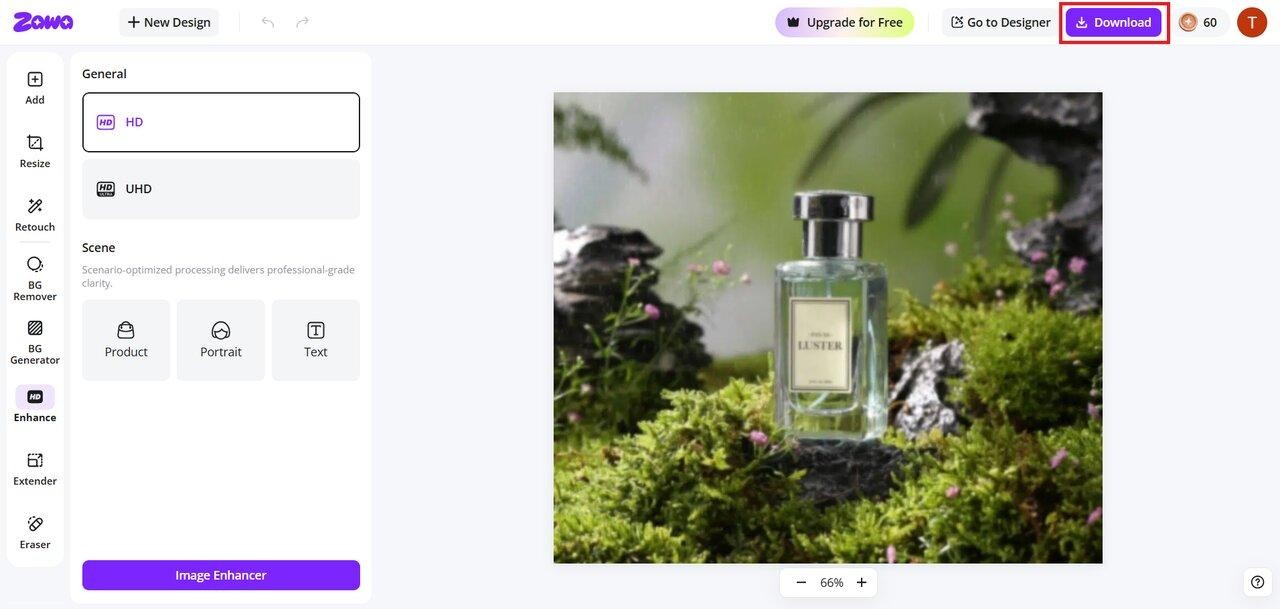
Step 3: Process and download
Processing happens automatically. When it finishes, zoom into the areas that matter most before downloading.
Hands-On Test:
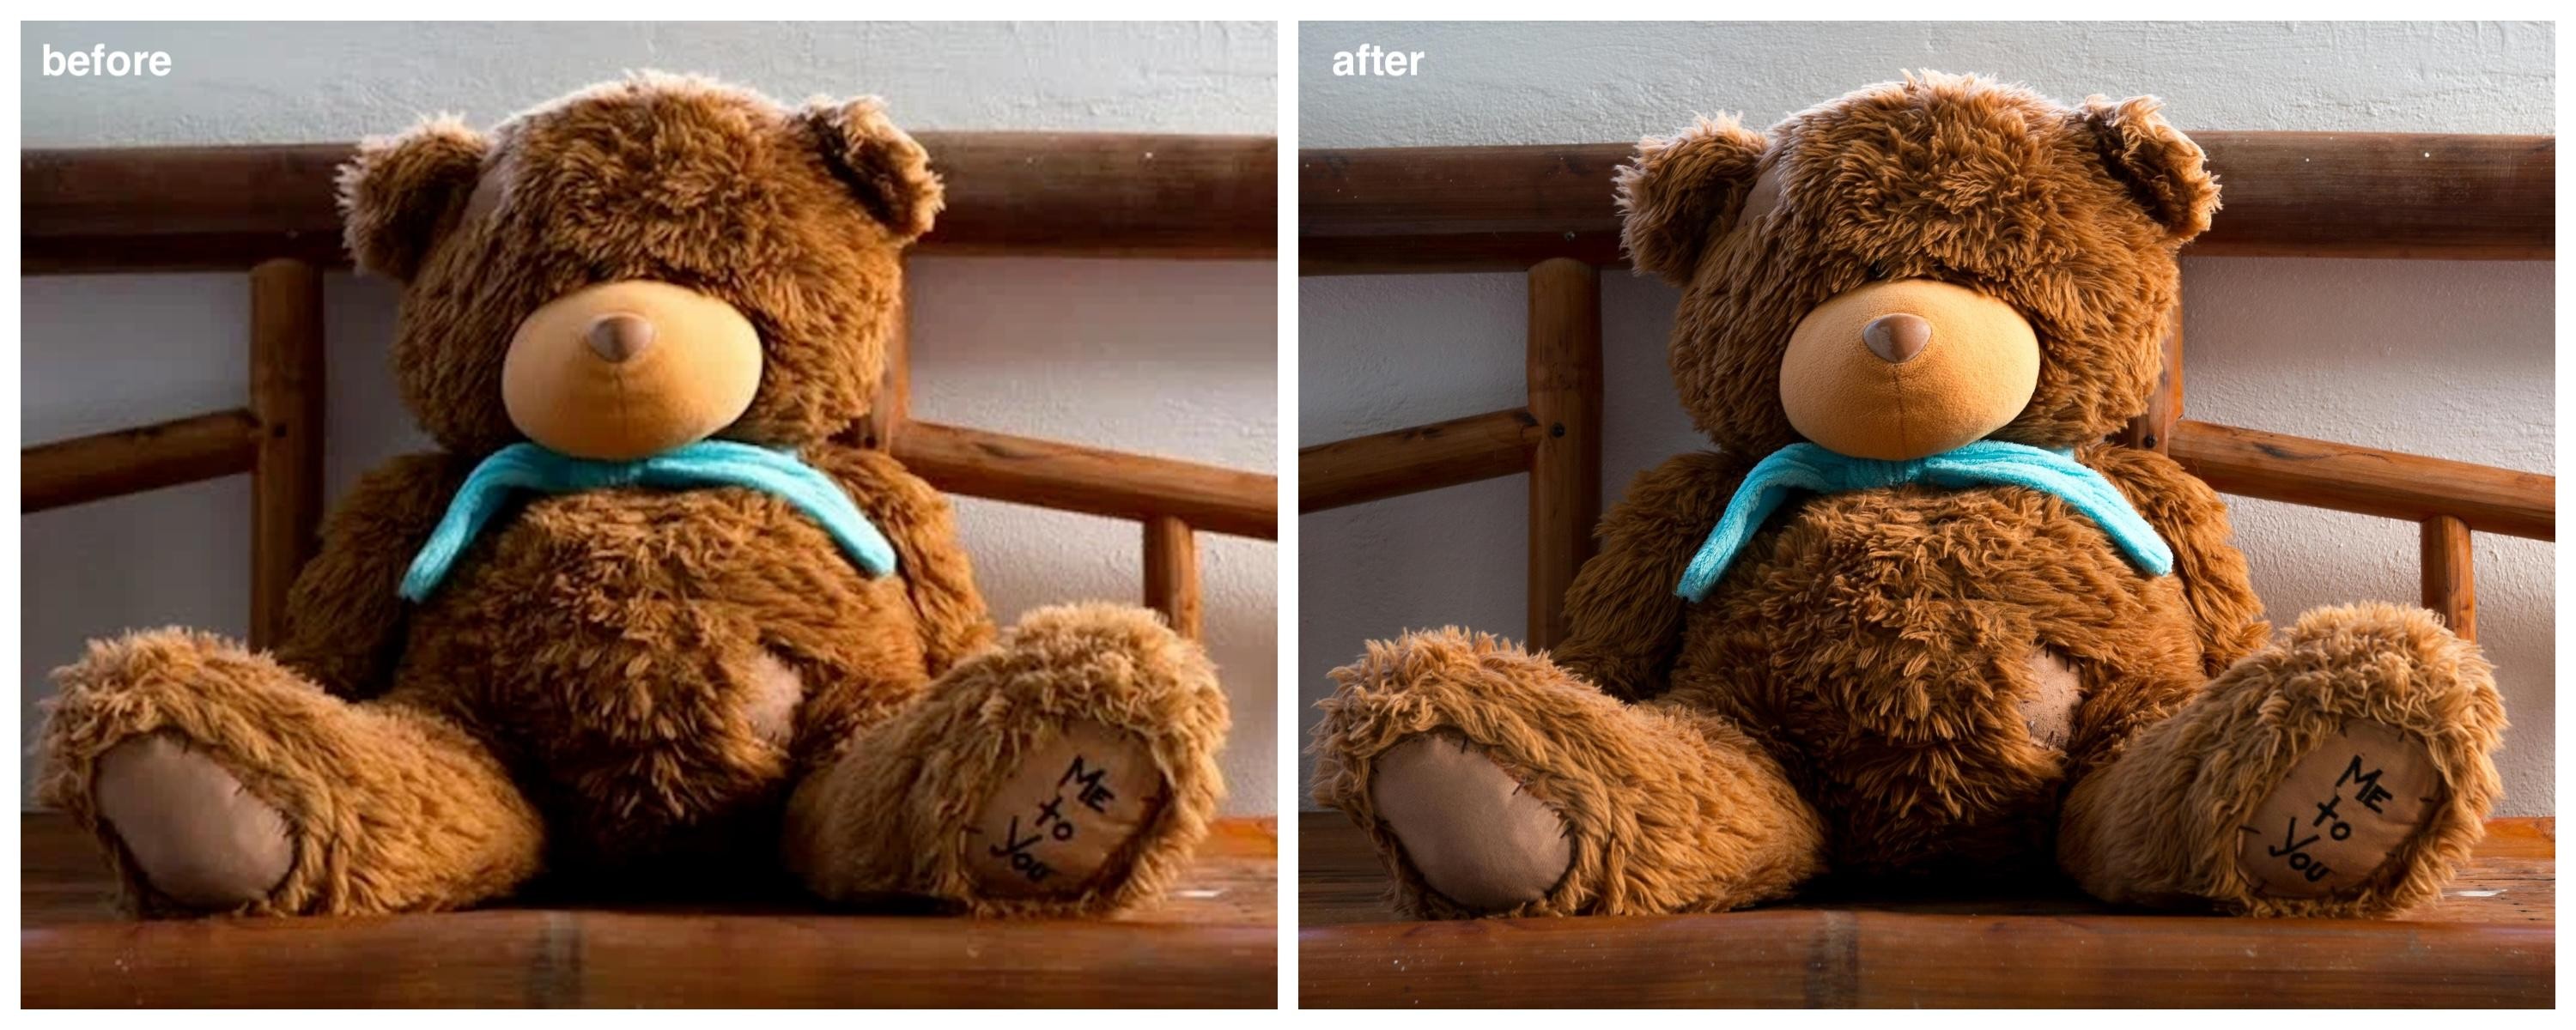
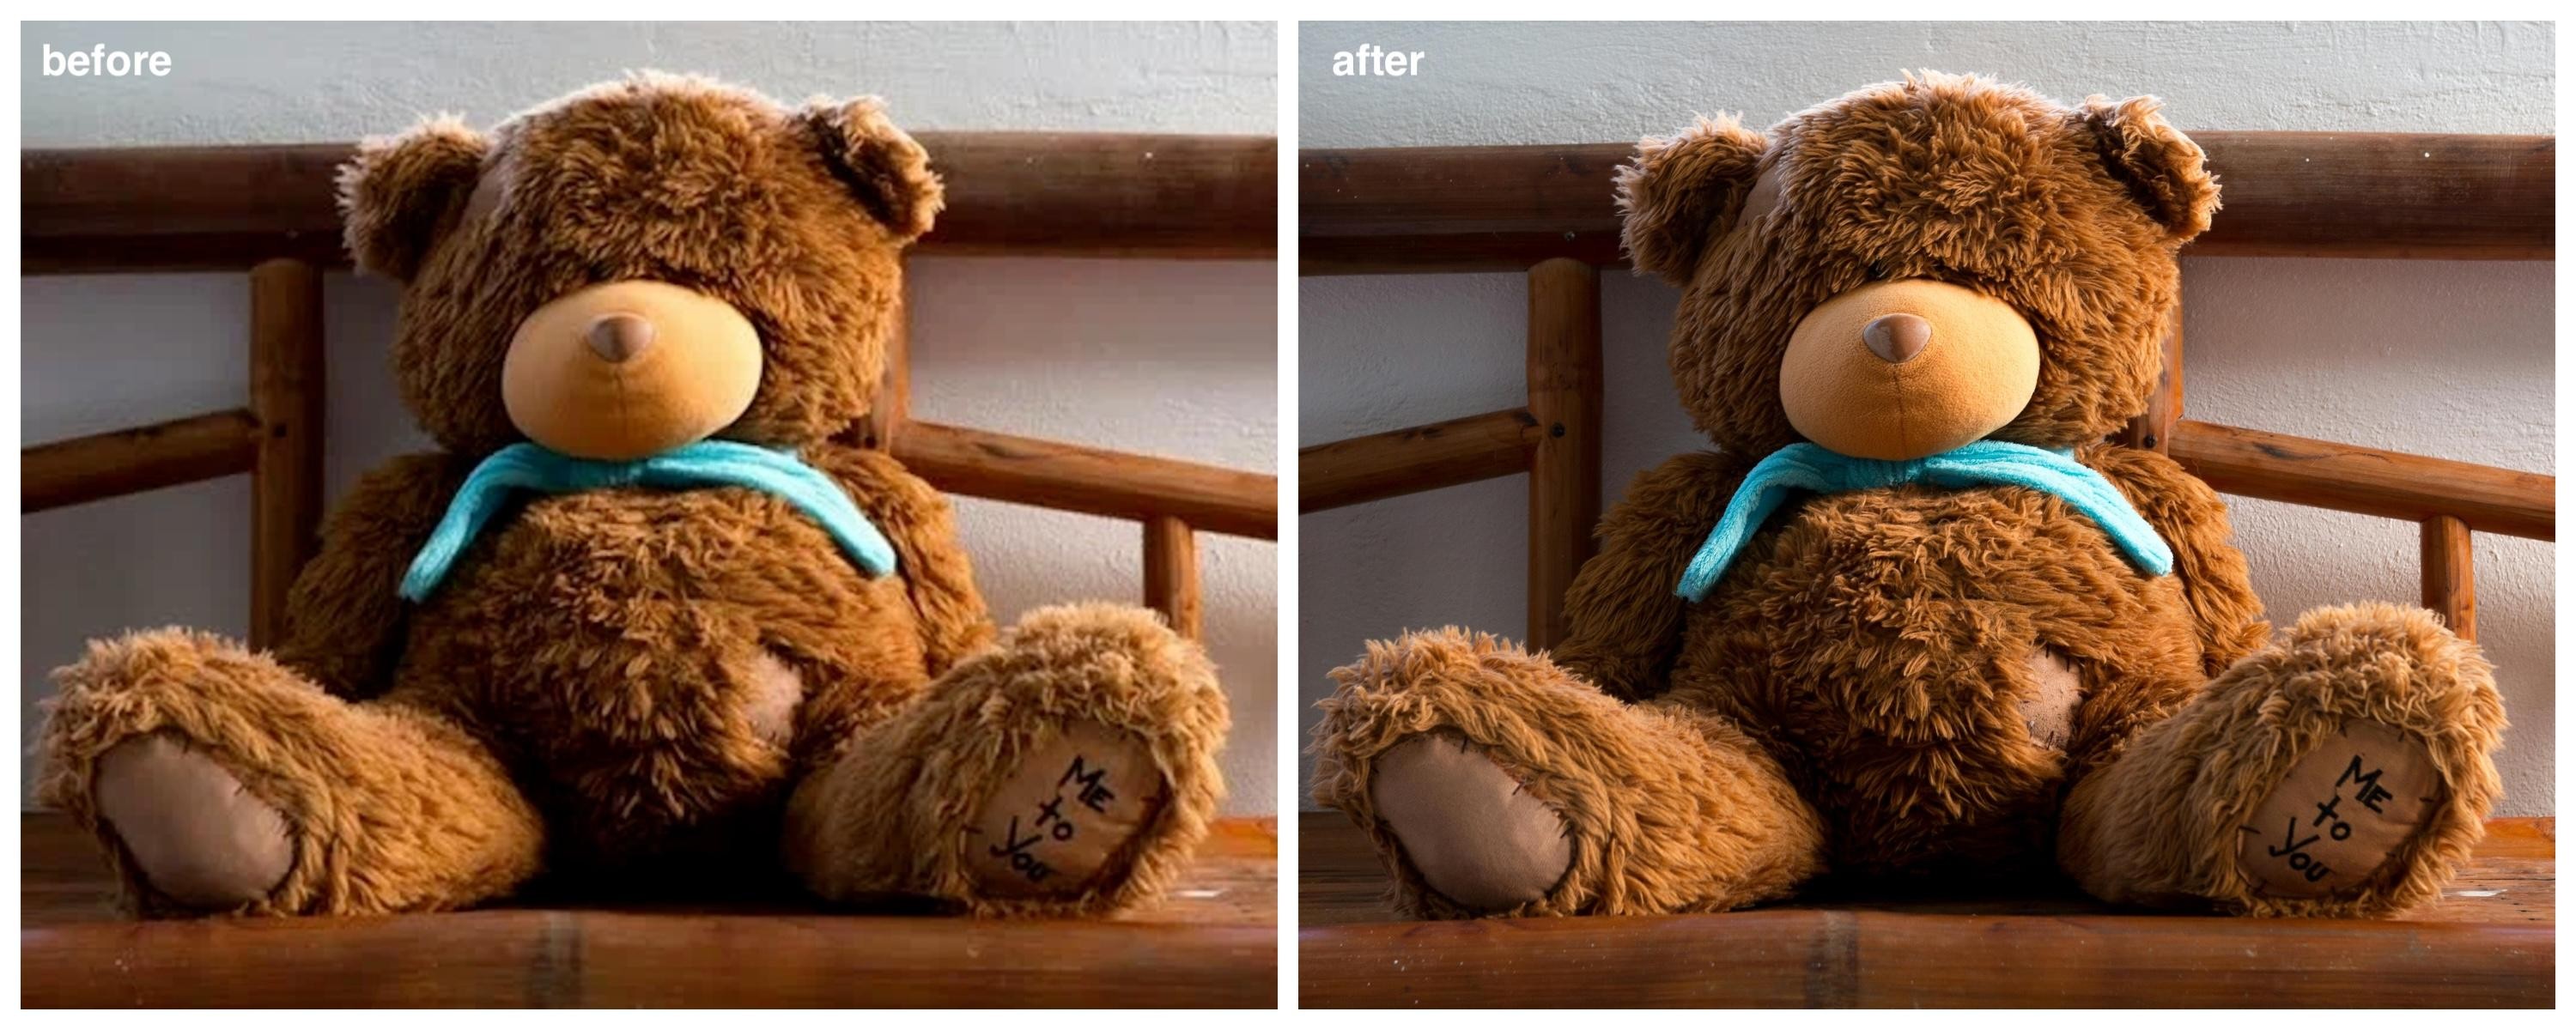
Zawa boosted image resolution in under two minutes. The "after" shot shows much sharper textures, especially in the teddy bear's fur and the text on its foot. While the edges are cleaner, very blurry areas can sometimes look a bit too smooth or "painted". Overall, it is a fast way to get high-quality results, though the final look depends on the quality of your original file.
Best for:
Suited for non-designers who need a faster result without manual editing. Works well for web images, social media, and moderate-resolution print. Not a substitute for a high-quality source file.
Method 2: Increase image resolution using Photoshop
Photoshop offers true control. You set the pixel dimensions, adjust the DPI, and choose the resampling method yourself. That level of hands-on control produces better results when the output actually matters, but it takes longer than a single click. If you're in a rush or unfamiliar with the settings, the learning curve can slow you down.
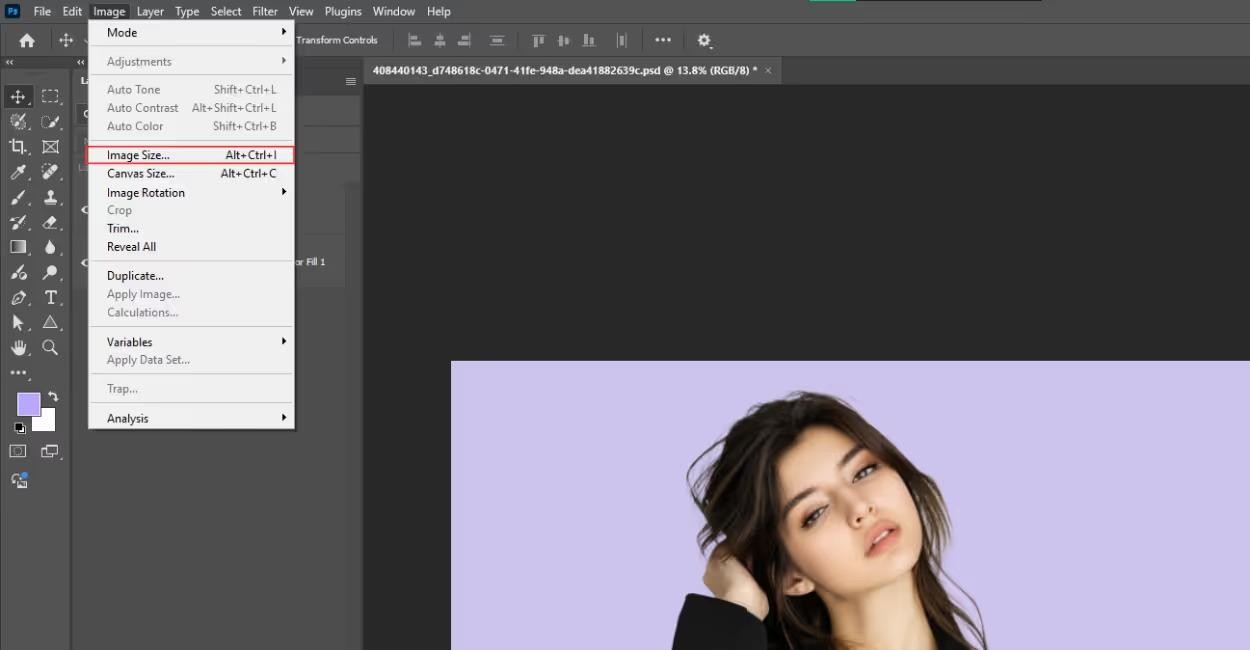
Step 1: Open the image and access the image size
Open your image. Then head straight to Image → Image Size. You'll see dimensions, resolution, and a few options that might look confusing at first.
Step 2: Adjust resolution and resampling
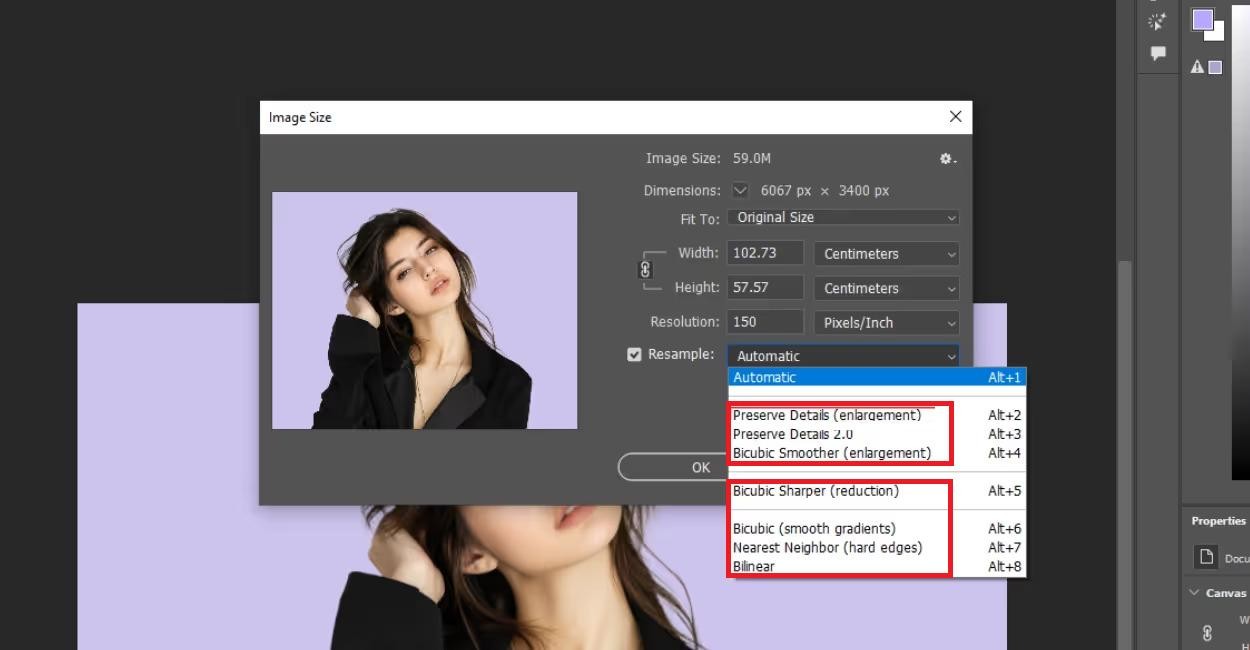
Turn on "Resample." Pick Preserve Details 2.0 from the dropdown. Now increase the pixel dimensions or DPI to increase picture resolution. Watch the preview closely.
Step 3: Preview and export the image
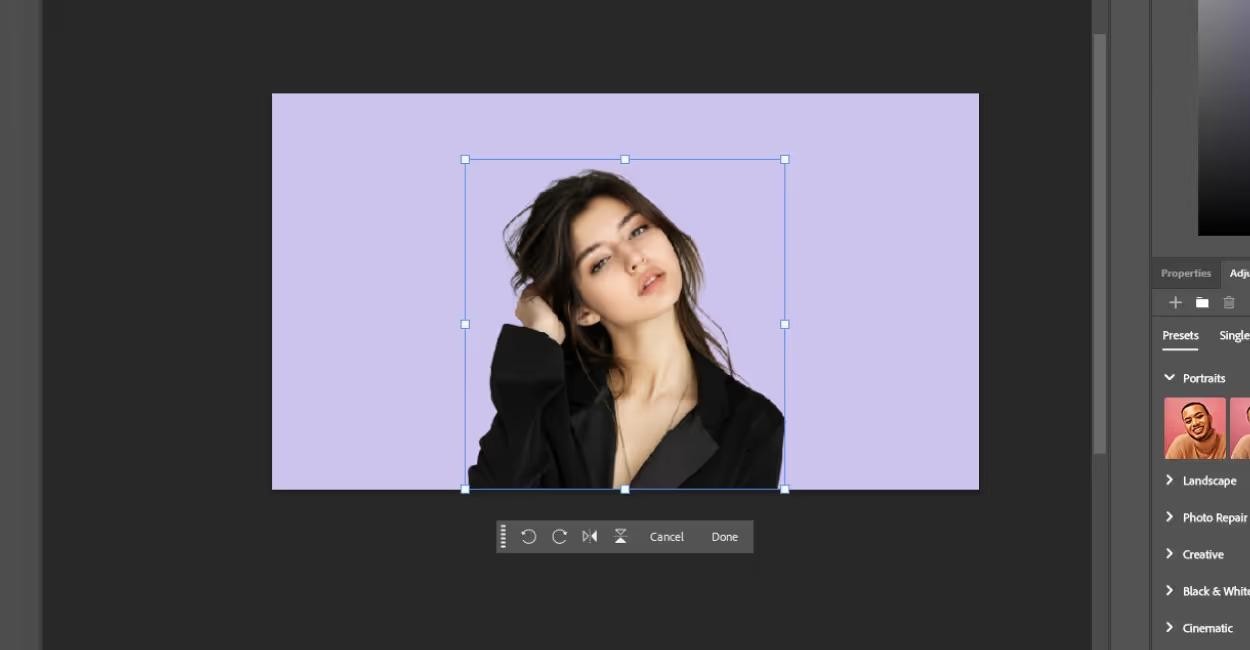
Zoom into edges and fine detail in the preview before committing. Halos or fringing are signs that the sharpening went too far. PNG gives you a cleaner export; JPEG works if you need a smaller file, and the quality loss is acceptable.
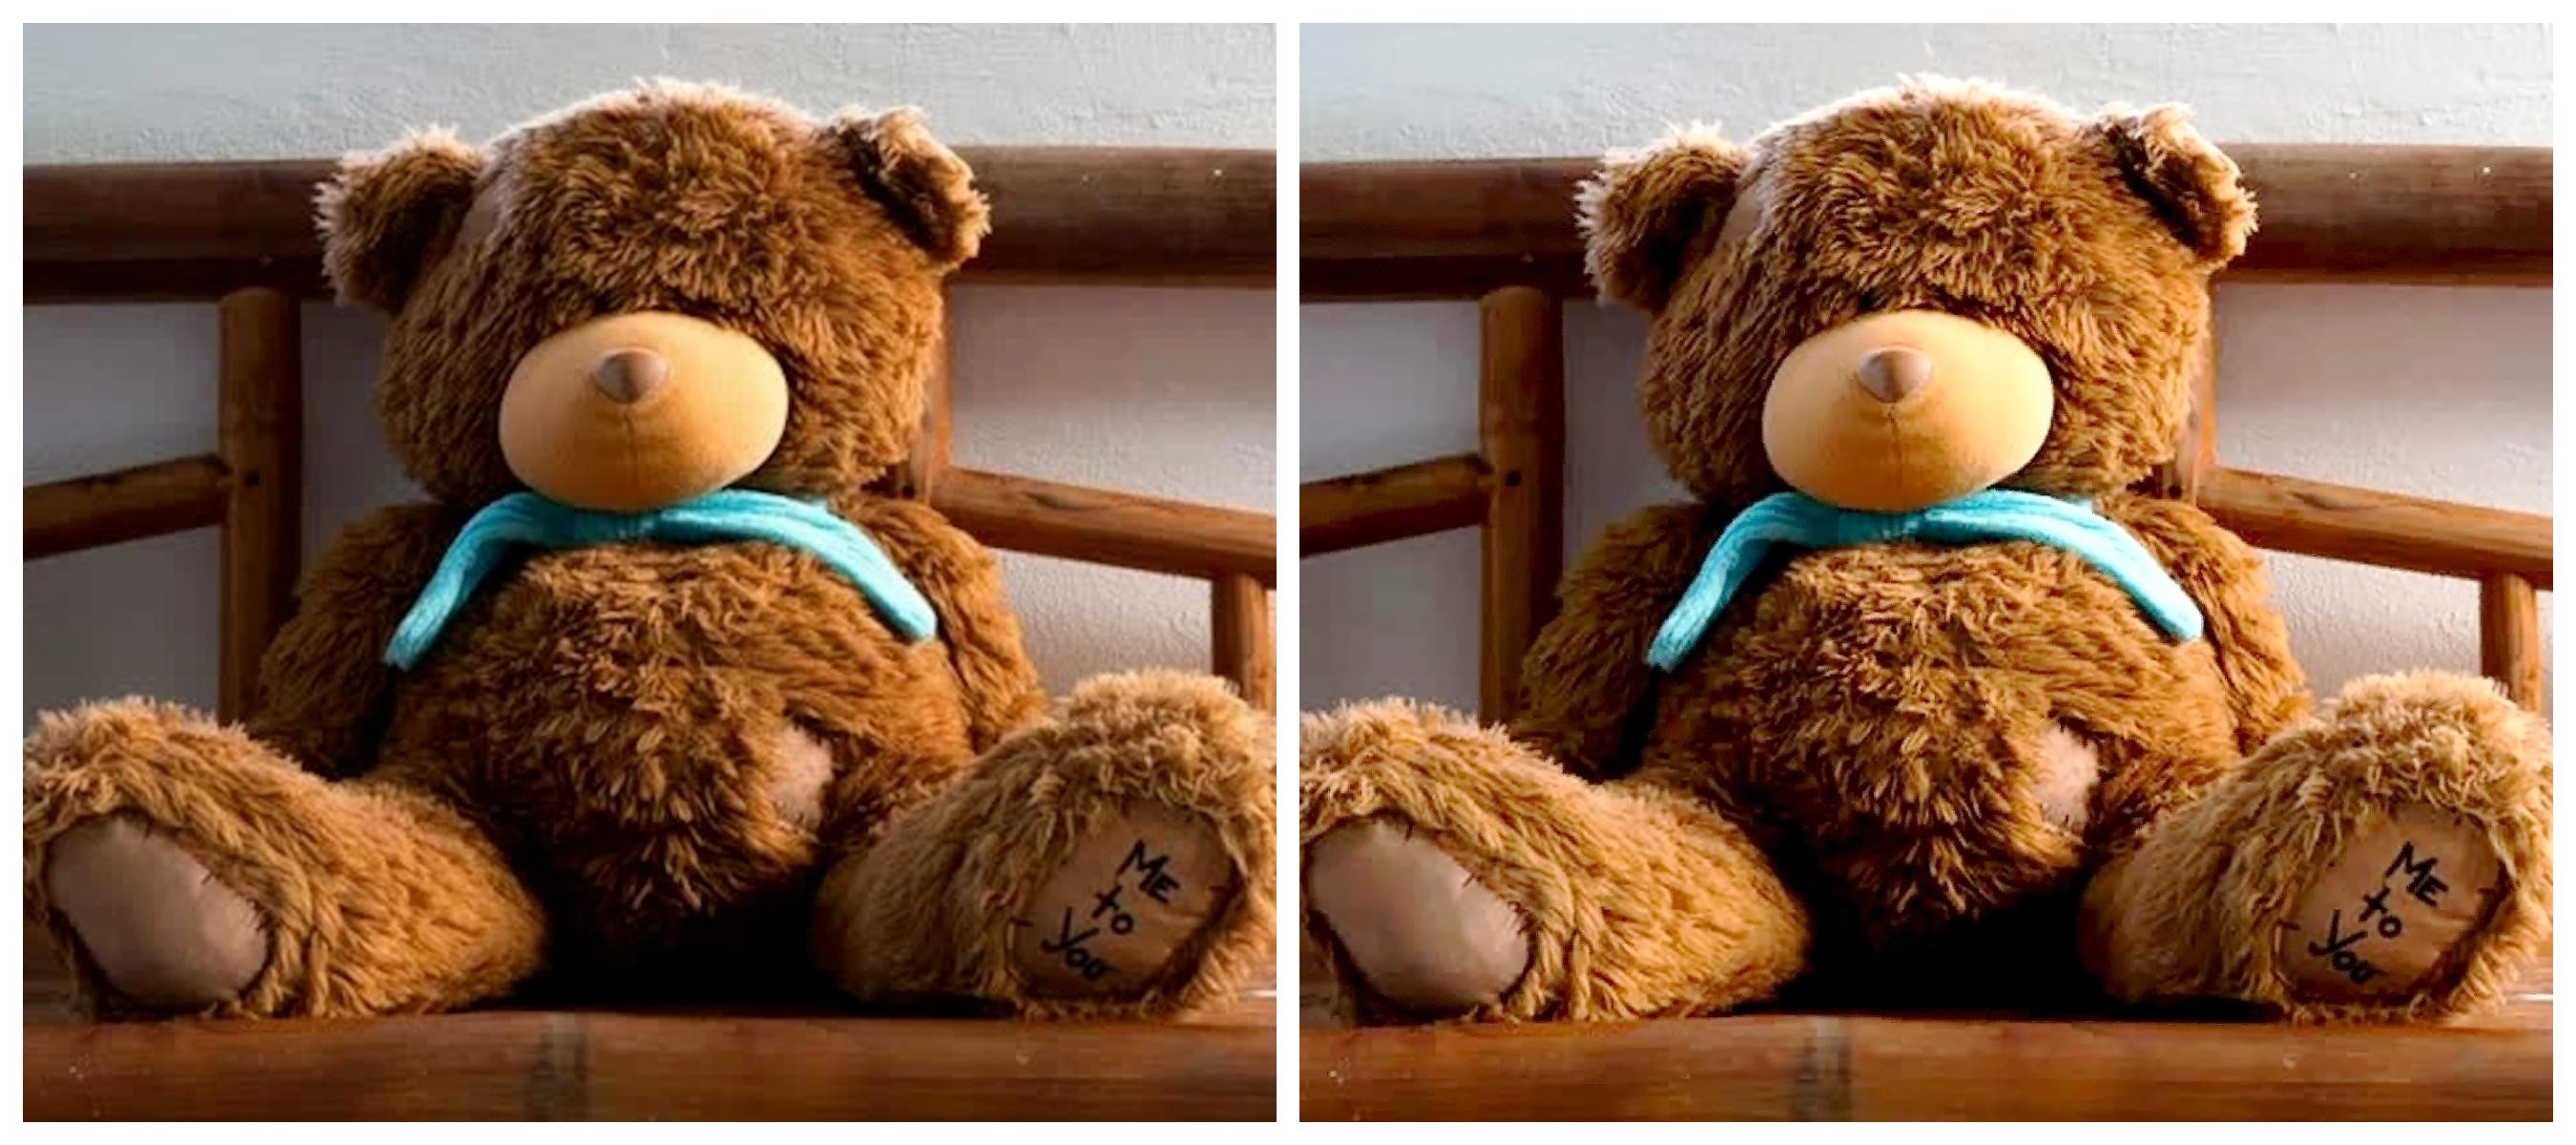
Hands-On Test:
Photoshop's Preserve Details 2.0 option made the inscription on the foot more readable and sharpened the edges. The fur is less blurry now, but the device is not generating missing organic textures. It's only sharpening what is already there.
Best for:
Photoshop makes sense when you need full control over how upscaling is applied. Photographers and designers working on print output will get the most from the manual settings. However, it requires a relatively clear source image; if the original is too blurry, it will only sharpen the flaws. While it improves edge clarity, it cannot restore lost organic details like hair and skin grain.
Method 3: Increase the resolution of pictures manually (without tools)
Neither Windows Photos nor Mac Preview does anything clever when you resize. They just spread the pixels you already have across a larger canvas. The file gets bigger; the image does not get sharper.
Step 1: Open the image in the system editor
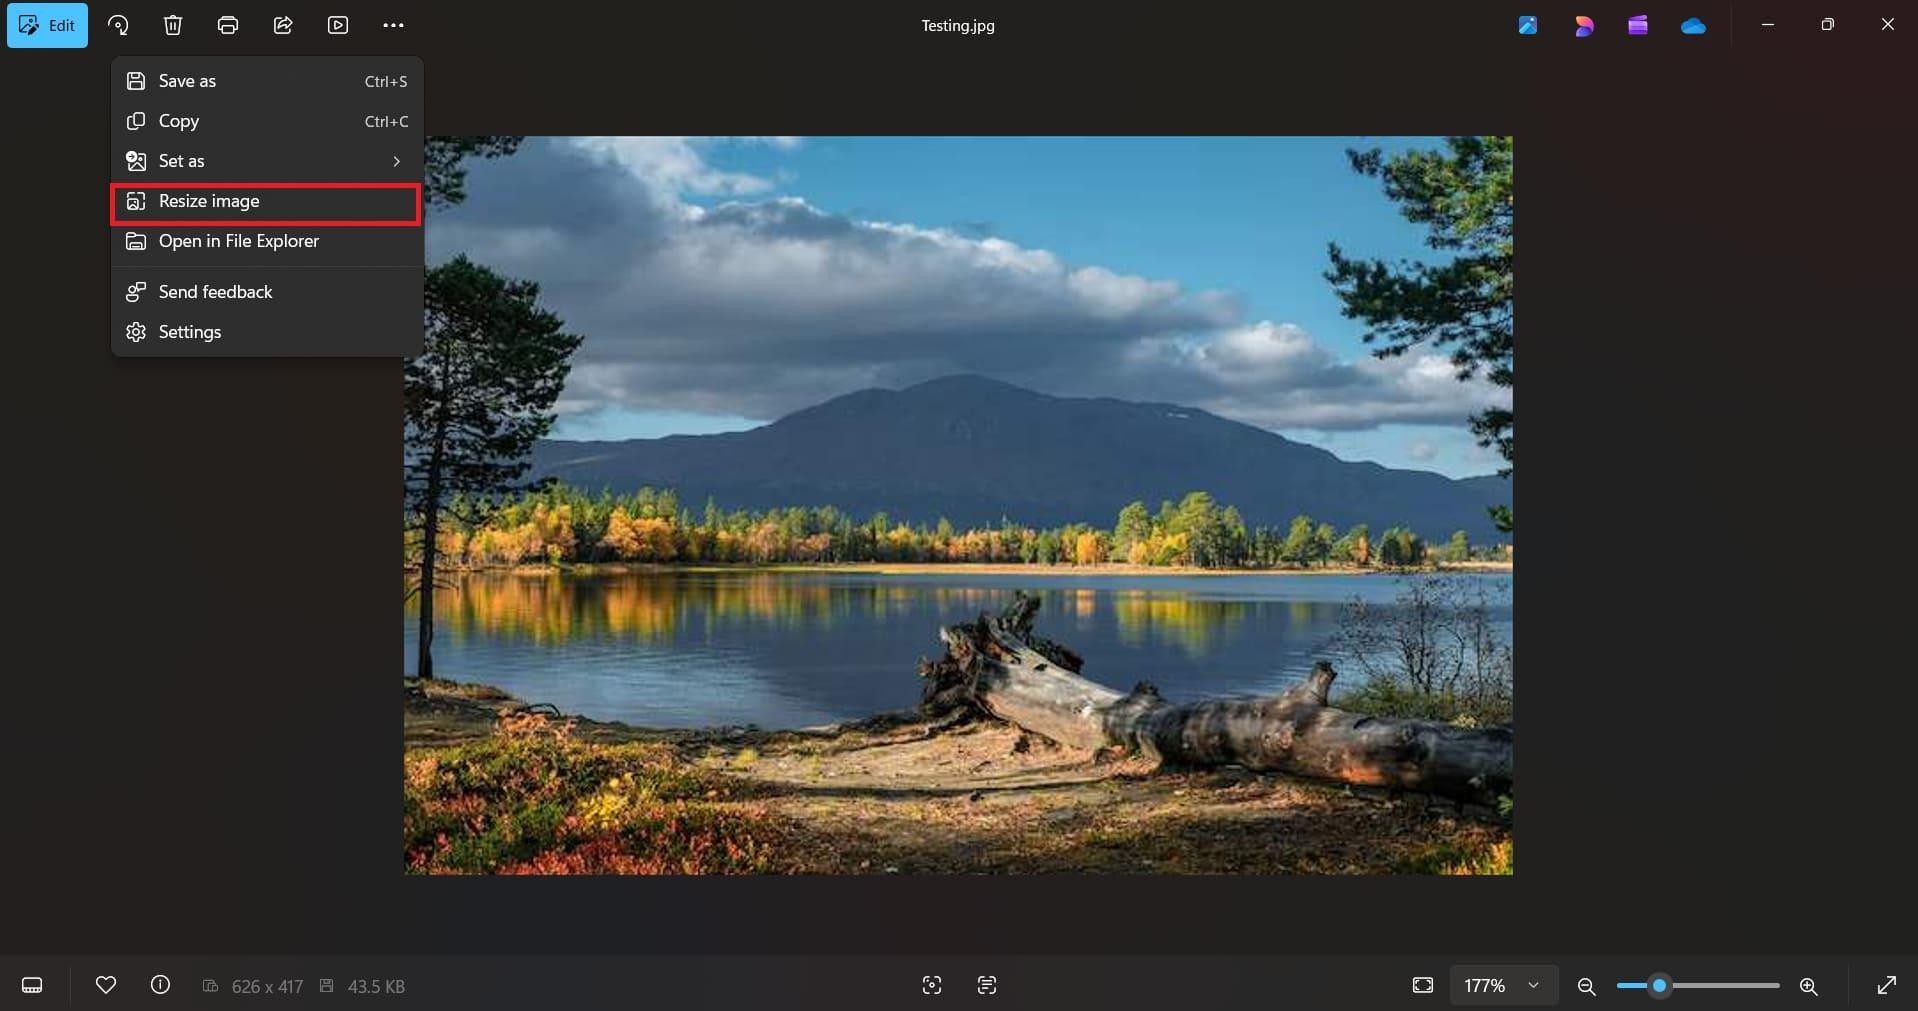
Right-click the image and open it in Windows Photos or Mac Preview. In Windows Photos, select the three-dot menu and choose "Resize image". In Mac Preview, go to Tools, then "Adjust size".
Step 2: Resize dimensions or resolution
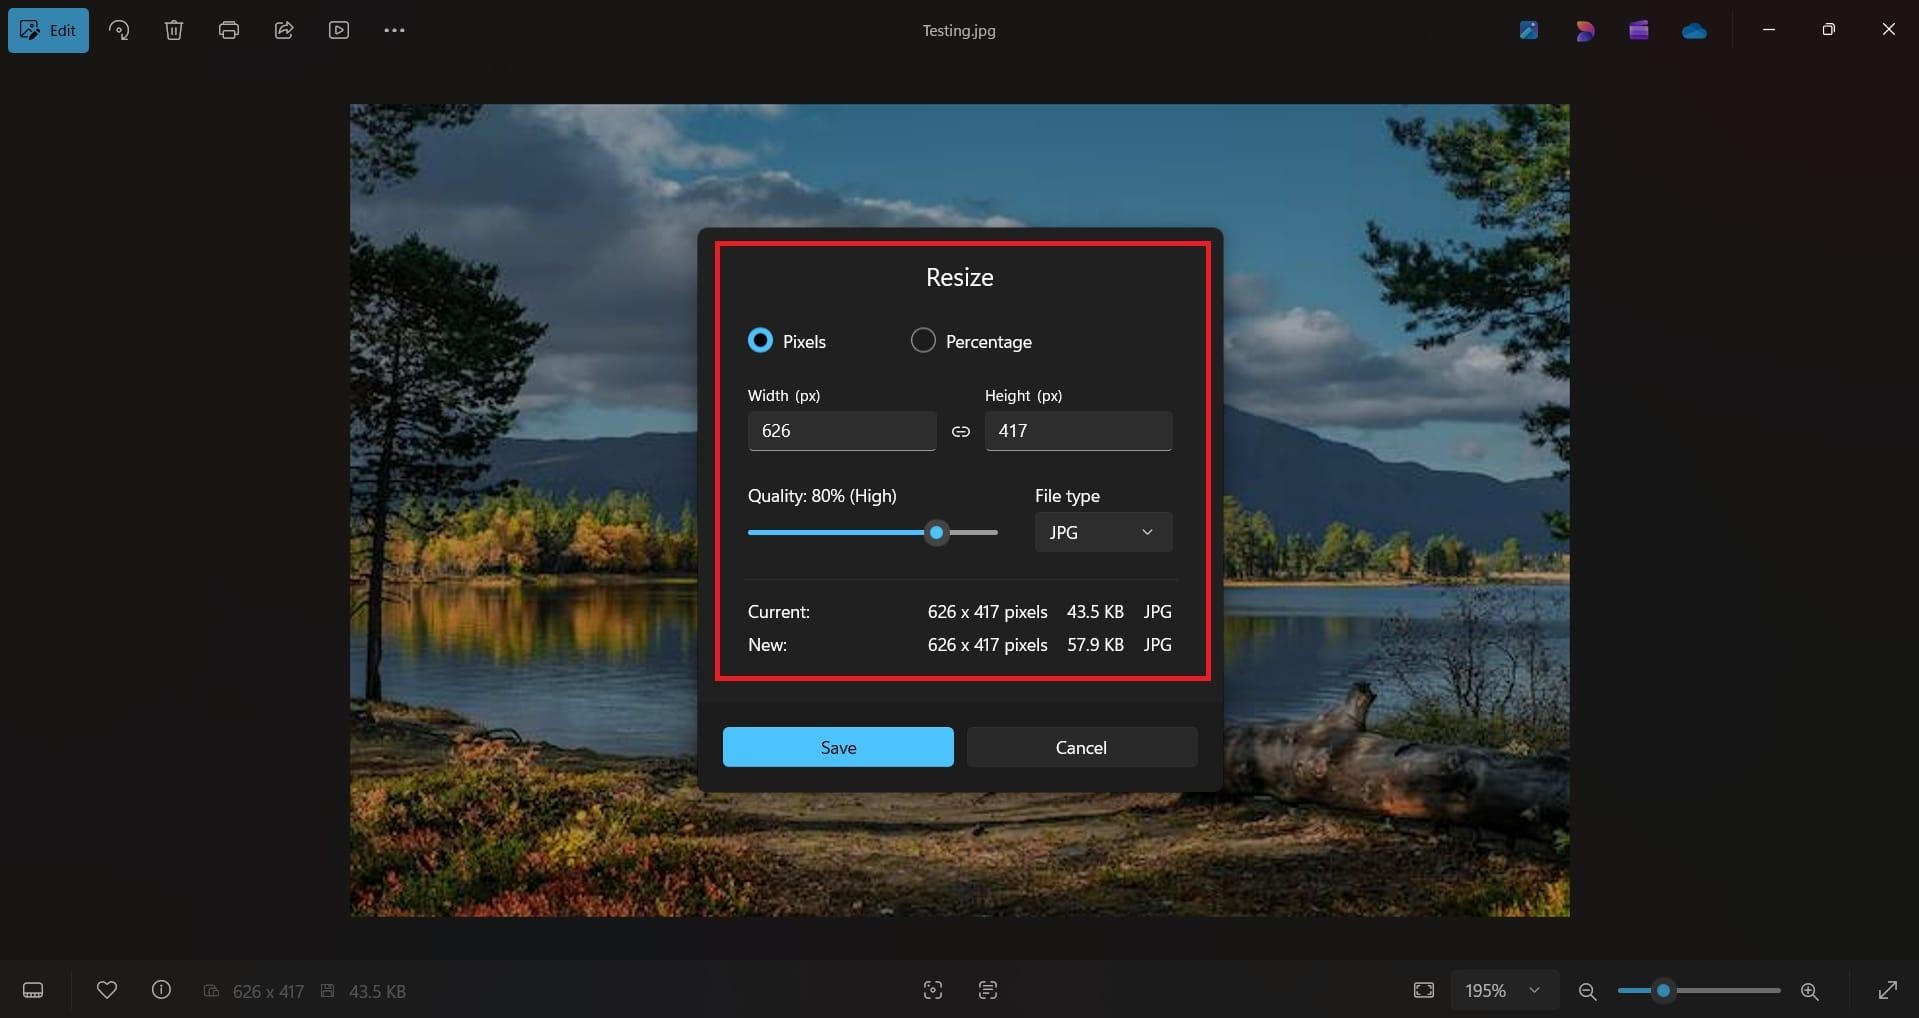
Type in the new dimensions or DPI value, keeping the aspect ratio locked. Without that lock, the image stretches out of proportion.
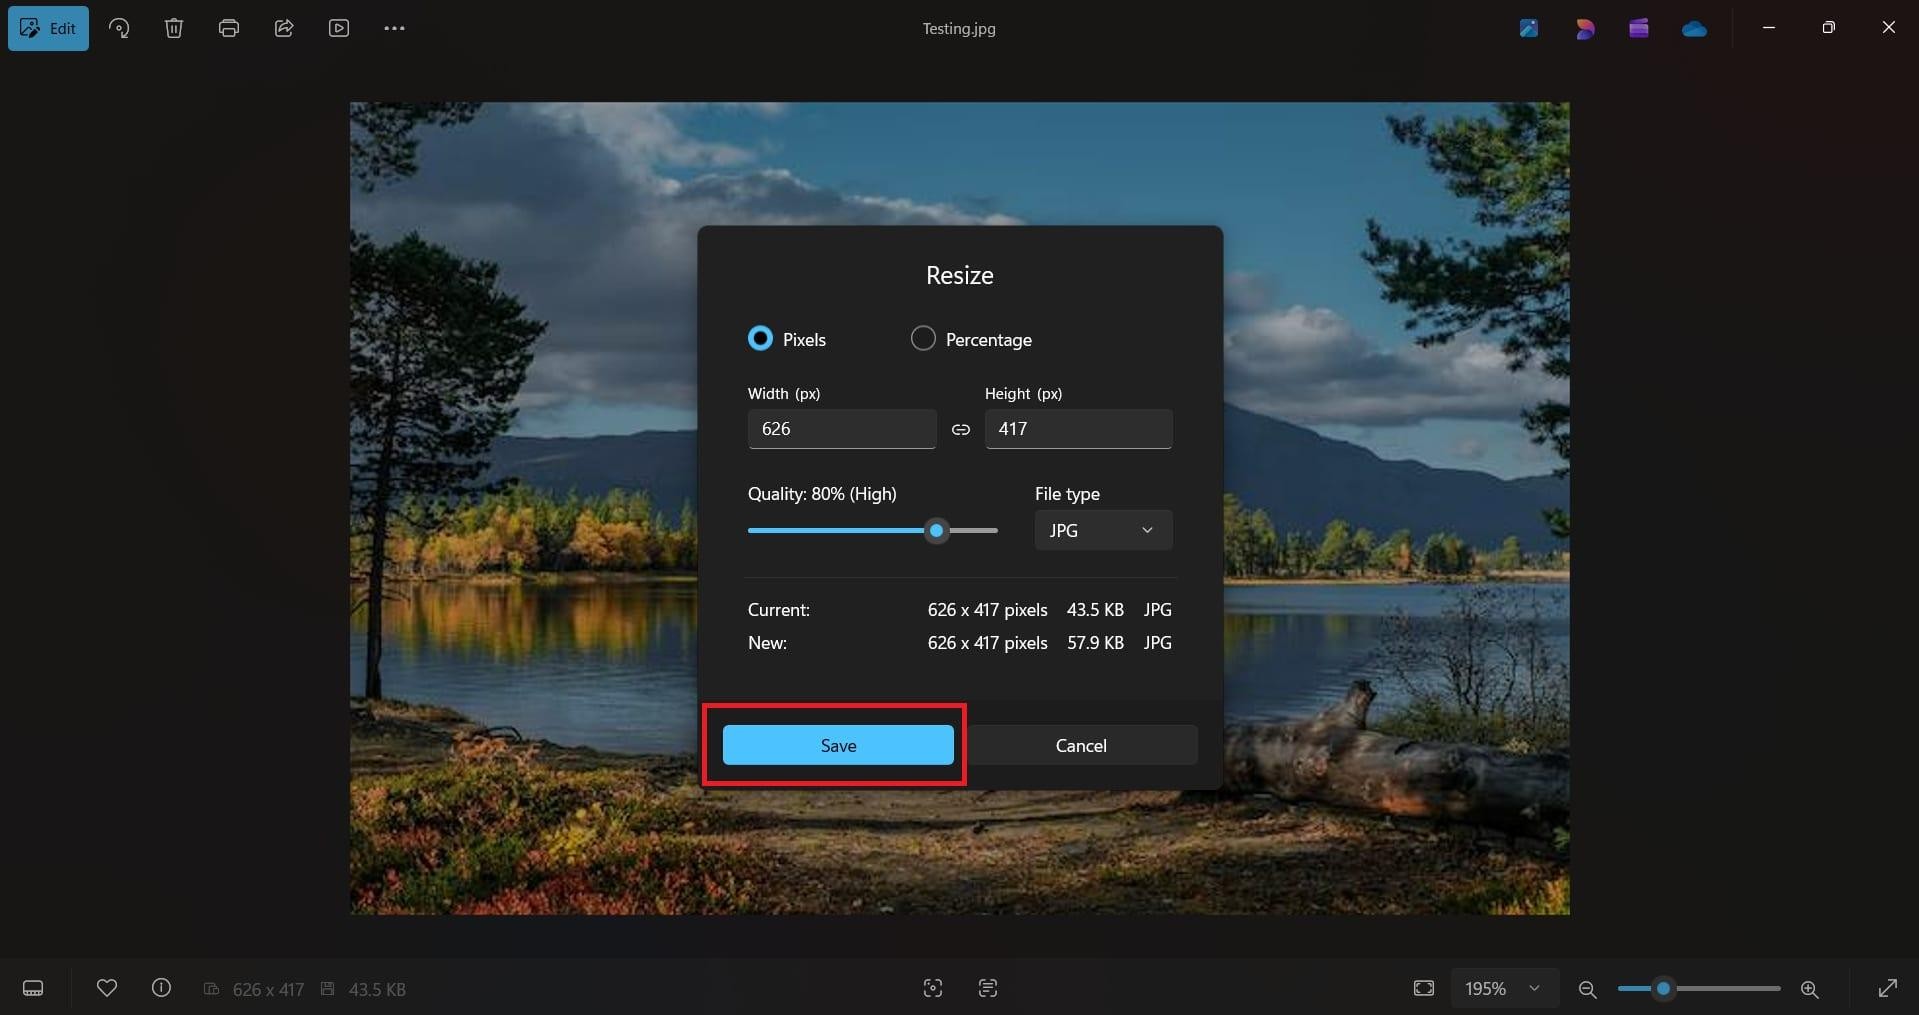
Step 3: Save the updated image
Always save as a new file rather than overwriting the original. PNG offers higher quality with further edits; JPEG is fine if this is the final output.
Hands-On Test:
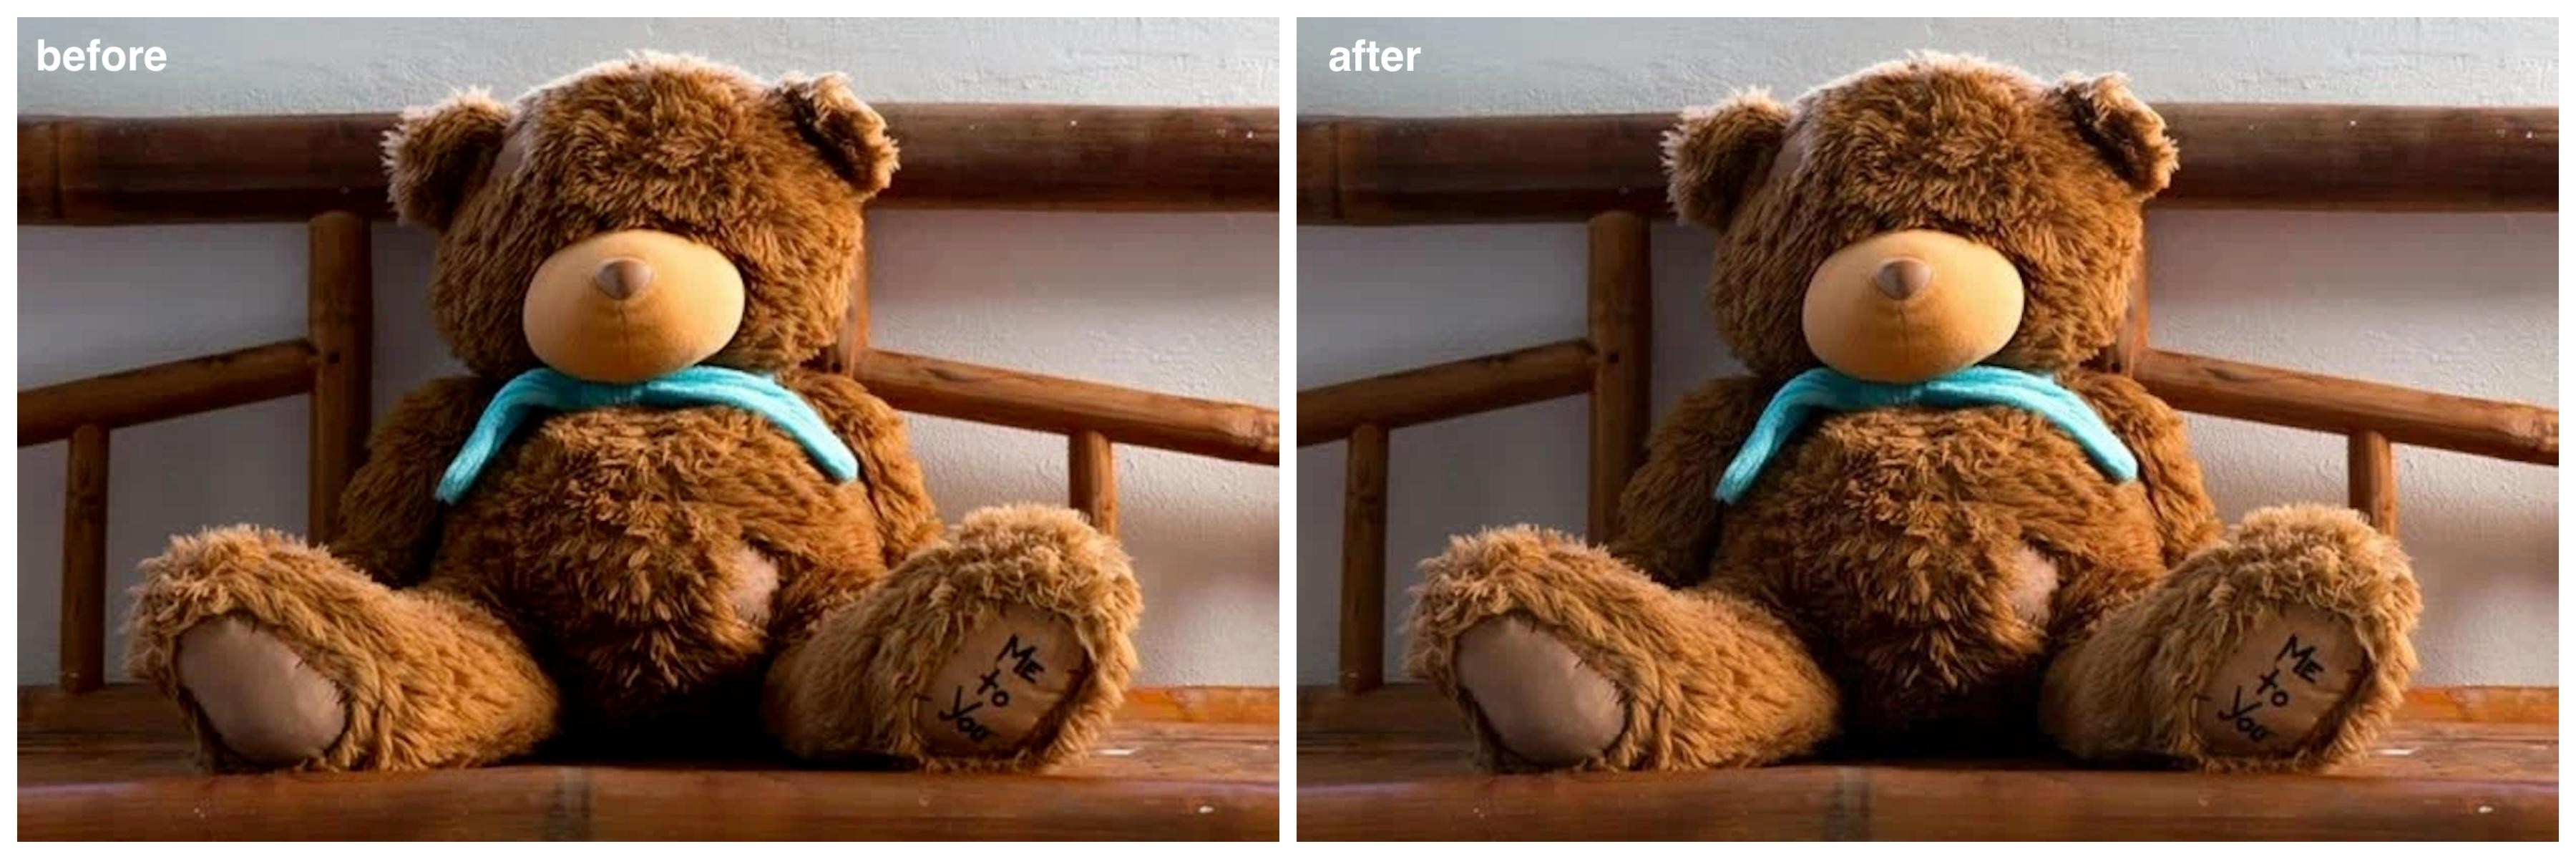
Manual resizing increases dimensions without improving sharpness. The "after" shot remains blurry because existing pixels are simply spread over a larger canvas. This method fails to restore textures like fur or text, making it ineffective for low-resolution files.
Best for:
This approach is fine for situations where the output quality bar is low: sending an image by email, uploading to a form that has a file size limit, or resizing for a context where no one will look closely. For anything where sharpness matters, use a different method.
Method 4: Mobile apps to improve image resolution
There are many mobile apps that can achieve this today, and the Zawa mobile app is a good example. It runs the same AI enhancer process as the web version, but directly on the phone.
Step 1: Upload your image
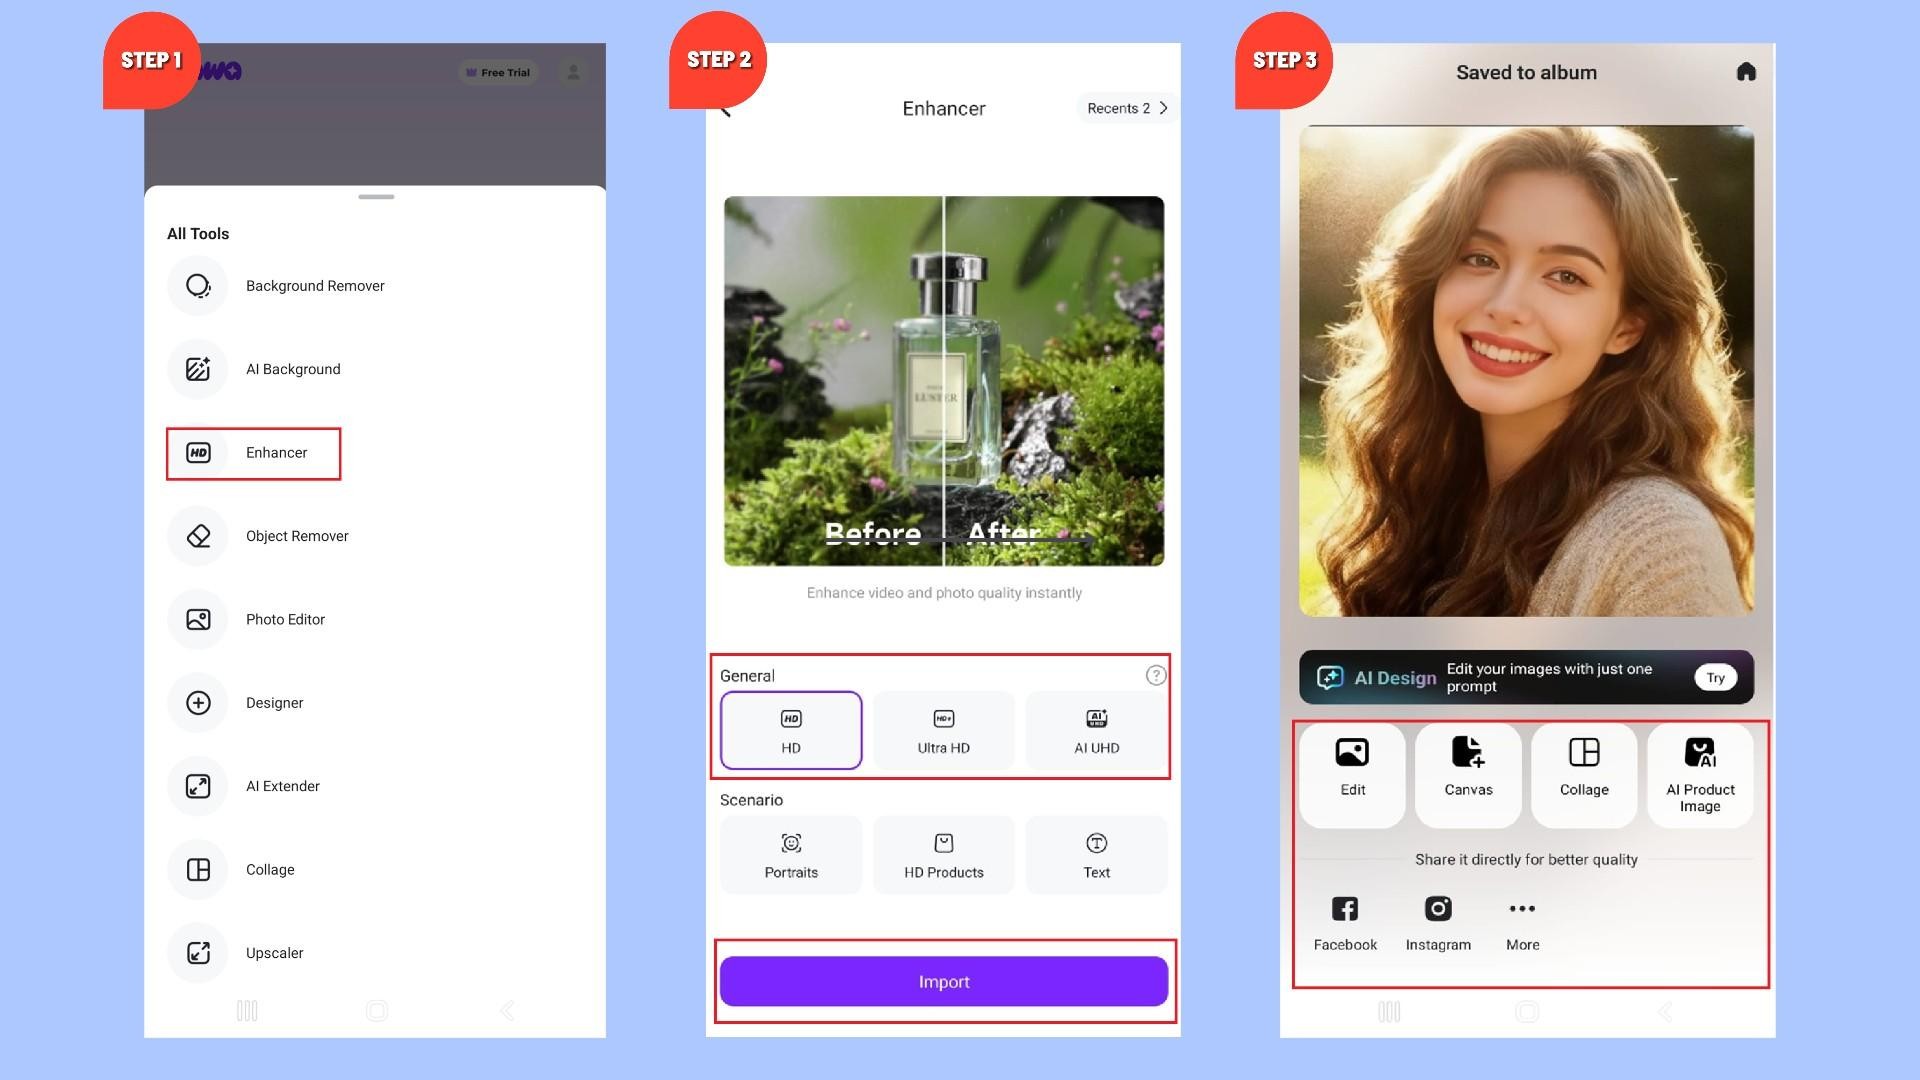
Open the Zava app on your phone. At the bottom, click on the "Tools" option. From there, choose "Enhancer" from the All Tools menu.
Step 2: Select the enhancement or upscale option
Tap the enhancement option, such as HD, Ultra HD, or AI UHD quality. After you pick the setting you want, "Import" the picture you want to improve from your gallery.
Step 3: Apply changes and save
Check the result before saving. If faces look waxy or edges have a painted quality, drop back to a lower enhancement level and run it again.
Hands-On Test:
The Zawa mobile app showed results similar to the web version. It is much faster for phone photos since you can enhance them directly on your device.
Best for:
Works well for social media posts and quick fixes on the go.
Best image resolution settings for different uses
No single right answer. The ideal resolution depends entirely on where and how the image will be displayed.
For printing
-
300 DPI recommended: 300 DPI is the standard for most commercial and professional print work. Below that, softness appears on larger prints. Adjusting DPI alone does not improve a low-resolution source. The pixel dimensions must support the print size at 300 DPI.
-
High pixel dimensions: Pixel dimensions determine how much detail is available at the target print size. Multiply the print width in inches by 300 to find the required pixel width. A small source file upscaled to those dimensions will show quality limits regardless of DPI.
For web & websites
-
72–150 DPI: Screen rendering is based on pixel dimensions, not DPI. A value between 72 and 150 DPI covers most display scenarios. Higher DPI does not improve on-screen appearance; it unnecessarily increases file size.
-
Optimized file size: Bigger images look better at first glance, but they can drag down load times, especially on mobile phones. So now you're balancing quality against speed. Compression helps, but don't push it too far.
For social media
-
Platform-specific resolutions: Each platform has different dimension requirements and crops images differently. Uploading at the recommended dimensions avoids automatic resizing that can shift the composition.
-
Balance between quality and load speed: You might try to figure out how to make a photo higher resolution, but uploading a very large file doesn't always help. Social platforms apply their own compression regardless. Aim for the recommended dimensions at moderate compression.
For professional design
-
High resolution + correct color profiles: Professional design work is often viewed in large sizes or in print. Pixel density needs to be supported by the output format. A weak source file will show its limits regardless of how much it is upscaled.
Tips to improve photo resolution without losing quality
Resolution quality depends as much on file handling as on the enhancement tool. These habits reduce quality loss at each stage of the process.
-
The source file sets a ceiling on every output. Screenshots, heavily compressed downloads, and forwarded images have already lost detail that cannot be recovered. Use the original camera file or the highest-resolution version available.
-
Go from the original file to the final size in one step. Each time you resize an already-resized version, you compound whatever quality loss happened the first time.
-
Every time you save a JPEG, it compresses again. The degradation is small at first, but it stacks up across multiple saves.
-
Changing one dimension without constraining the other pulls the image out of shape. The distortion is obvious and cannot be fixed after the fact without reverting.
-
Upscaling often softens edges slightly. Applying a small amount of sharpening after resizing can recover some crispness. Use a light hand: over-sharpening creates halos and artificial-looking edges, particularly around fine detail.
Conclusion
Tool choice comes down to what the image needs to do. Zawa handles web uploads and social posts quickly, with no setup or learning curve. Photoshop gives you the control you need when the output is printed or for a client. Mobile apps fill the gap when you're away from a desk.
One thing stays consistent across all of them: the source file sets the ceiling. If you're working from a heavily compressed or low-resolution original, no method to increase the image's resolution will fully recover what's already been lost. Start with the best version you have, pick the right tool for where the image is going, and you'll rarely need to redo the work.
FAQs
-
Can I increase the quality of JPEG?
JPEG compression throws away data permanently. You can sharpen the edges or boost contrast to make it look better, but the original detail is gone. A heavily compressed file will always have a ceiling on how good it can get.
-
Can AI enhance photo resolution?
Yes, but the results depend on what you start with. AI tools predict what a missing detail should look like based on patterns from other images. That works well on portraits, landscapes, and product photos. It works less well on heavily compressed or very low-resolution sources, where too much has already been lost.
-
How to make a higher resolution image without changing its size?
Bumping the DPI number in your file settings doesn't create new detail; it simply tells a printer how tightly to pack existing pixels on paper. While this might make a print look crisper, the digital pixel count remains the same, and no new information is added. To achieve a true high-resolution result without shrinking the image, you need an AI image enhancer (such as Zawa) —these tools reconstruct lost details and textures, effectively increasing clarity and density while keeping your original dimensions intact.
-
How to improve a picture's resolution for large-format printing?
Use the best source file you have. For most large-format prints, 300 DPI at the final print size is the target. If you need to upscale, do it once with a good AI tool (such as Zawa image upscaler) rather than in steps.
-
Can you change the resolution of a photo already taken?
You can resize or resample it, yes. That changes the pixel count or the DPI value, but it doesn't recover what the camera didn't capture. If the original was sharp, upscaling gives you more to work with. If it was blurry or compressed, you're mostly stretching what's already there.
You May Be Interested

Product Photography-How to Take Product Photos

Gemini Images Too Blurry? Here’s How to Make Them Crystal Clear in Seconds

How to Remove People From Pictures
How to Sharpen an Image in Photoshop: 2026 Guide & Top AI Alternative
How to Upscale an Image in Photoshop (Step-by-Step)

5 Tools to Extract & Convert Images to Text