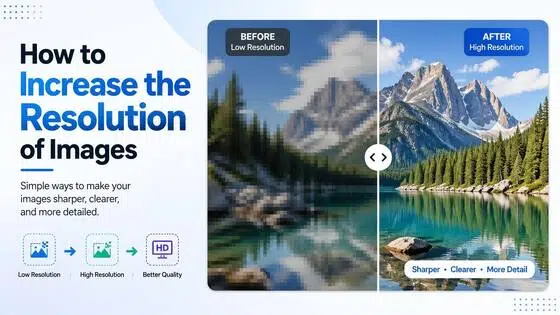
How to Fix Pixelated Video: 6 Methods That Work (2026)
Pixelated video is usually caused by compression, low resolution, or a resolution mismatch between the source and playback. This guide covers the 6 effective ways to fix it, from AI-based video enhancement to adjustments in Premiere Pro, After Effects.


Pixelated video shows up as blocky squares, blurred edges, or a mosaic pattern across the frame. Usually it comes down to one of three things. Either the footage was shot or exported too small to begin with, it got compressed too aggressively along the way, or the file is being shown bigger than its native size. Sometimes two or three of these stack on top of each other, and that is when the pixelation looks really bad.
The fix you need depends on which of those three is the cause. Throwing every fix at the problem at once usually makes things worse, not better. This guide covers six methods to fix pixelated video, from a quick browser-based AI tool to manual fixes inside Premiere Pro and After Effects. Pick the one that matches your situation, your software, and how much time you want to spend on it.
Why Is My Video Pixelated and Grainy?
Pixelation and grain look similar but come from different places. Knowing which one you are looking at is the fastest way to pick the right fix. Trying to fix grain with an upscaling tool, or trying to fix low-resolution footage with a noise reduction filter, wastes time and rarely improves anything.
Low Source Resolution
The footage was shot at 480p or 720p and is now being shown or exported at 1080p or 4K. Without AI processing, upscaling just stretches the pixels that already exist. Each pixel gets bigger and more visible. Screen recordings, video calls, and old archive footage run into this constantly.
Over-Compression
Compression formats like H.264, H.265, and VP9 shrink file size by throwing away pixel data the encoder decides is not essential. Push the compression ratio too far and fine texture and edge detail go first. The result is visible blocking, especially in fast motion and dark scenes.
Bitrate drives most of this. A 1080p video at 1 Mbps will look noticeably worse than the same footage at 8 Mbps. And if you re-encode an already-compressed video, you add another compression pass on top of the first. Quality drops again. This is called generation loss.
Resolution Mismatch and Playback Issues
A video encoded at 1280x720 shown full-screen on a 4K monitor gets scaled up by the player. That reveals the native pixel grid underneath. Some players also render video using the GPU, and driver issues or wrong rendering settings can introduce artifacts that look like pixelation but disappear on a different device or player entirely. Corrupted files can also cause pixelation in specific sections even when the rest of the file plays fine. If you only see the problem on one device or in one app, the source file is probably fine. The issue is in how that specific setup handles playback.
Poor Shooting Conditions
High ISO in low light makes the camera sensor amplify its signal to compensate. That amplification introduces random noise across the frame. Fast motion combined with a low frame rate or slow shutter speed means the subject moves between frames faster than the camera can capture cleanly, which produces motion blur that reads as pixelation. Older or cheaper camera sensors also produce more inherent noise than modern sensors at the same ISO.
How to Fix Pixels on Videos: 6 Methods
Which method to use depends on your technical comfort level, what software you already have, and how much control you need over the final output. Some of these fixes take two minutes. Others take longer but give you more precision. None of them work equally well for every type of pixelation, so match the method to the cause you identified above.
Method 1: AI Video Enhancer, Zawa (Fastest, No Software Install)
Best for: anyone who wants their pixelated or grainy footage looking better fast, with zero downloads. Zawa Video Enhancer lives in the browser. It looks at each frame, figures out what the sharper version probably looked like, and rebuilds the edges and texture.
A regular display upscale just stretches the same pixels over a bigger area. Nothing new gets added. Zawa works differently. It looks at each frame, figures out what the sharper version probably looked like, and rebuilds the edges and texture that got smoothed away during compression.
Step 1: Open Zawa Video Enhancer and upload your video
Find Video Enhancer in the tool panel at the bottom-right of the Zawa workspace. You can drop a file straight in or paste a link instead. It takes MP4, MOV, and M4V. Want to try it first? There are sample clips on the page before you commit your own footage.
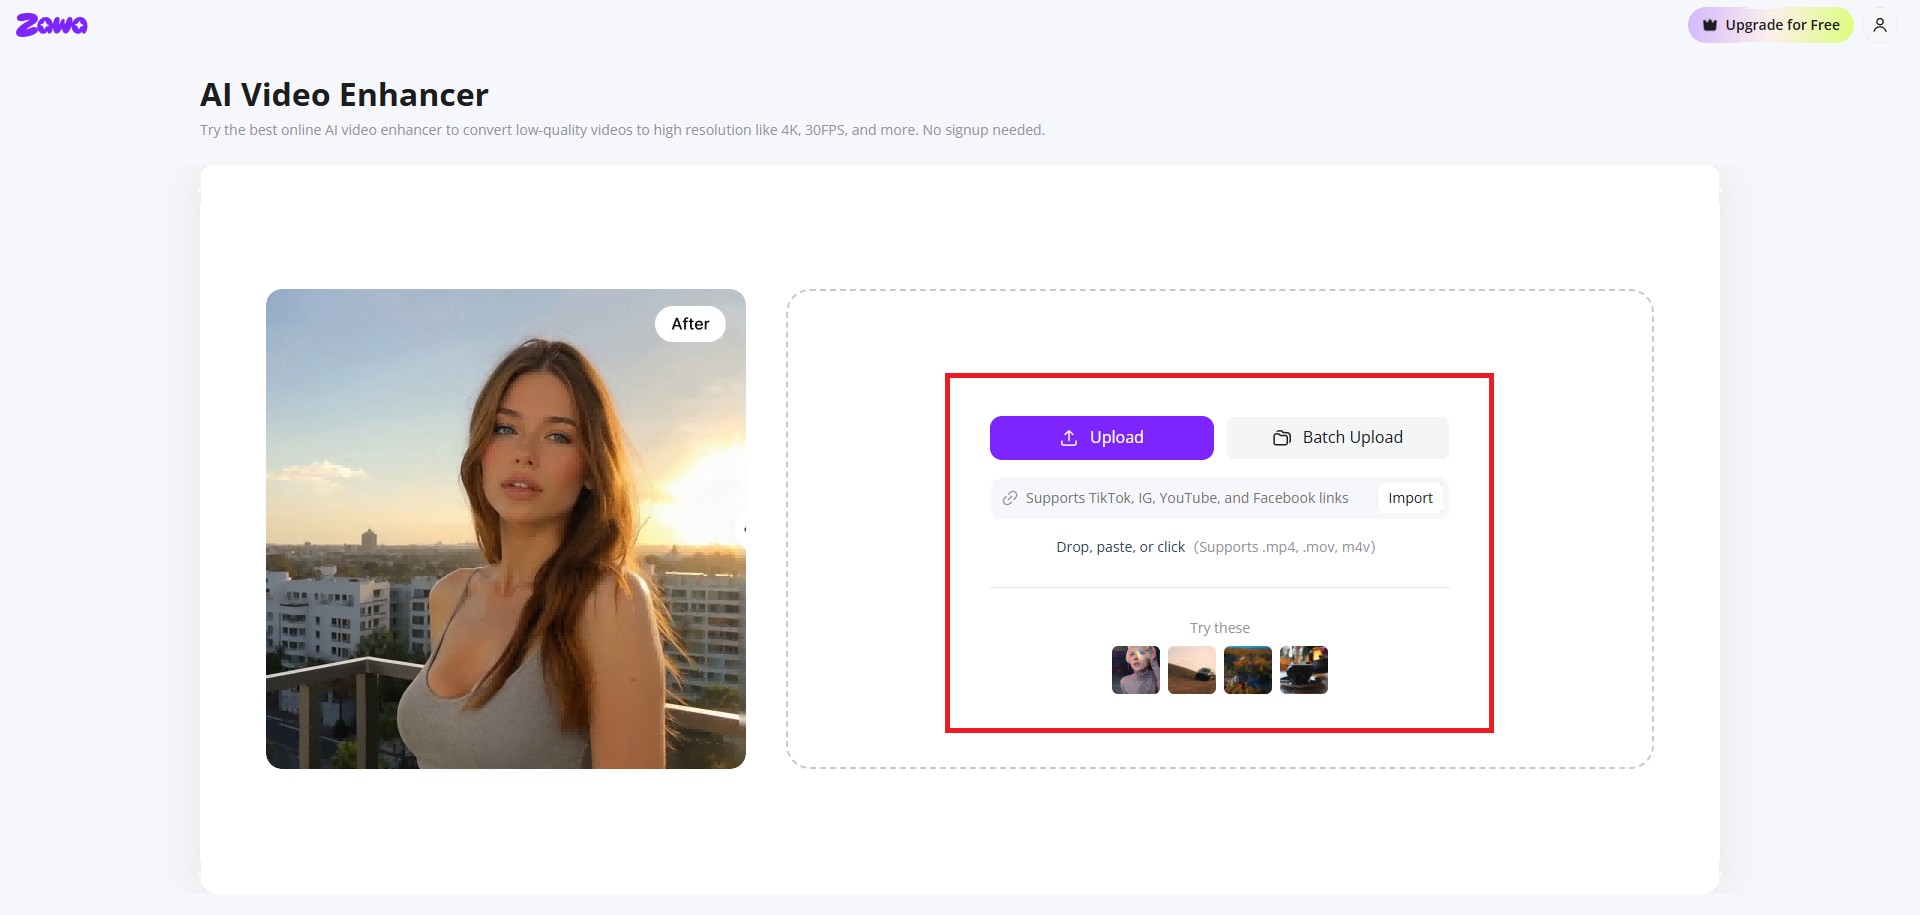
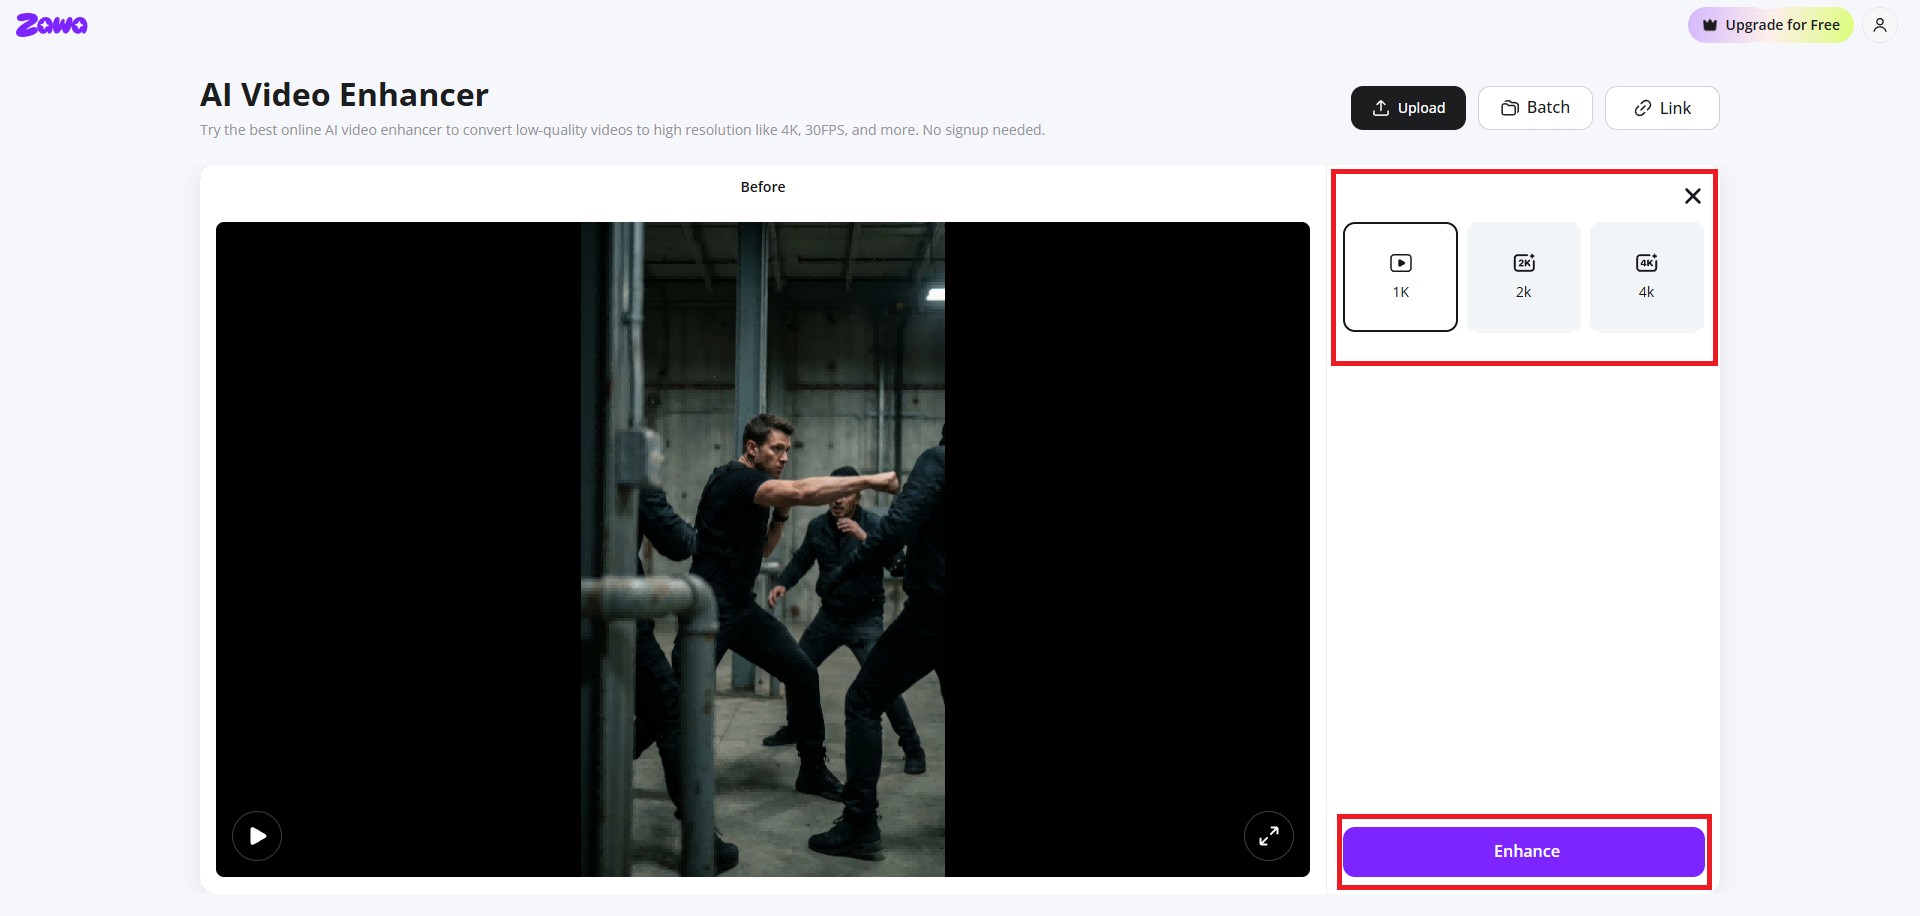
Step 2: Choose your target resolution and start the enhancement
Pick 1K, 2K, or 4K from the output options, then hit Enhance. Behind the scenes, Zawa works through each frame and builds in the extra detail at the higher resolution. It is not stretching what was already there. It is adding to it.
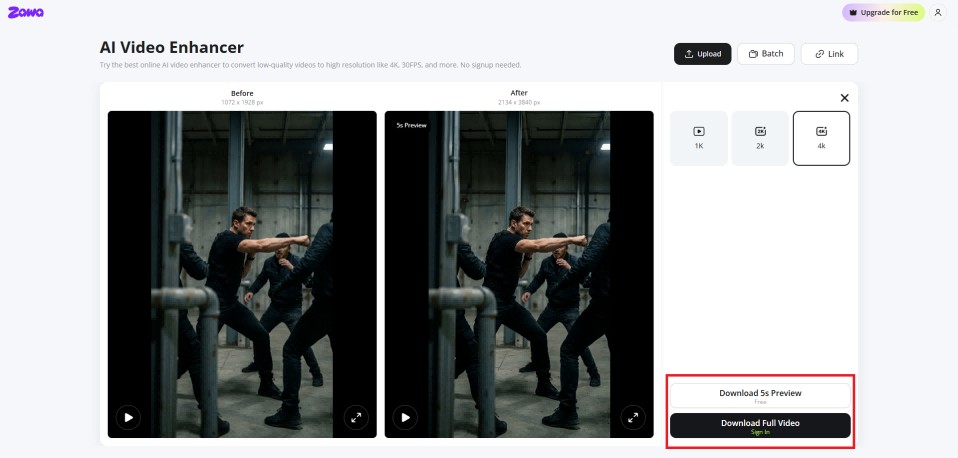
Step 3: Preview the result and download your video
Once it is done, you get a split screen showing before and after. Scroll through the parts with the most detail or motion and see how it holds up. If it looks good, download it.
Method 2: Adobe Premiere Pro (Sharpening)
Best for: people already working in Premiere Pro who need to clean up pixelated footage without leaving their editing workflow. This method applies sharpening to make existing pixels look less blocky. It does not add new detail. It just makes what is there look cleaner.
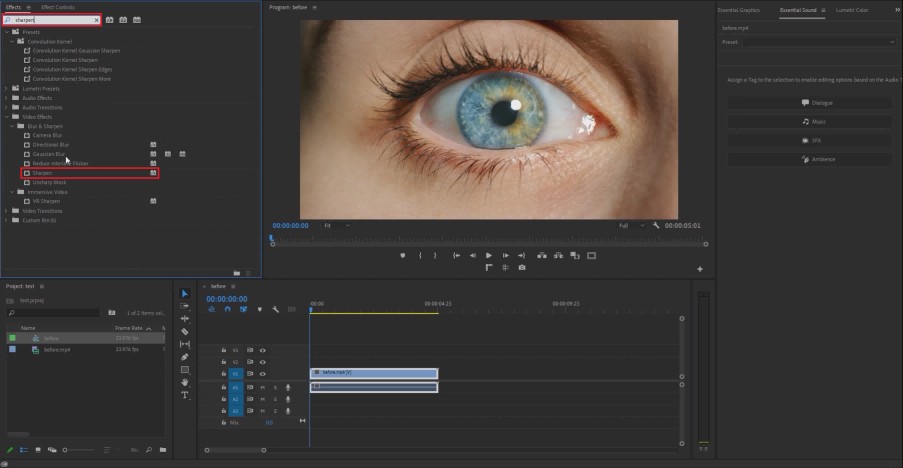
Step 1: Add the Sharpen and Unsharp Mask effects
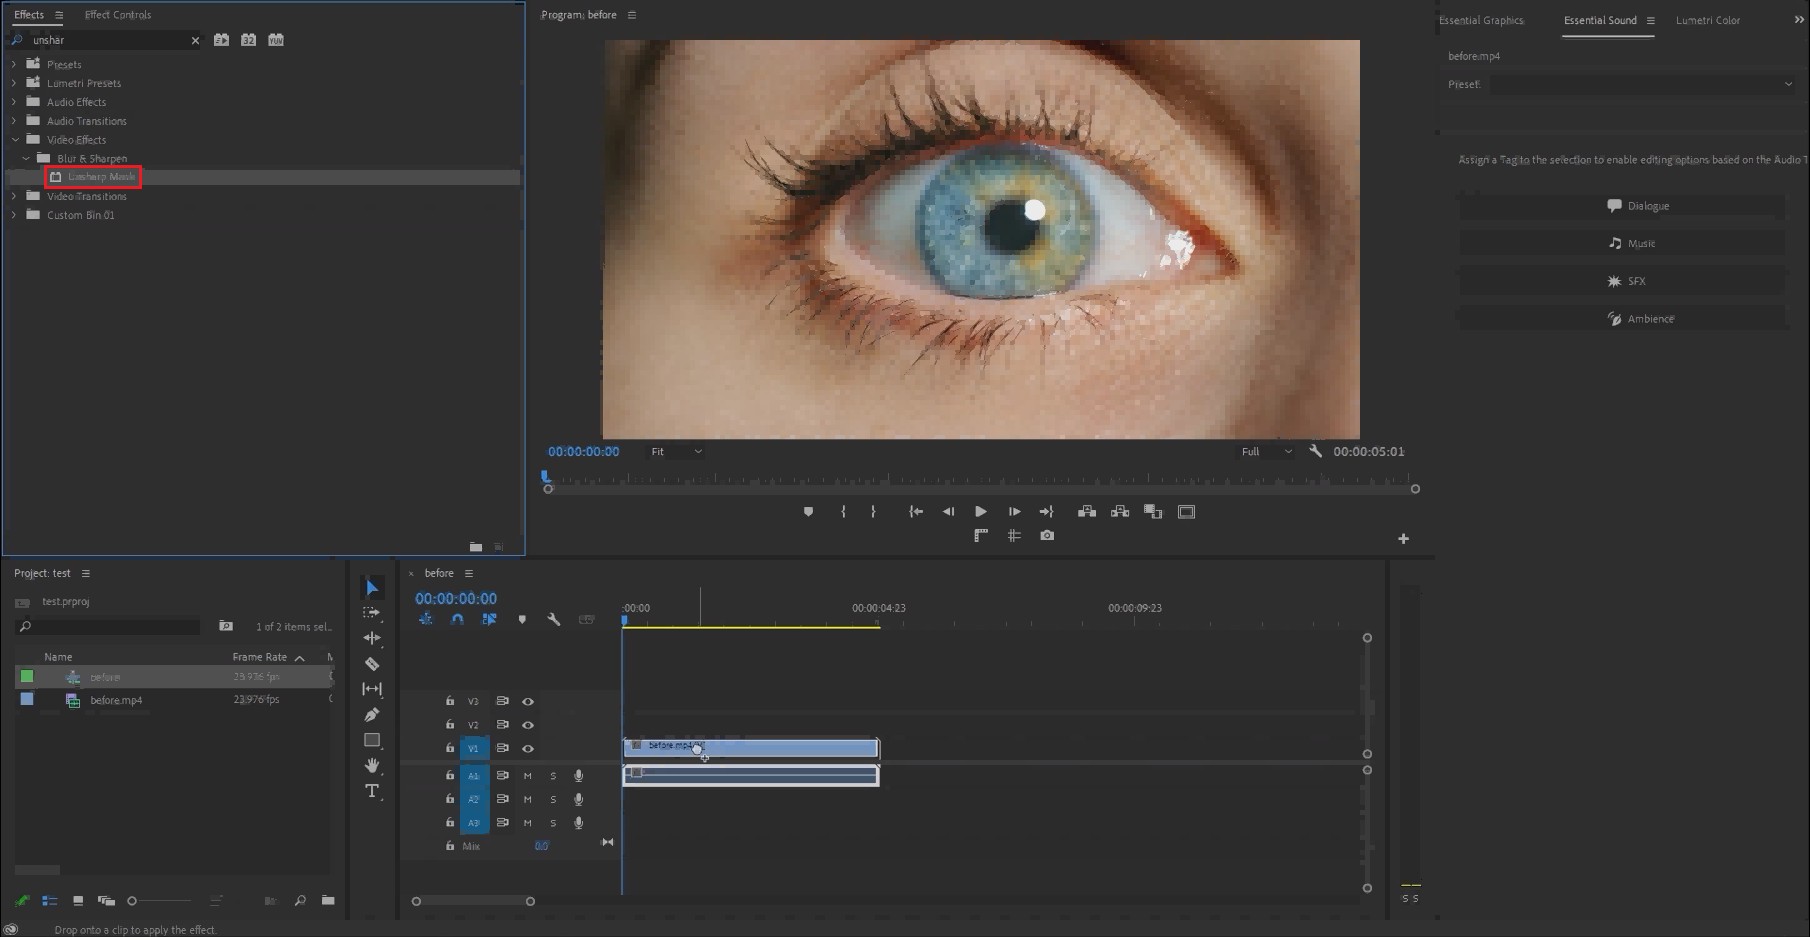
Launch Premiere Pro and drag your video onto the timeline. Open the Effects panel from Window, then Effects. Search for Sharpen and drag it onto your clip. Then search for Unsharp Mask and drag that onto the same clip.
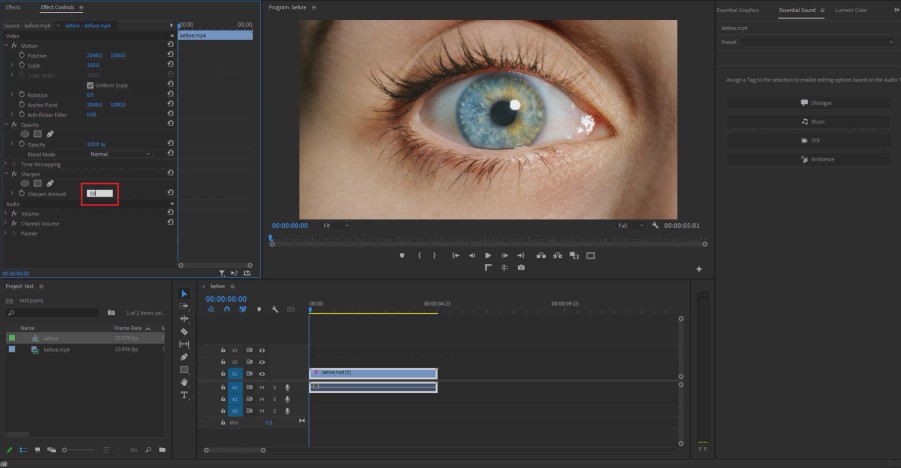
Step 2: Adjust the Sharpen settings
Select the clip and open Edit, then Effect Controls. Under the Sharpen effect, raise the slider to a moderate value. Going too far introduces visible halos around edges, so make small adjustments and check the preview as you go.
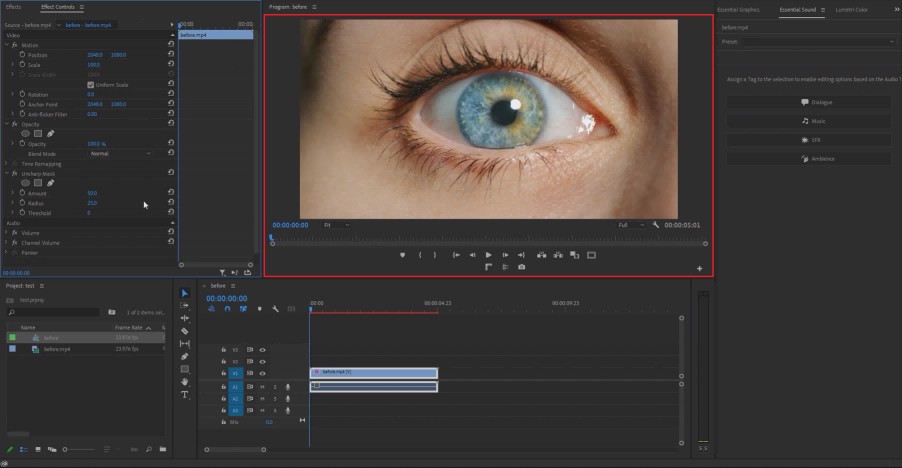
Step 3: Refine with Unsharp Mask
Under Unsharp Mask, set the Amount value between 15 and 30. This adds a light refinement on top of the main sharpening without over-processing the image. Higher values make blocking and noise more visible rather than less.
Step 4: Export at a high bitrate
Export your sequence using a high bitrate setting. A low export bitrate adds new compression artifacts on top of the sharpening fix, which can cancel out the improvement you just made to the footage.
Method 3: Adobe After Effects (Detail-Preserving Upscale)
Best for: footage with interlacing problems, or anything where you need finer control over noise than Premiere's basic tools give you. After Effects has more dedicated options for tackling pixelation and noise at a granular level.
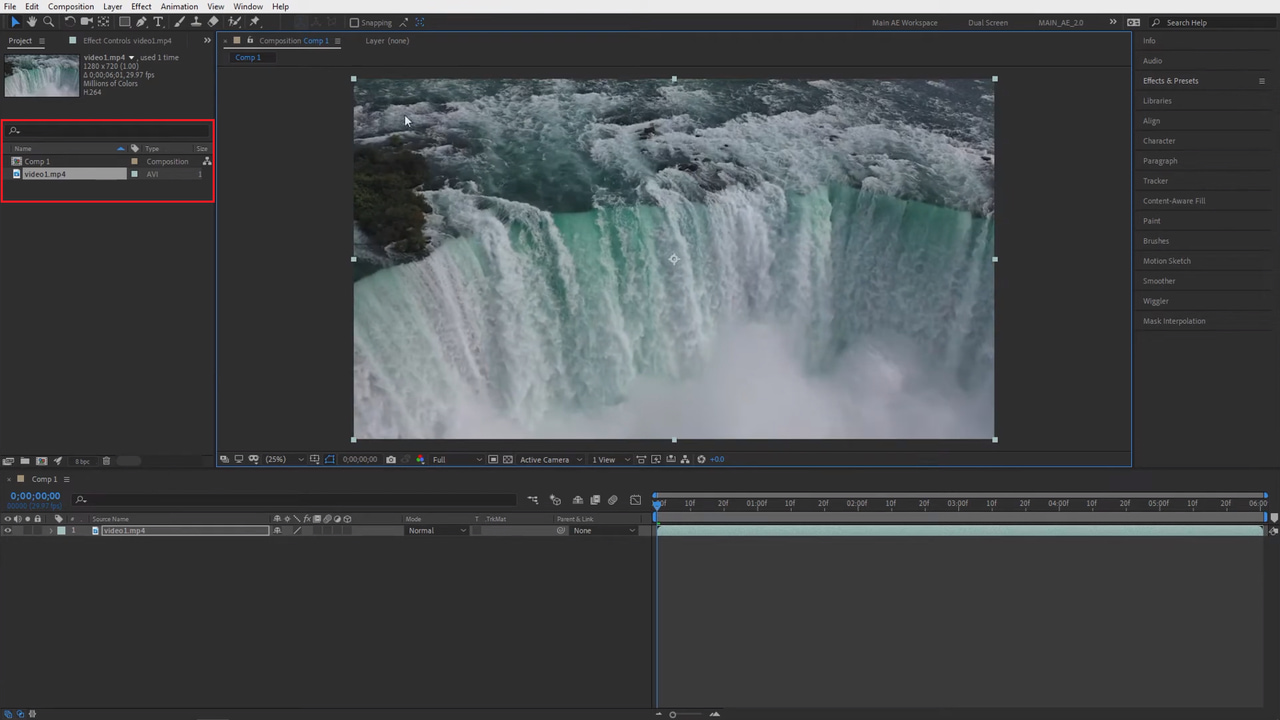
Step 1: Import your video and create a composition Open After Effects and import the pixelated video. Drag the clip into the Composition panel to automatically create a composition matching the video's original settings.
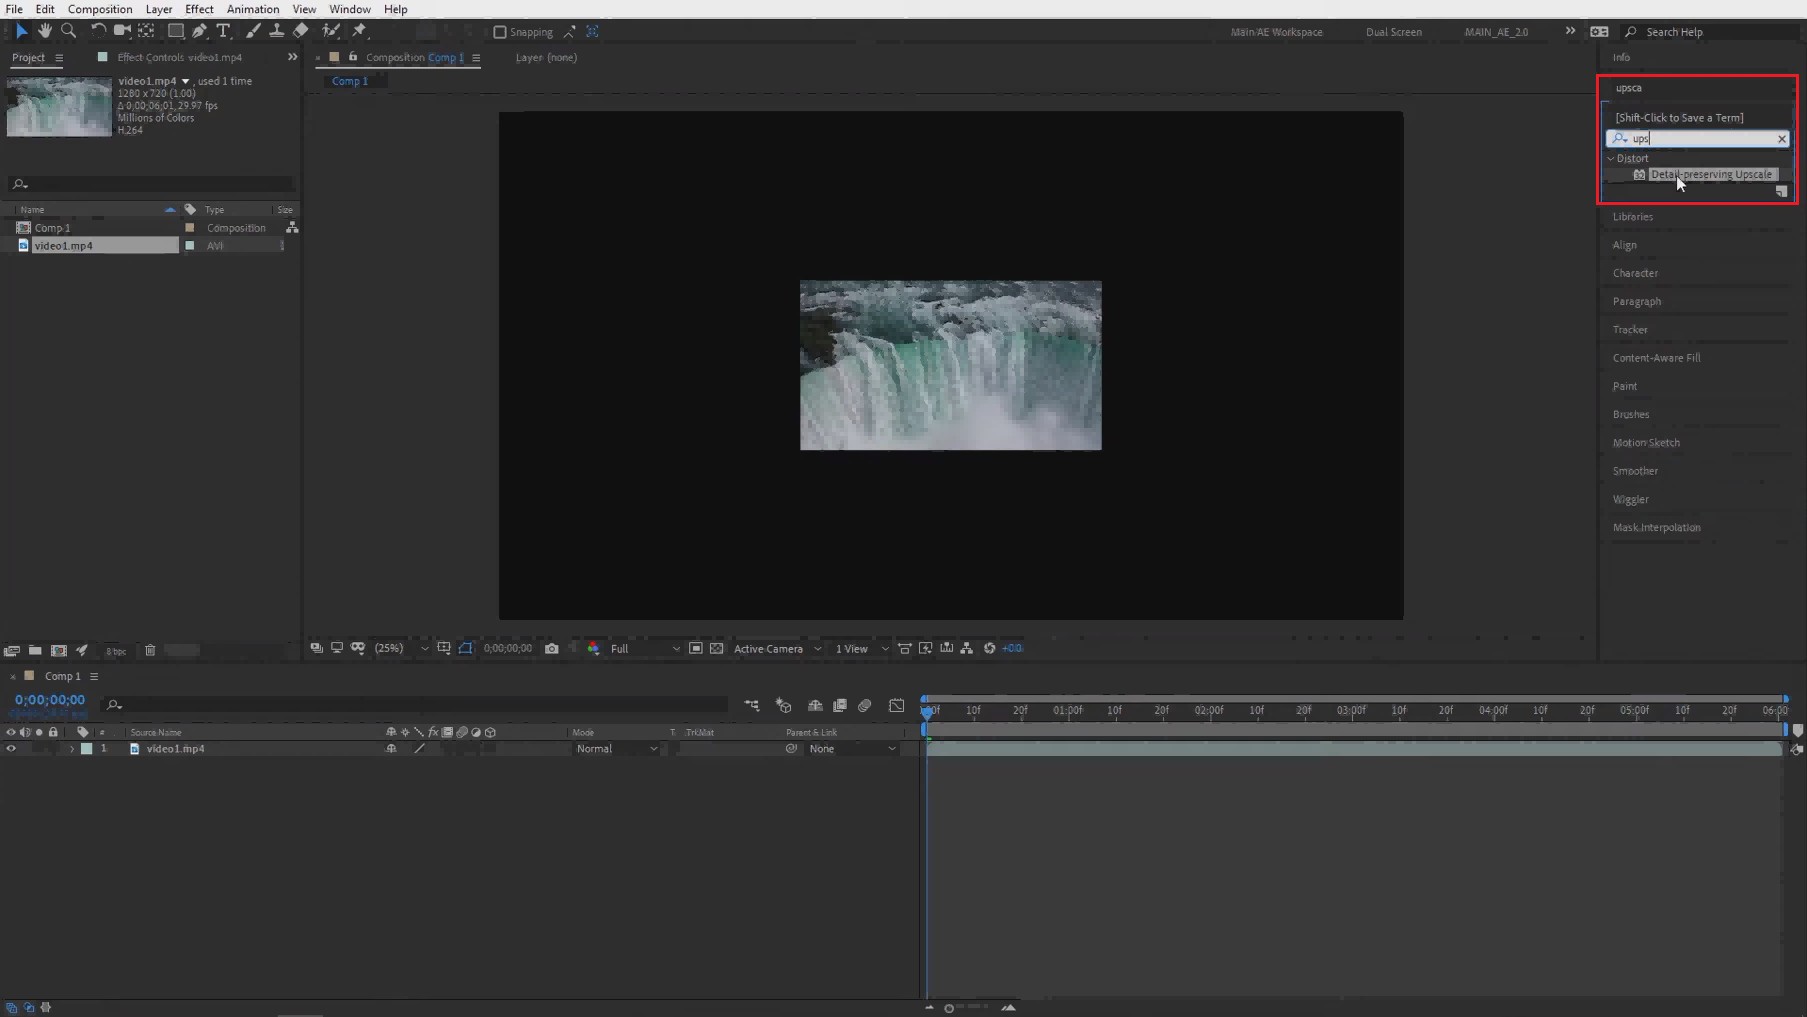
Step 2: Apply the Detail-Preserving Upscale effect Select the video layer, open the Effects & Presets panel, and search for Detail-Preserving Upscale. Apply the effect to your clip to begin enhancing pixelated areas.
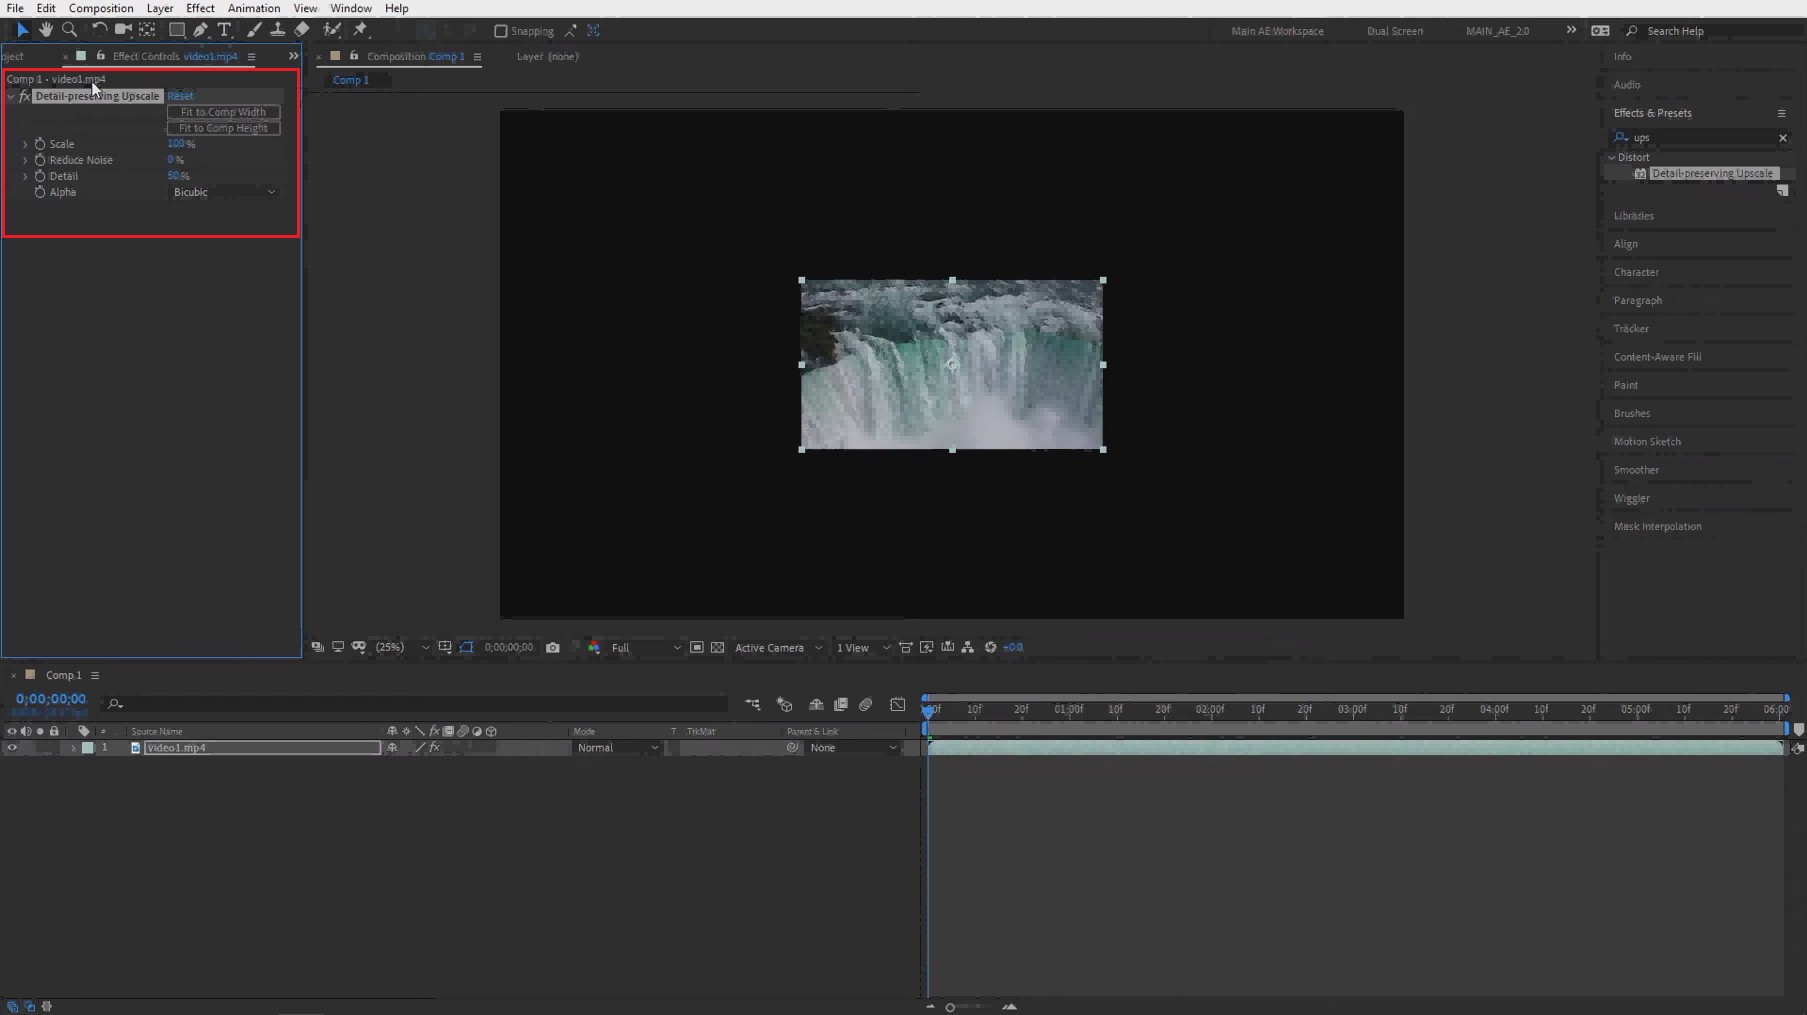
Step 3: Adjust upscaling and detail settings Increase the Scale value gradually until the video reaches the desired resolution. Fine-tune Reduce Noise and Detail settings to sharpen edges while minimizing artifacts and blocky pixels.
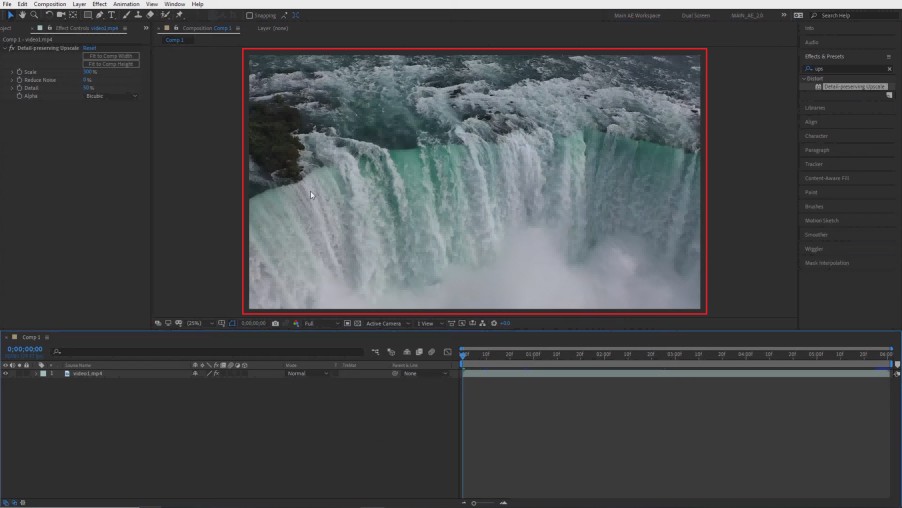
Step 4: Preview and export the enhanced video Preview the footage to check clarity and make final adjustments if needed. Once satisfied, export the video through Adobe Media Encoder using your preferred format and quality settings.
Method 4: DaVinci Resolve (Noise Reduction and Sharpening)
Best for: serious noise reduction and getting detail back on grainy or pixelated footage. If you need to fix grainy video without paying for software, DaVinci Resolve includes powerful tools in its free version, while advanced features are available in the paid Studio edition.
Step 1: Import your video and open the Color Page Launch DaVinci Resolve and import your pixelated video into a new project. Add the clip to the timeline, then switch to the Color page for enhancement tools.
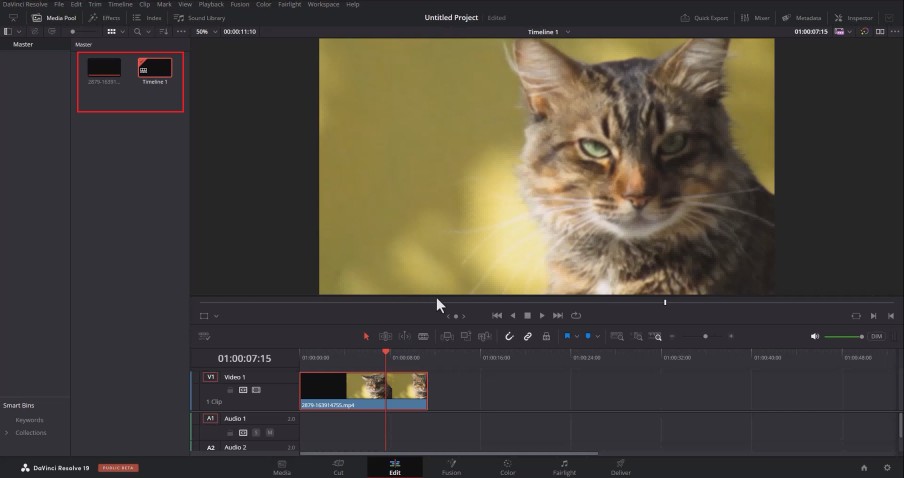
Step 2: Apply Noise Reduction to clean pixel artifacts On the Color page, open the Motion Effects panel and enable Noise Reduction. Adjust the settings carefully to reduce blocky artifacts and unwanted visual noise without over-smoothing important details.
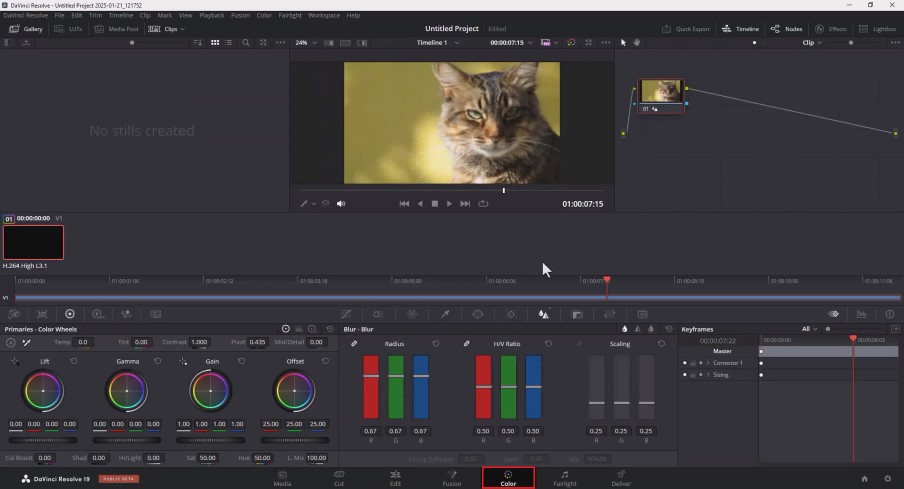
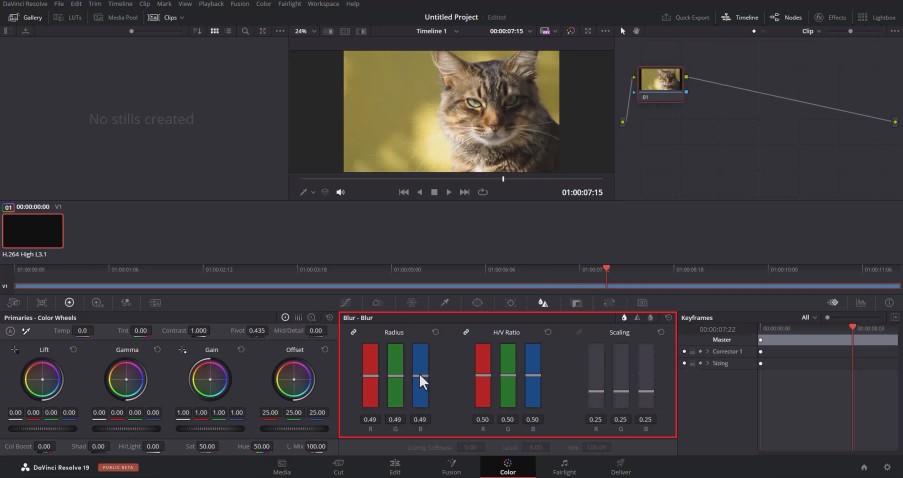
Step 3: Enhance clarity with sharpening controls Open the Blur/Sharpen controls and increase sharpening gradually. Fine-tune the strength to improve edge definition and detail while avoiding halos or an overly processed appearance.
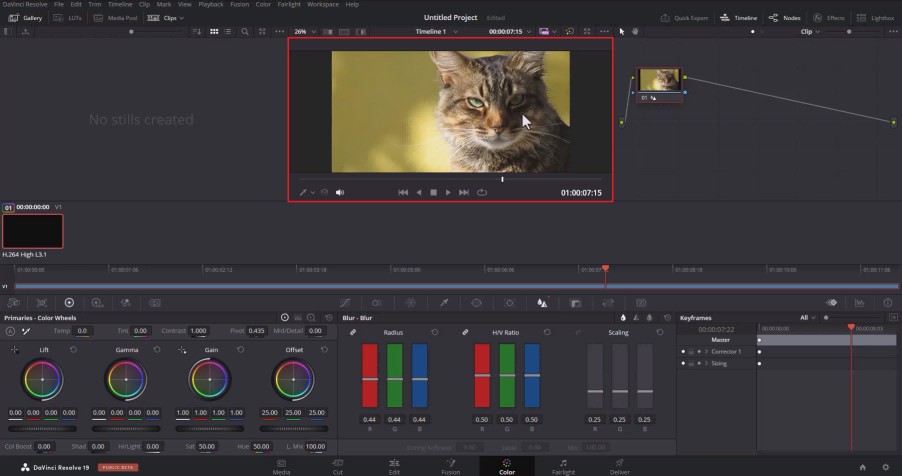
Step 4: Review the results and export the video Play back the enhanced footage to ensure the image looks cleaner and sharper. Make any final adjustments, then export the video using your preferred resolution and format settings.
Method 5: VLC Media Player (Quick Playback Fix)
Best for: pixelation that shows up on one particular device during playback, not a problem with the file itself. VLC has filters built in that can make compression artifacts less noticeable while you watch, and they do not touch the actual file.
Step 1: Open the Effects and Filters panel
Open your file in VLC, then go to Tools and Effects and Filters. That is Ctrl+E on Windows or Cmd+E on a Mac. From there, click Video Effects, then Enhance, to get to the filters you need.
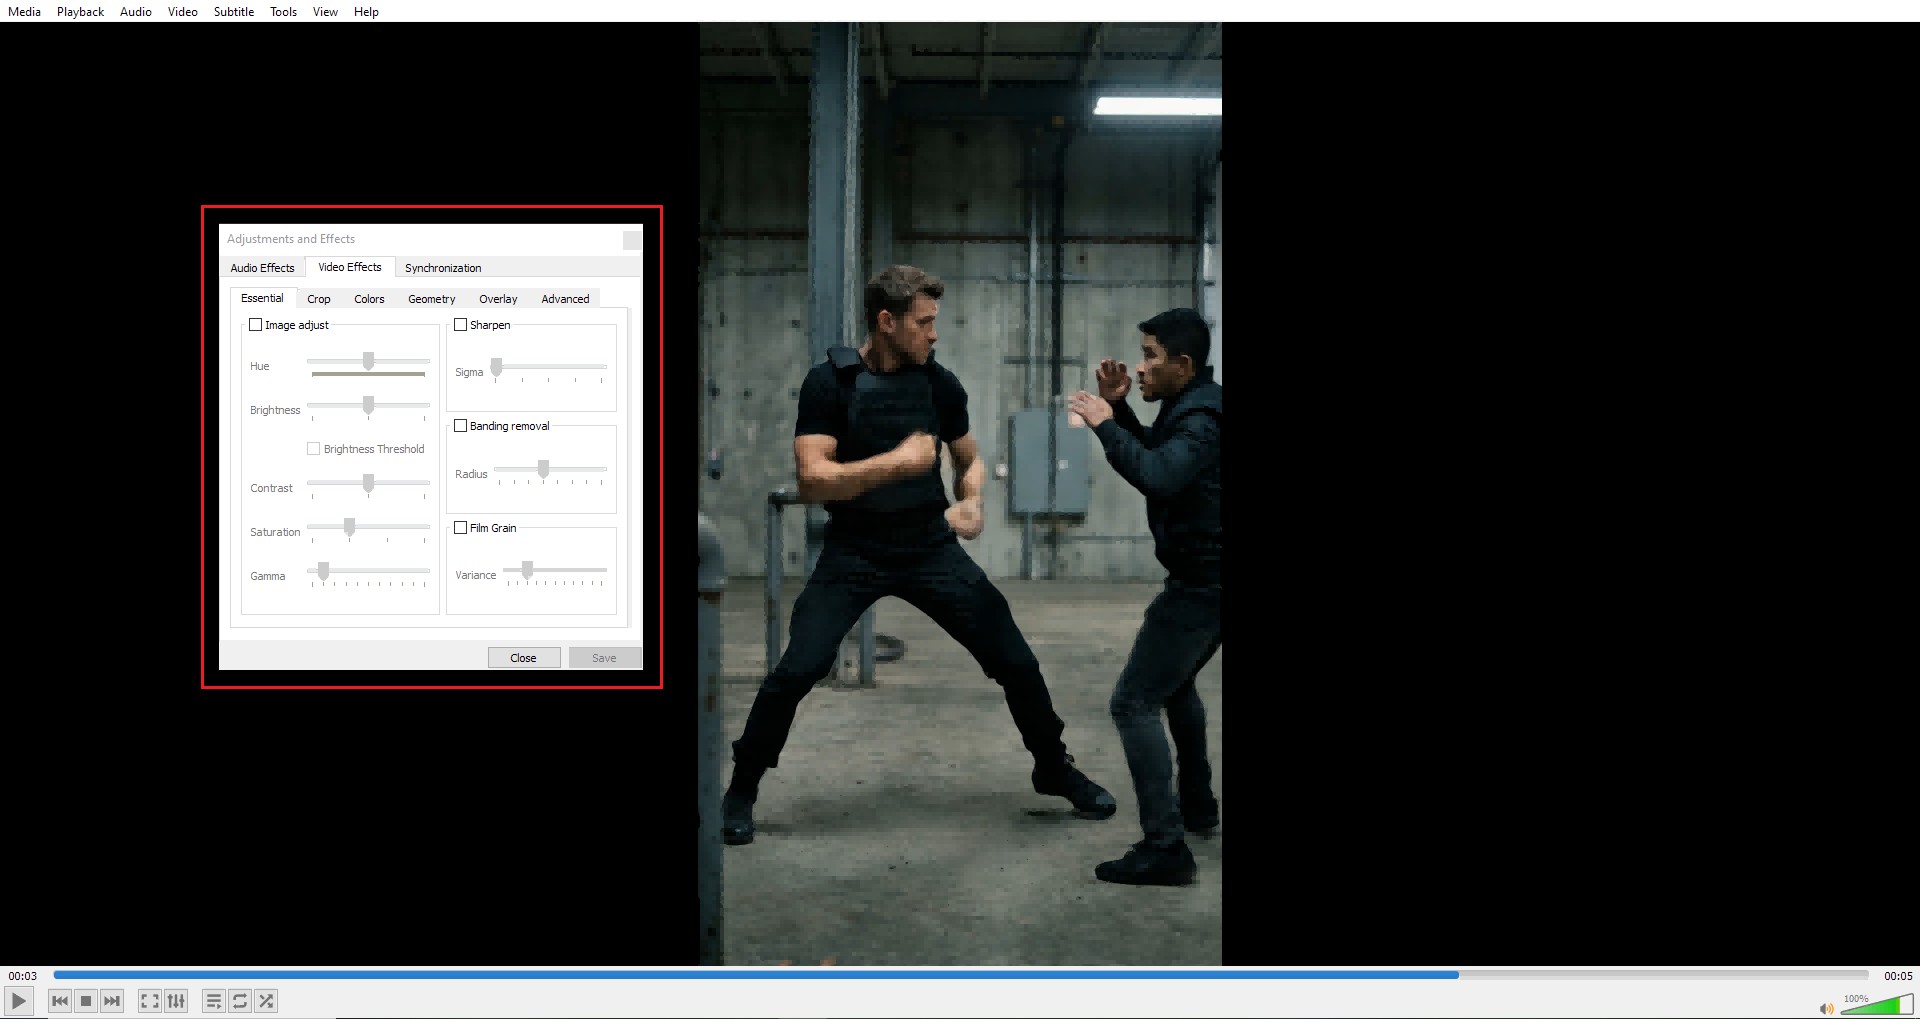
Step 2: Enable Sharpen
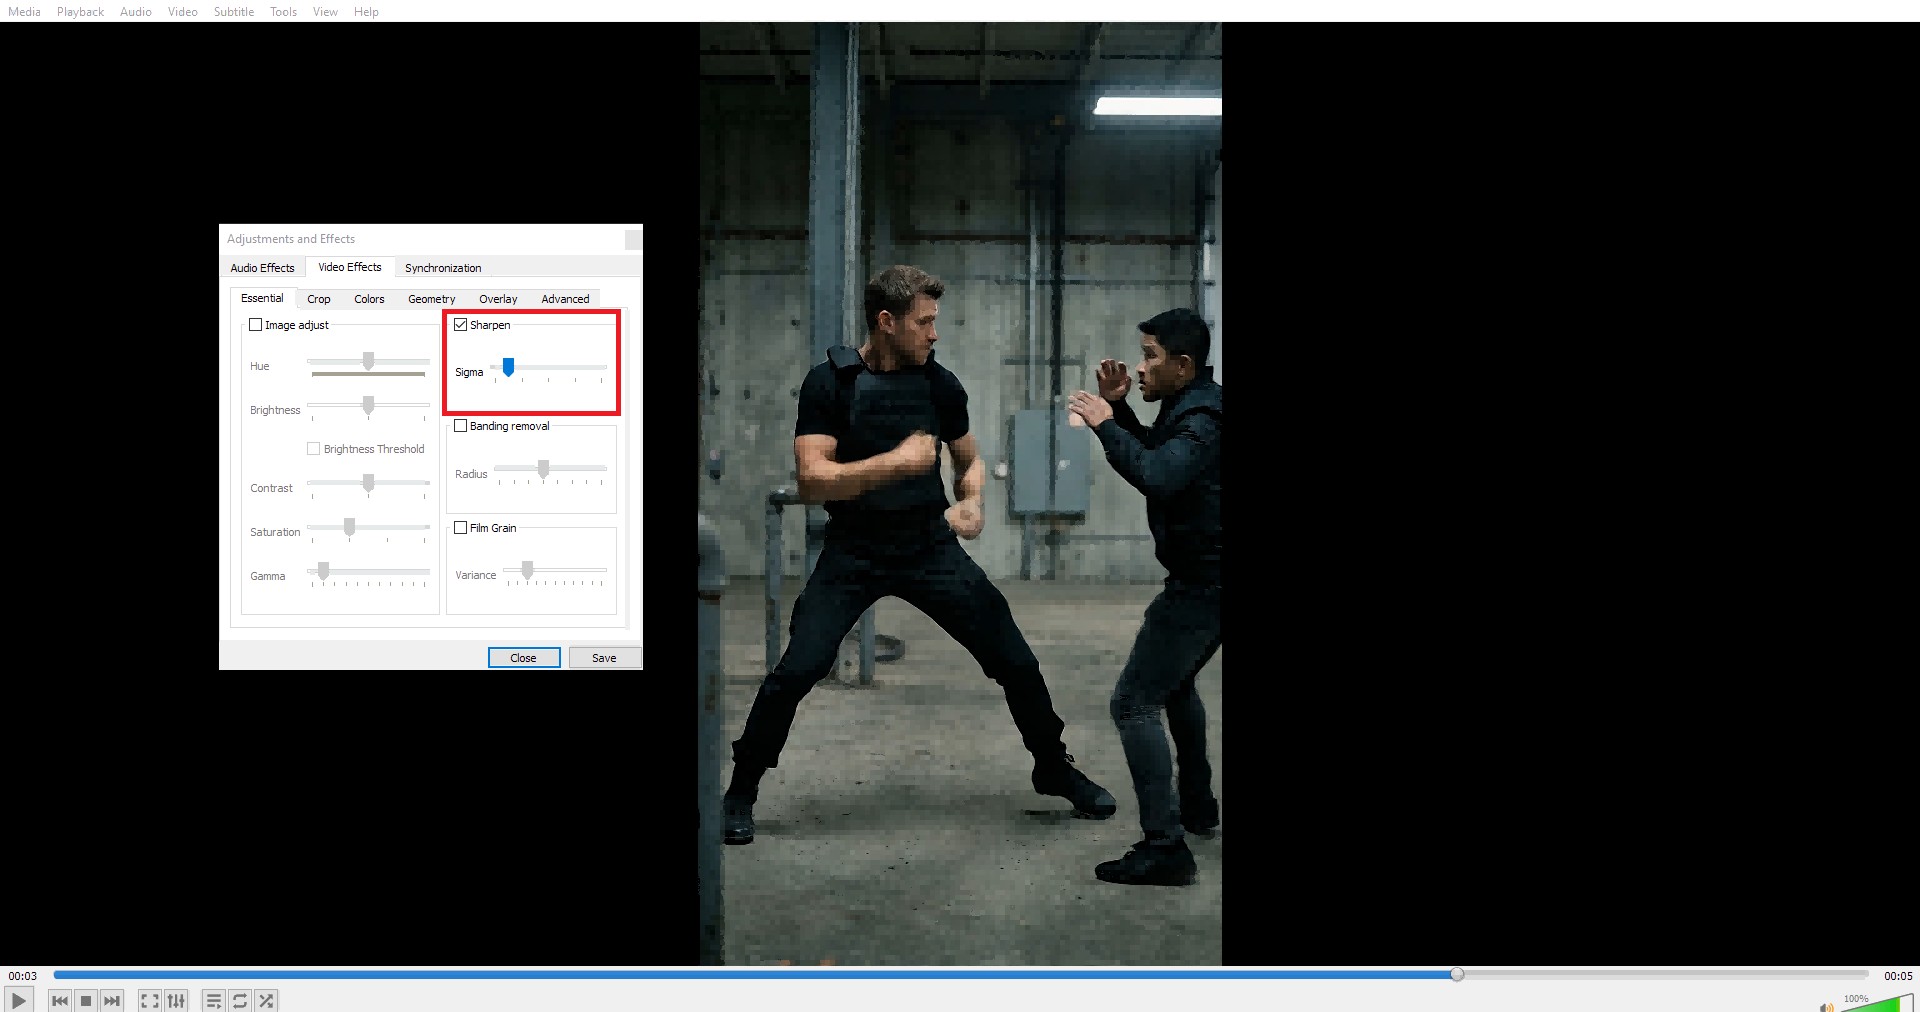
Tick the Sharpen box and set the sigma value somewhere between 0.5 and 1.5. In some cases, sharpening can make compression artifacts appear less noticeable during playback.
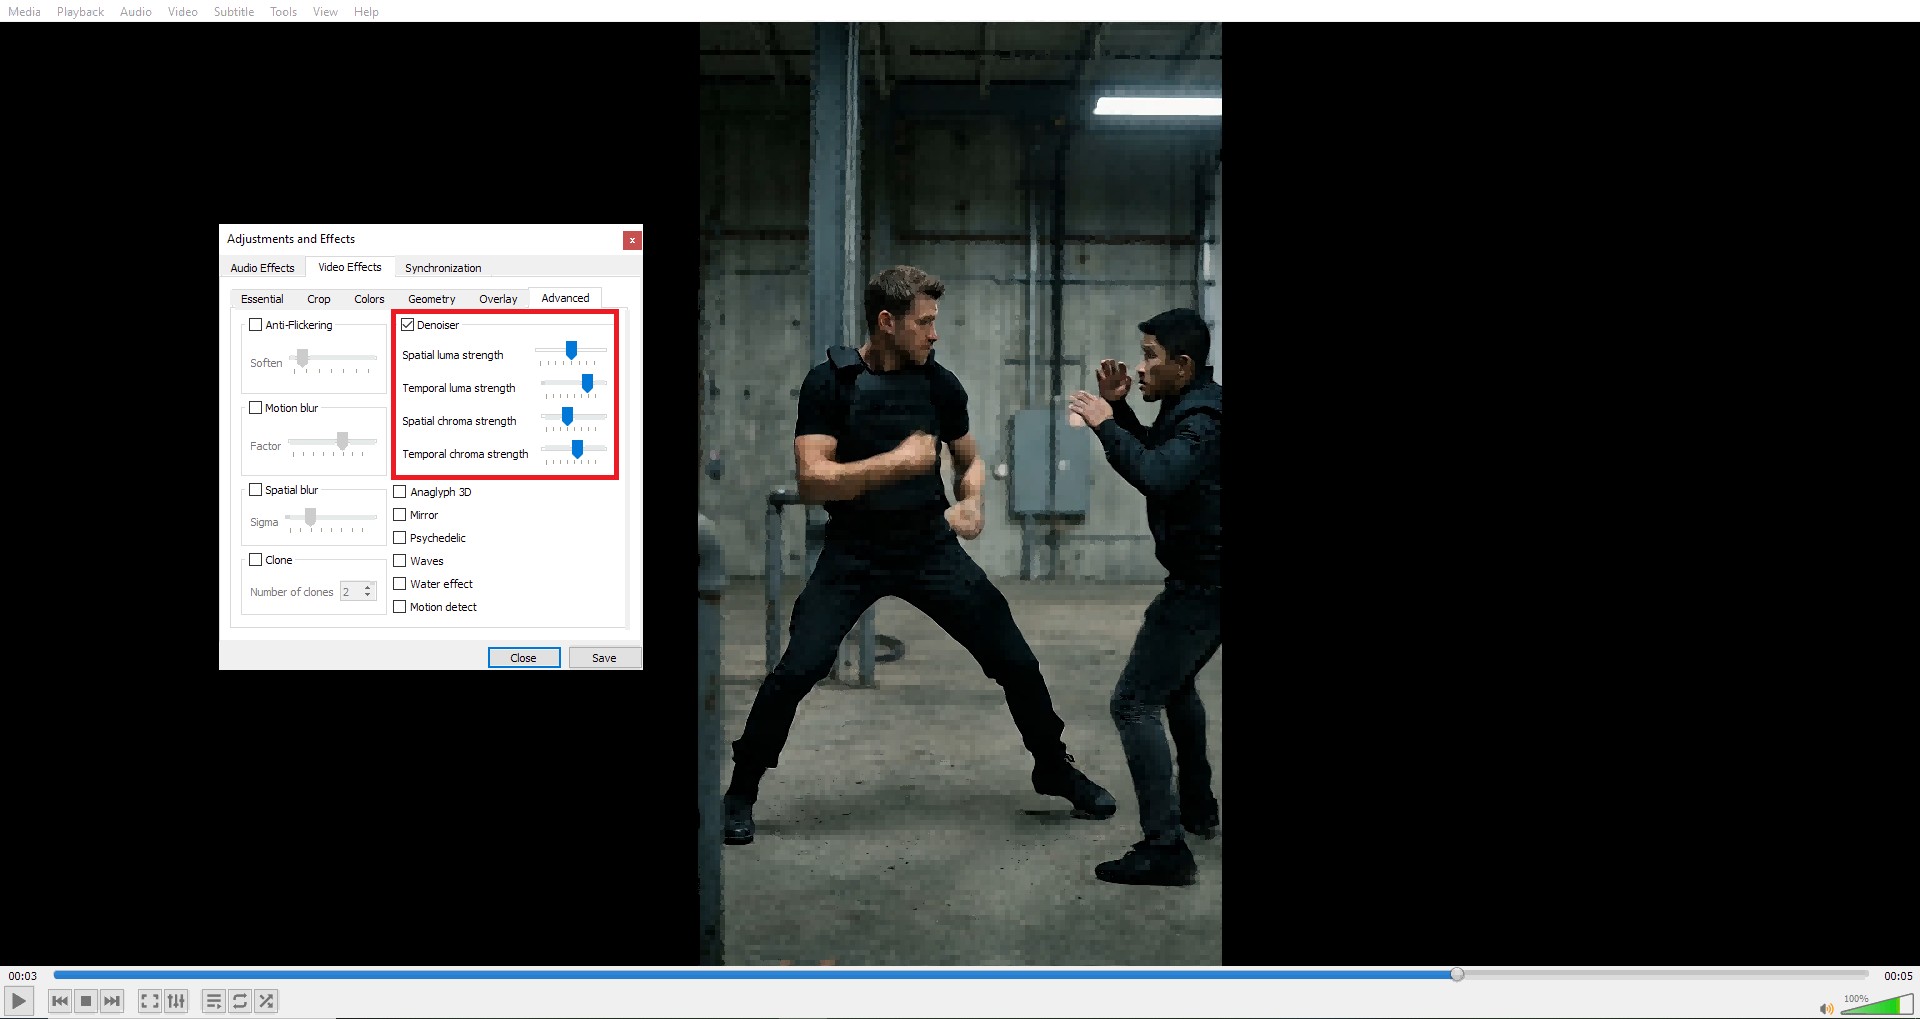
Step 3: Enable Denoise if the footage is grainy
Grainy footage? Tick Denoise too, and set sigma to 1 or 2. Hit Save when you are happy. Keep in mind these tweaks only stick for the current playback session, so they reset once you close VLC.
Step 4: Make the fix permanent if needed
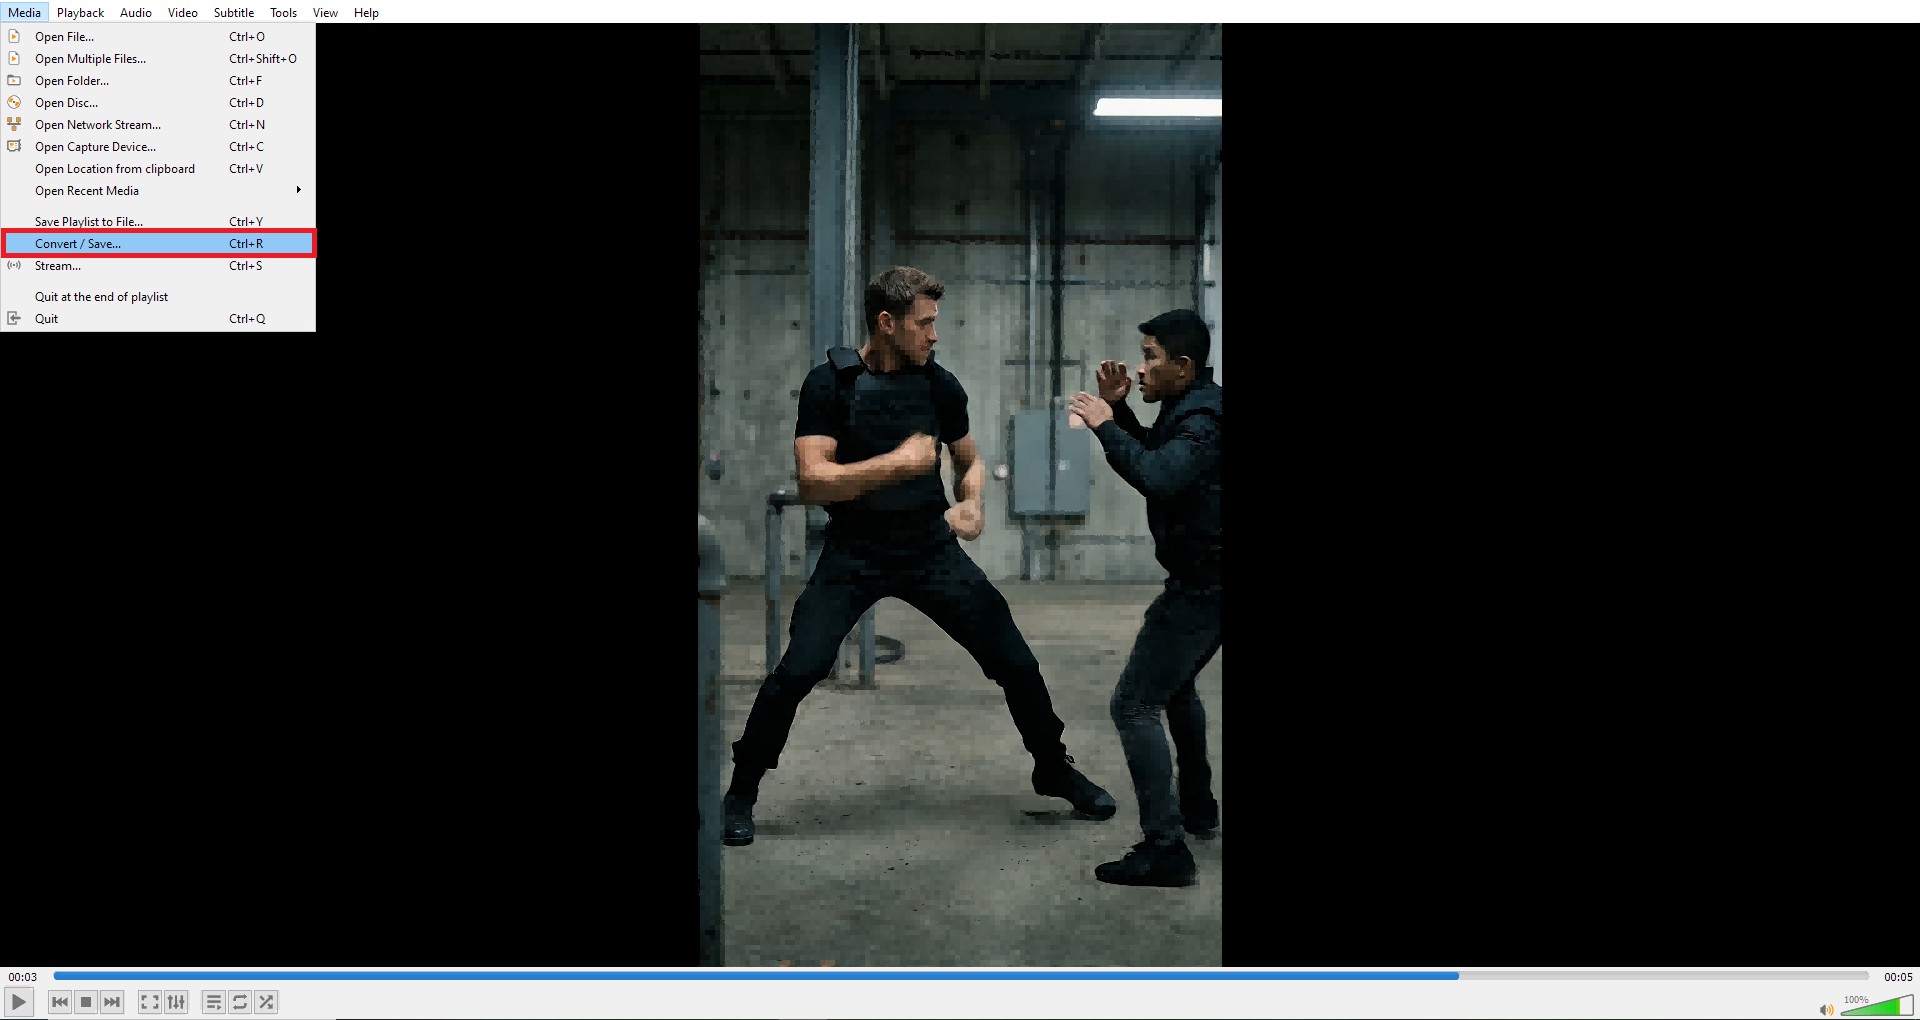
These VLC filters only change what shows on your screen, never the file itself. If you want the fix to actually carry over to the file, go to Media, then Convert and Save, and use VLC's transcode tool.
Method 6: Handbrake (Re-encode with Better Settings)
Best for: footage that got pixelated because it was squeezed too hard on export. If your original is fine but the exported or downloaded copy looks blocky, re-encoding it with better settings in Handbrake can clean a lot of that up. Just know going in: re-encoding cannot bring back detail that the first compression pass already threw away.
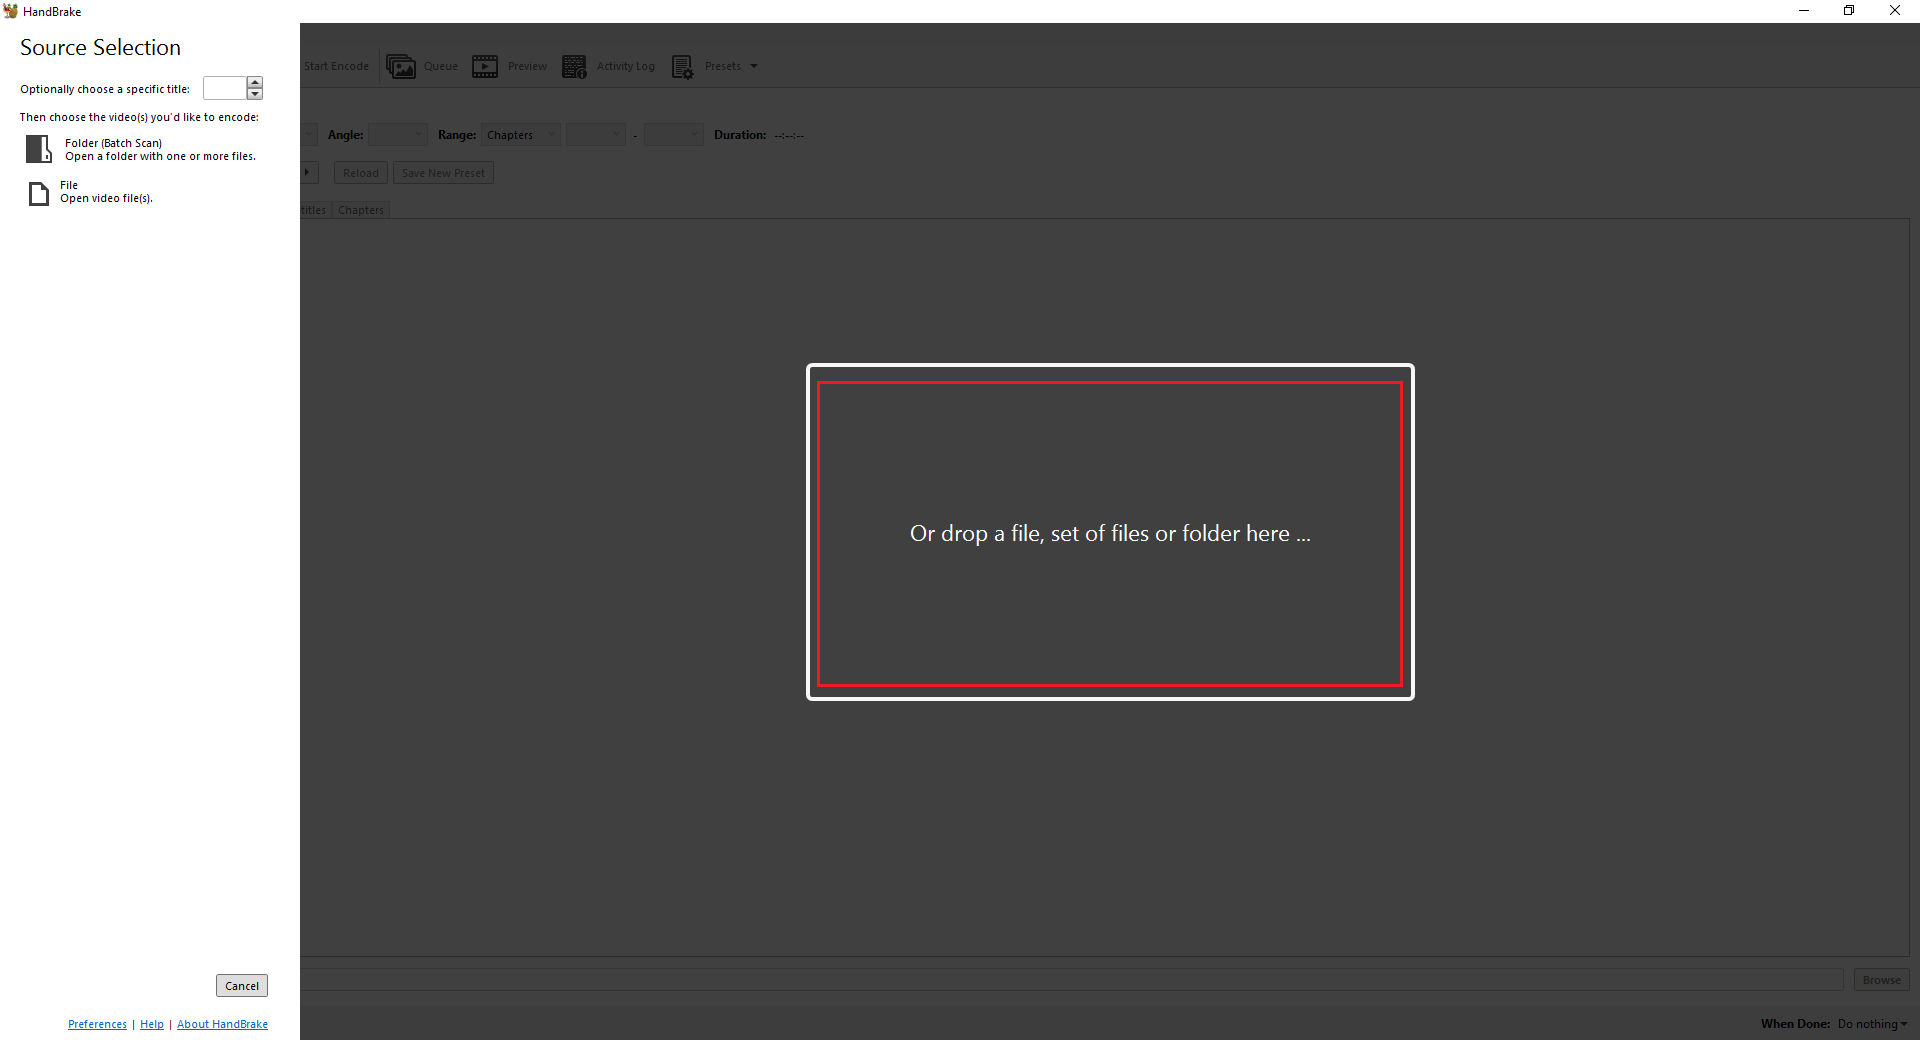
Step 1: Load the file and pick a preset
Fire up Handbrake and load your pixelated file. For a starting preset, go with either H.265 MKV 1080p or H.265 MP4 1080p. Both work well as a baseline for general re-encoding.
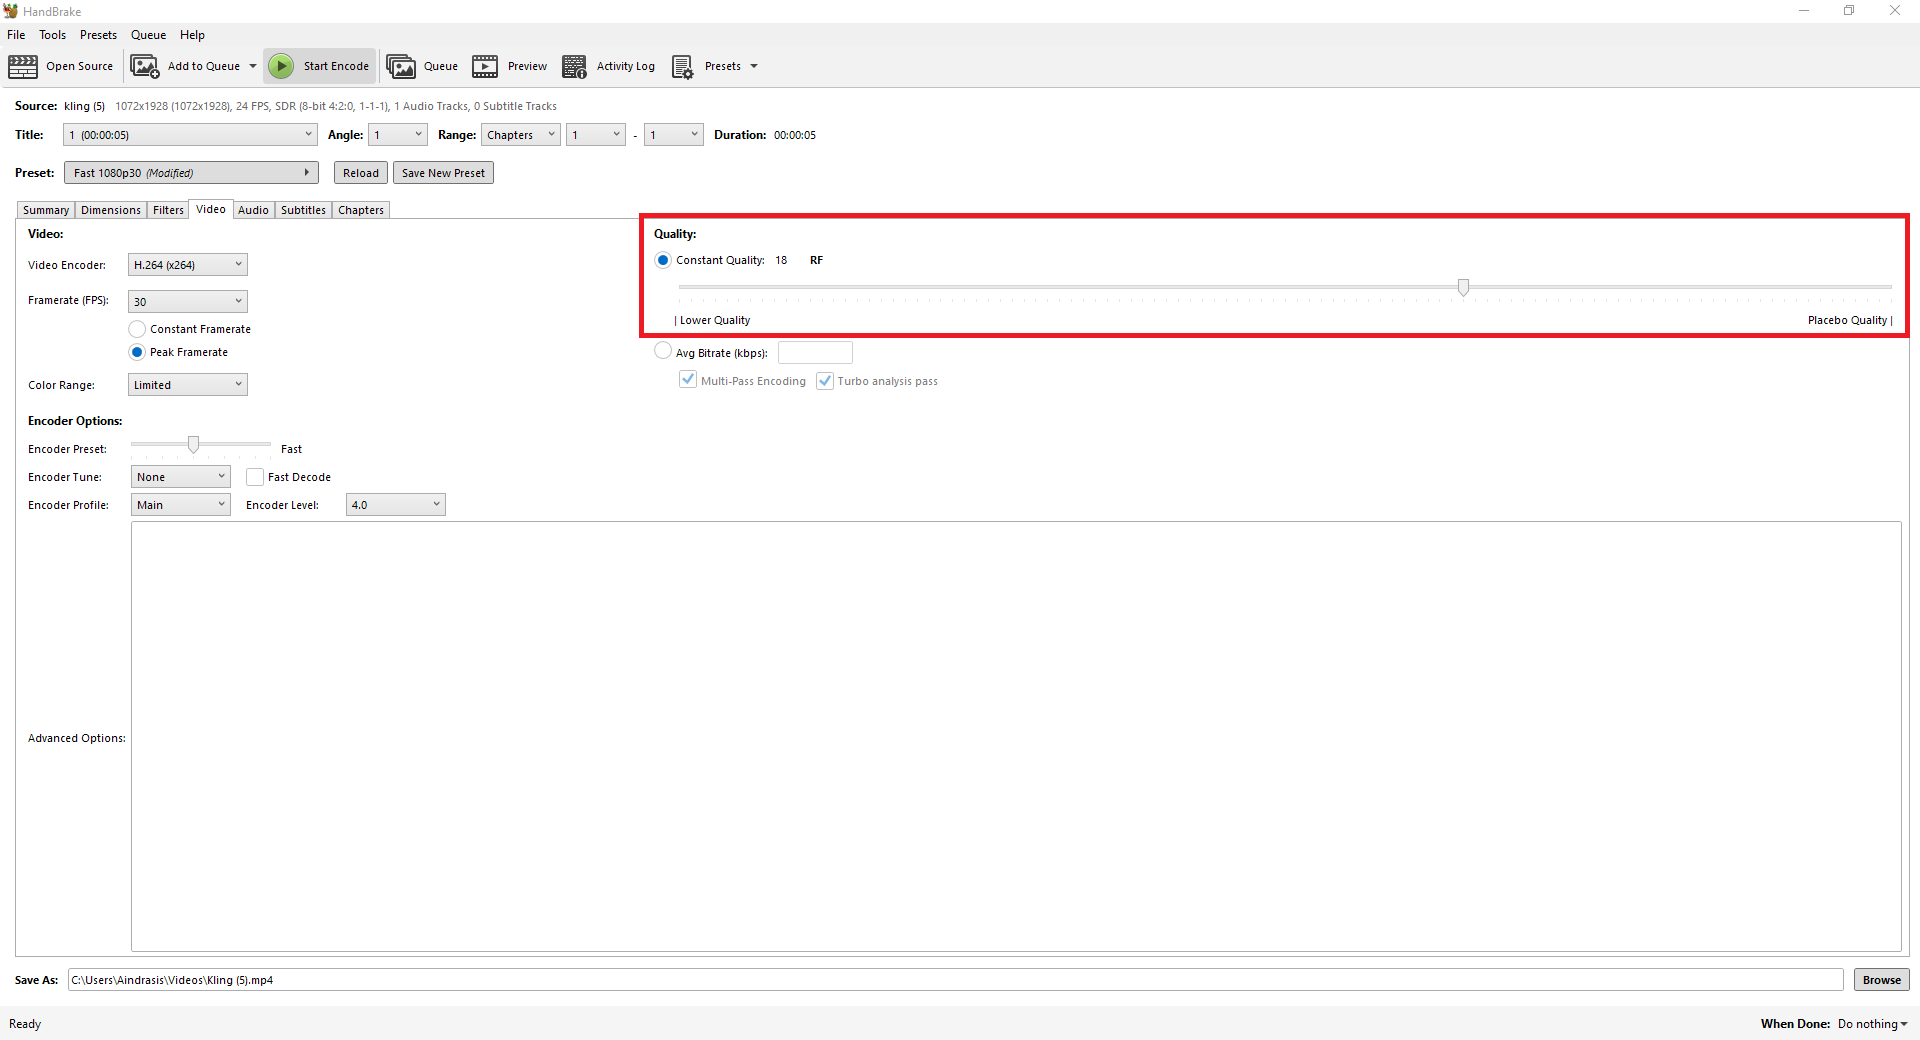
Step 2: Set the quality slider
In the Video tab, set the quality slider to RF 18 to 22. Lower numbers mean higher quality and larger files. RF 18 gives you a large but clean file with minimal extra compression.
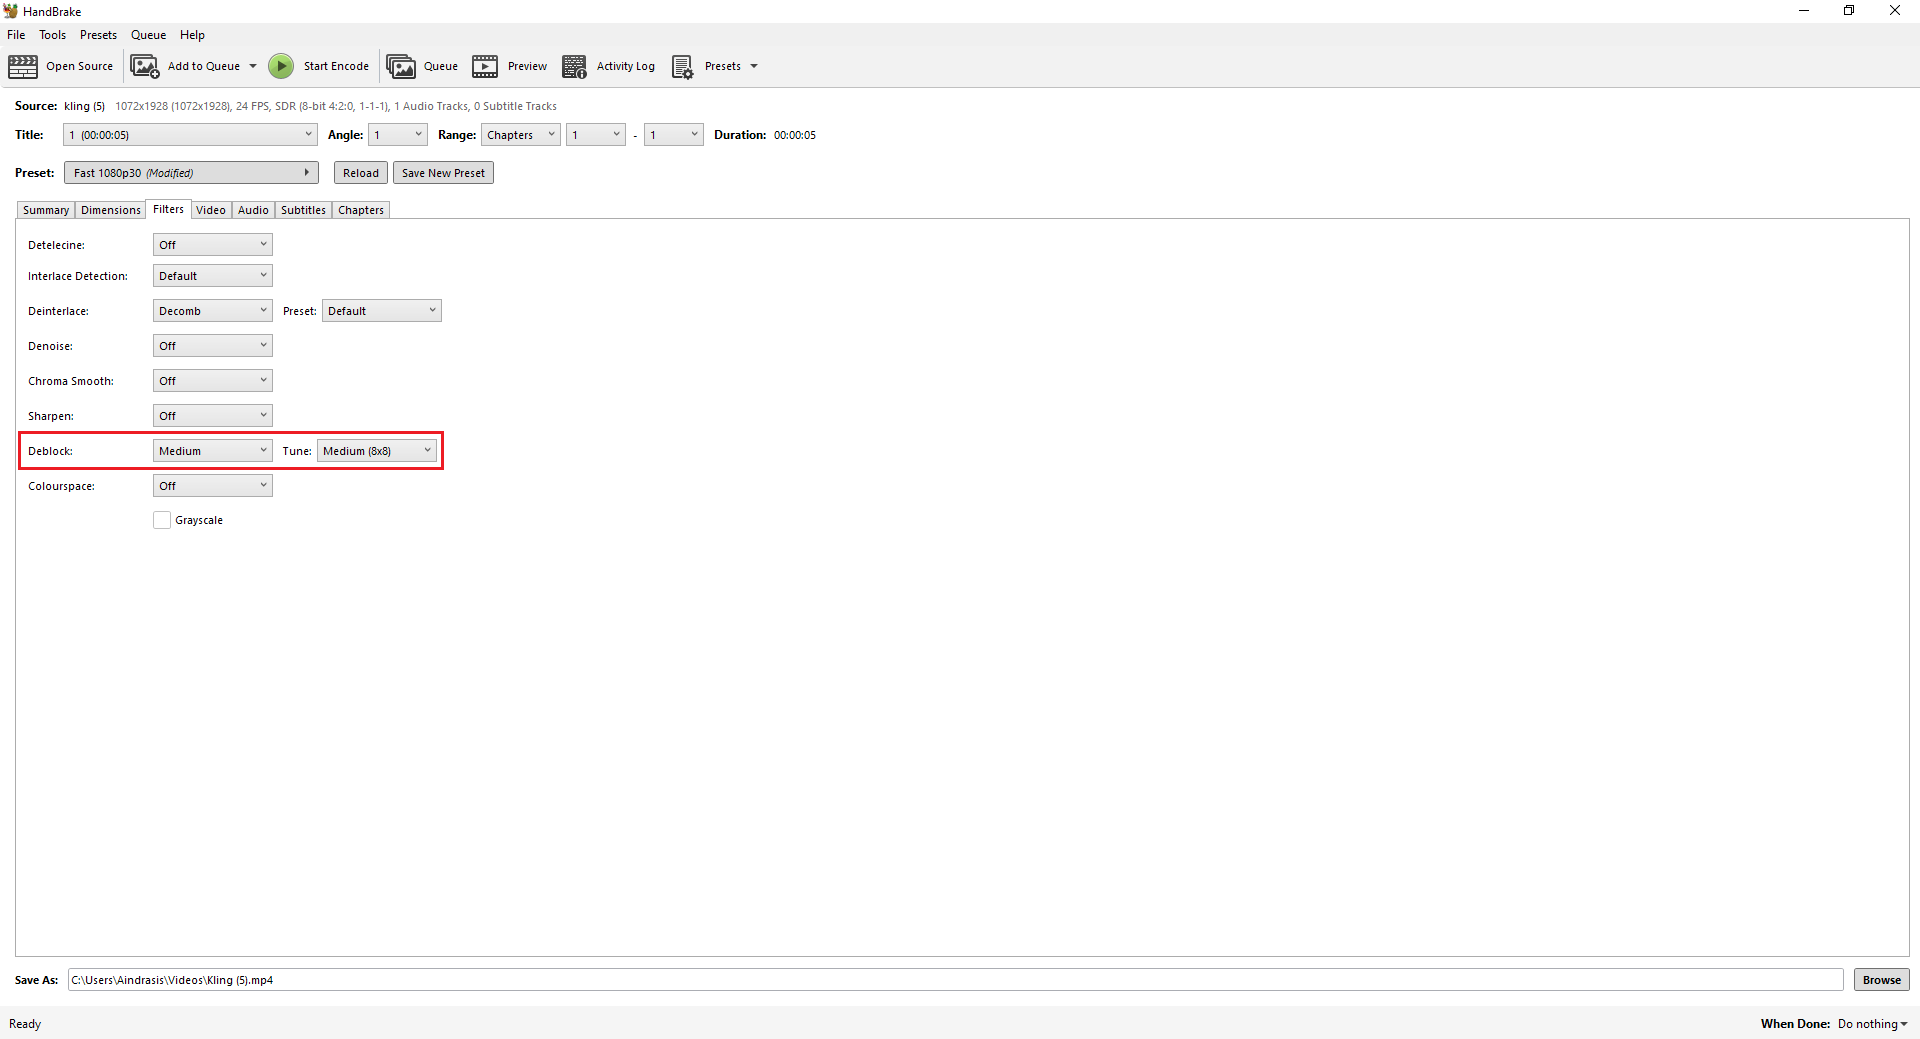
Step 3: Enable Deblock if needed
If the pixelation looks like blocking from compression, enable the Deblock filter in the Filters tab. This smooths out the square artifacts that heavy compression leaves behind.
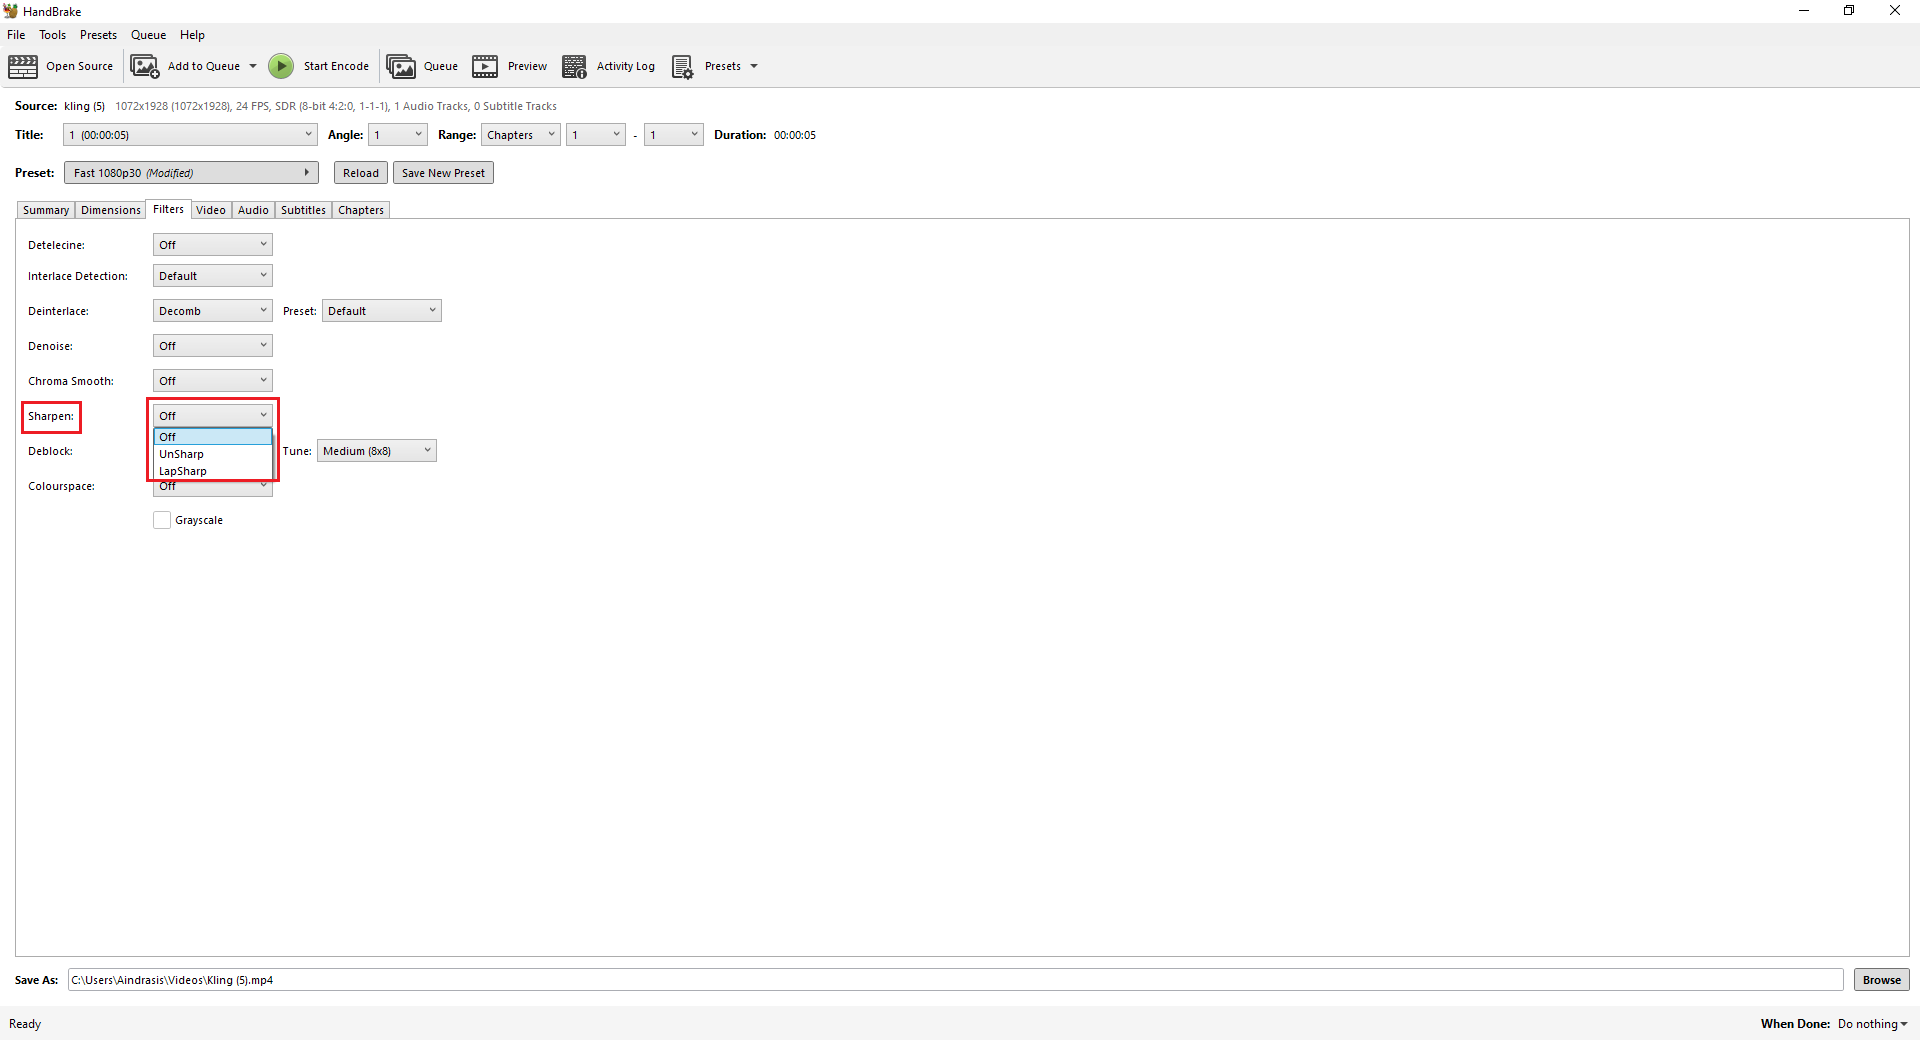
Step 4: Add sharpening and encode
Enable Unsharp or Lapsharp in the Filters tab to counter the softness the deblock filter introduces. Click Start Encode. The output will have fewer visible compression artifacts than the input.
How to Avoid Video Pixelation in the Future
Most pixelation problems are easier to stop before they happen than to fix afterward. These habits cover the most common causes, and none of them require expensive equipment. They are mostly about settings and decisions made before you hit record or export.
Record at the Highest Resolution Your Hardware Supports
Recording at 4K and delivering in 1080p gives you real reframing room and a sharper downscale. Footage shot at 4K and scaled down to 1080p looks sharper than footage shot natively at 1080p on the same camera.
For screen recordings, match the recording resolution to your display resolution. Recording at a lower resolution and then upscaling for delivery is the single most common cause of pixelated screen capture footage. For video calls and streaming, check your platform's recommended resolution and confirm your hardware can sustain it. Dropping below the target resolution under load is a common cause of pixelated call recordings.
Use an Appropriate Bitrate at Export
YouTube recommends 12 to 15 Mbps for 1080p at 60fps, and 53 to 68 Mbps for 4K at 60fps SDR content. For local storage or client delivery, use variable bitrate at the highest quality your file size budget allows.
Avoid exporting to a heavily compressed format like a WhatsApp-optimized or social-media-native export if the file will be re-edited or re-exported later. Always keep a full-quality master version.
Avoid Re-encoding Compressed Files
Every compression pass throws away more detail. If you receive a compressed file and need to edit it, export using a high-bitrate codec like ProRes, DNxHD, or high-bitrate H.265 to limit further quality loss. For archived or downloaded content, keep the original file untouched and only work from copies.
Shoot in Adequate Light
ISO noise is much easier to prevent than to remove later. Shoot with as much light as the scene allows and keep ISO as low as possible. A wider aperture, meaning a lower f-number, lets in more light without raising ISO and introducing grain. If low light is unavoidable, some cameras have an in-body noise reduction profile that processes grain before the file is written.
FAQs
Why does my video look pixelated even at 1080p?
A 1080p label does not guarantee image quality. If the footage was heavily compressed at export, encoded at a very low bitrate, or scaled up from a lower-resolution source, it will still look pixelated at 1080p. Bitrate and compression quality matter just as much as the resolution number on the file.
What is the difference between pixelation and graininess?
Pixelation shows up as visible blocky squares from compression artifacts or upscaling. Grain is random noise across the frame caused by high ISO, low light, or the sensor itself. Both hurt image quality, but the fix is different. To remove pixelation from video, AI upscaling or deblocking filters work best. Grain responds to temporal or spatial noise reduction.
Can AI unpixelate a video?
Pretty much, yes. Tools like Zawa Video Enhancer go frame by frame, rebuilding detail based on patterns it learned from tons of high-resolution footage. You end up with something noticeably sharper and cleaner than a basic upscale, which just stretches the same pixels over a bigger space. If you are looking to unpixelate a video without opening any editing software, this is the way to go.
Can a pixelated video be fully restored to its original quality?
Short answer: no. Once compression or low resolution throws data away, there is no math that brings it back exactly. What AI tools like Zawa do is take a good guess. They reconstruct detail based on what they have learned from other footage, and the result genuinely looks much better than a standard upscale. But it is still a guess. It is not the same as what the camera actually captured. However, Zawa is still very useful for improving visual quality, and it also offers many practical features, such as video watermark removal and video background removal, which can help enhance and optimize existing video content.
Does converting the video format fix pixelation?
Sometimes, but only in specific cases. If the problem is really down to your current format's compression, then yes, switching to a higher-bitrate H.265 encode can help a little. It will not pull back detail that the original compression already wiped out.
How do I fix a pixelated video on an iPhone or Android?
For a quick fix on mobile, Zawa Video Enhancer works through its mobile site. For more manual control, apps like CapCut and Adobe Premiere Rush include basic sharpening and quality enhancement tools on both iOS and Android.
You May Be Interested

How to Fix Pixelated Photos and Enhance Quality Instantly

How to Fix Grainy Photos: Causes, Fixes, and Prevention Guide
How to Fix Unfocused Pictures and Restore Image Clarity

1440p vs 4K: Key Differences, Real Scenarios & Blur Fix

HD vs 4K: Differences, Visual Impact & Which to Choose