
Why Does Instagram Darken My Photos
Why does Instagram darken my photos? HDR tone mapping, wide-gamut color conversion, compression, filters, and display settings can all affect brightness. Learn how to export in SDR and sRGB, adjust midtones, and upload photos without darkening again.

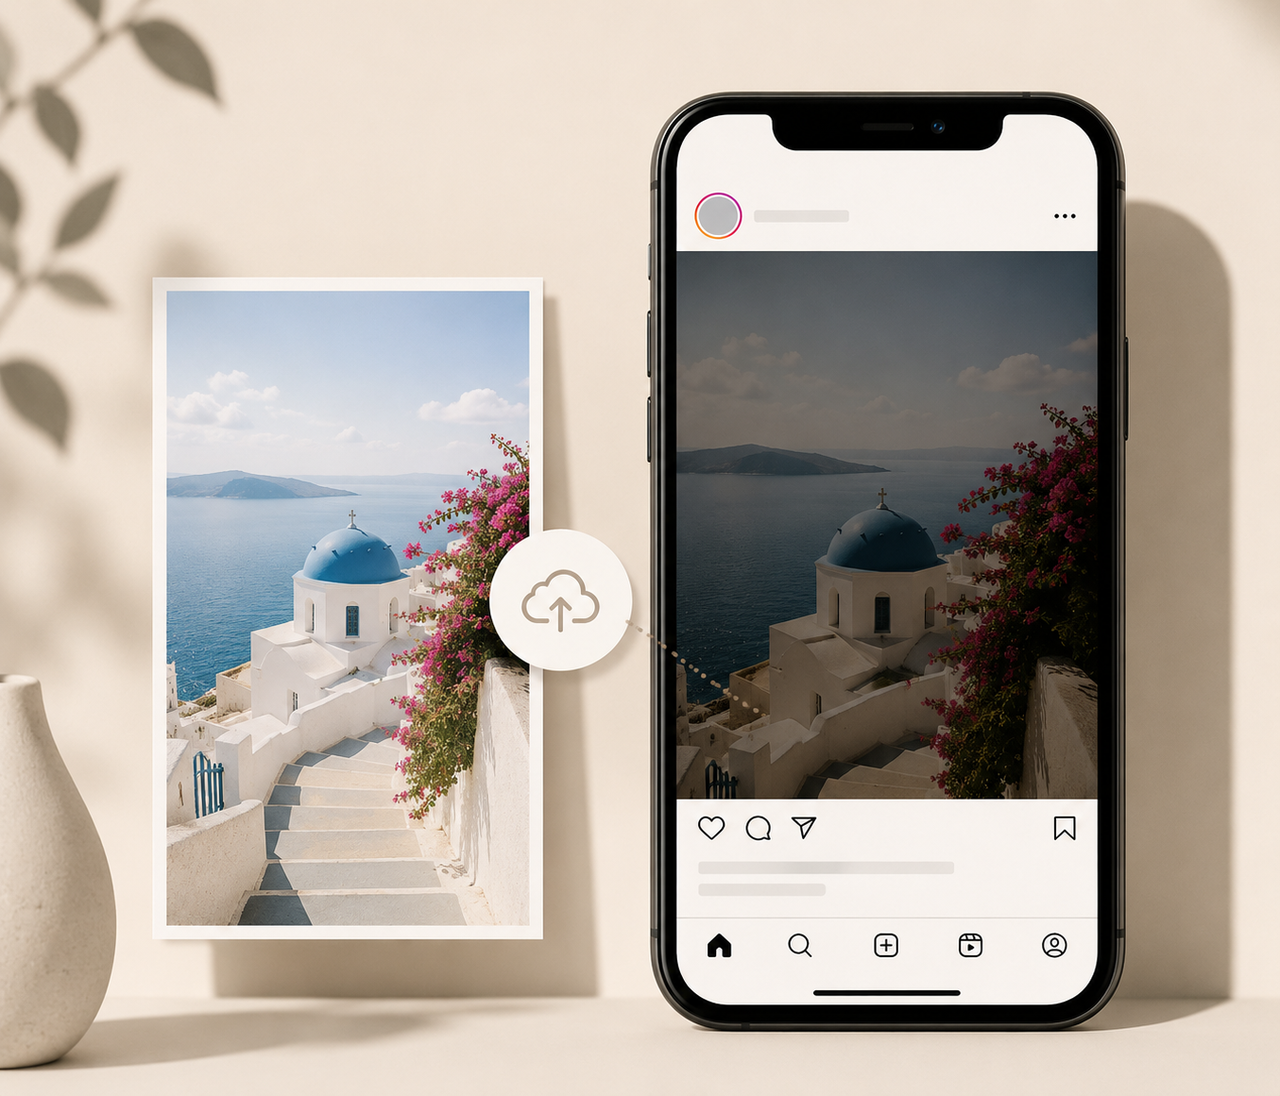
A photo can look bright and balanced in your camera roll, then appear noticeably darker after you upload it to Instagram. Shadows may become heavier, skin tones can lose warmth, and a sunset that looked vivid on your phone may suddenly seem flat. The change is often most obvious with HDR photos, heavily edited images, or files exported in a wide color space.
Instagram does not apply one universal “darkening” effect to every photo. The difference usually appears somewhere in the display and upload pipeline: HDR tone mapping, color-profile conversion, compression, export settings, or the screen used to view the post. Finding that point first will help you correct the photo without making the original unnecessarily bright.
Why Does Instagram Make My Photos Look Darker?
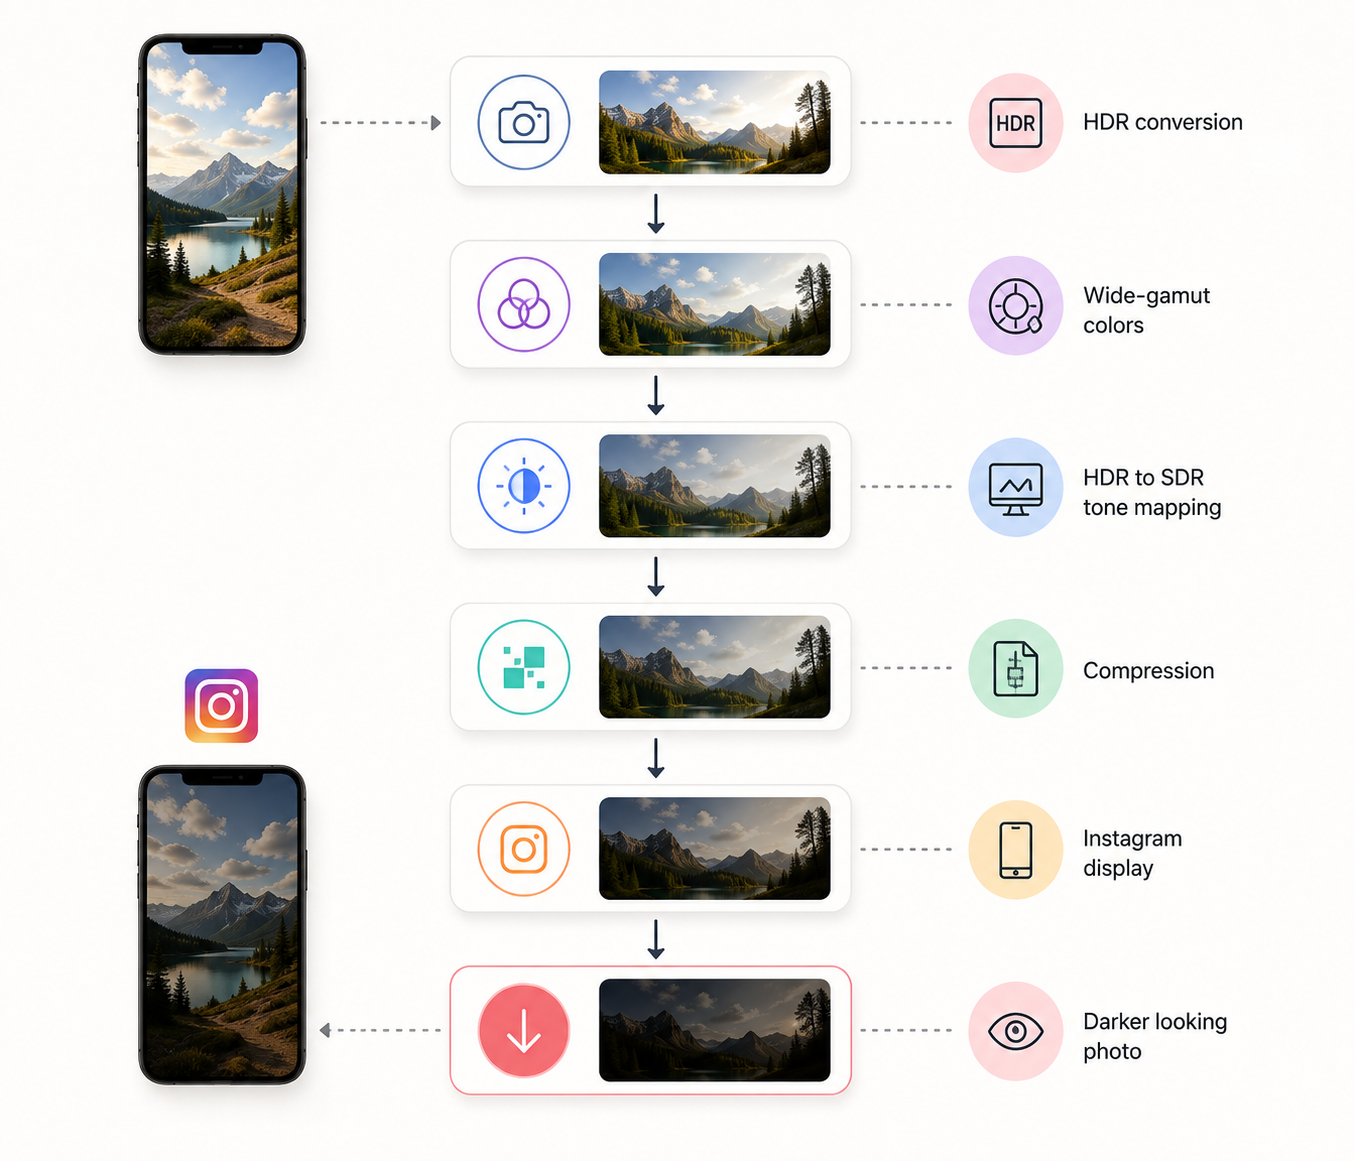
Several processes occur between selecting a photo and seeing it in the published feed. Each one can affect brightness differently, so the cause may be a single conversion or a combination of smaller changes.
HDR Photos Are Converted or Tone-Mapped
Modern phones can capture HDR photos with a wider brightness range than a standard image. When that photo is displayed on a device or Instagram surface that does not reproduce the same HDR range, it must be tone-mapped into SDR. Meta notes that poor tone mapping can make HDR media appear too bright or too dark, even when the original looks correct. Instagram now supports HDR photos on compatible devices, but results can still vary across phones and viewing conditions. Meta Engineering explains how HDR photo delivery depends on the capabilities of the receiving device.
Wide-Gamut Colors Shift During Conversion
Photos shot or edited in Display P3, Adobe RGB, or another wide-gamut space can contain colors that extend beyond standard sRGB. If an app converts those colors differently—or fails to interpret the embedded profile as expected—deep reds, greens, and blues may shift, making the whole image feel darker or more contrast-heavy. A restaurant photo with saturated red walls, for example, may lose separation between the wall and its shadows after conversion. Creating a dedicated sRGB copy reduces this uncertainty.
Compression Makes Dark Areas Look Heavier
Instagram resizes and compresses uploaded images for efficient delivery. Compression does not simply lower brightness, but it can remove subtle tonal differences in shadow areas. Dark hair against a black jacket or trees in a twilight landscape may merge into denser blocks, creating the impression that the picture has been darkened. This effect becomes more visible when the source is already small, saved repeatedly, or exported at a very low JPEG quality.
Gamma and Export Settings Change Midtone Brightness
Two files can have similar white and black points while showing very different midtones. An incorrect gamma interpretation or a mismatch between the editor’s working space and export profile may push faces, walls, and cloudy skies lower than expected. This commonly happens when a photo is edited on a bright, wide-gamut monitor without checking an SDR preview. Learning how to brighten an image through controlled midtone and shadow adjustments can help correct the problem without washing out the highlights.
Instagram Filters Increase Contrast or Reduce Exposure
An Instagram filter, Lux adjustment, or manual edit may remain active without being immediately obvious on the small upload screen. Some filters deepen blacks or add contrast, while the Edit controls can lower exposure, brightness, or shadows. A lightly filtered café photo may look appealing in the preview but lose detail beneath tables once published. Before sharing, return every Instagram adjustment to zero and compare the unfiltered preview with the original file.
Display Brightness and HDR Settings Change How the Photo Looks
The photo may not have changed at all; the screen can be responsible. Auto-brightness, battery-saving modes, Night Shift, True Tone, blue-light filters, and HDR display settings all affect perceived brightness or color. An image edited indoors at maximum screen brightness can look underexposed when viewed outside on a dimmed display. Comparing the post on another phone at a moderate brightness level helps separate a file problem from a display problem.
How to Find Out When Instagram Is Darkening Your Photo
Before editing the image again, identify where the difference first appears. A quick comparison can reveal whether the problem originates in the exported file, Instagram’s preview, the published post, or one particular display.
Compare the Original, Upload Preview, and Published Photo
Place the original photo, the Instagram upload preview, and the published post side by side without changing screen brightness. If the preview is already dark, the issue probably involves Instagram’s editing controls or the file’s color and HDR data. A normal preview followed by a darker published post points more strongly toward processing or display behavior. Taking screenshots can help, although screenshots themselves may be SDR and should only be used as a rough visual reference.
Check the Post on Another Phone or Screen
Open the published photo on a second device, preferably one with different HDR capabilities or a different operating system. If it looks dark only on your phone, check that device’s brightness, display tone, accessibility, and power-saving settings. When the post appears consistently dark on several screens, the uploaded file is more likely responsible. This test is particularly useful when a client sees an underexposed product photo that looks normal on the editor’s calibrated monitor.
Compare Feed Posts, Stories, Reels, and Carousels
Upload the same test image to a feed draft and a temporary Story, then compare the previews. These surfaces use different layouts and may not display or process media identically, especially when a still image is placed in a Reel or combined with Story effects. When posting multiple photos on Instagram, prepare every carousel slide with the same color space, dynamic range, and aspect ratio before upload. This prevents format differences from being mistaken for an exposure problem.
Check Whether Only HDR Photos Are Affected
Choose one recent HDR camera photo and one ordinary SDR screenshot or JPEG, then upload both without filters. If the SDR file stays consistent while the HDR photo darkens, tone mapping or HDR display support is the likely cause. You can confirm the pattern by exporting an SDR version of the same HDR photo and testing it again. This controlled comparison is more reliable than judging unrelated images with different lighting and edits.
What Are the Best Export Settings for Instagram Photos?
A predictable Instagram export should minimize the amount of interpretation required after upload. The goal is not to create the largest possible file, but to provide a correctly sized SDR image with a standard, embedded color profile.
Instagram Export Settings at a Glance
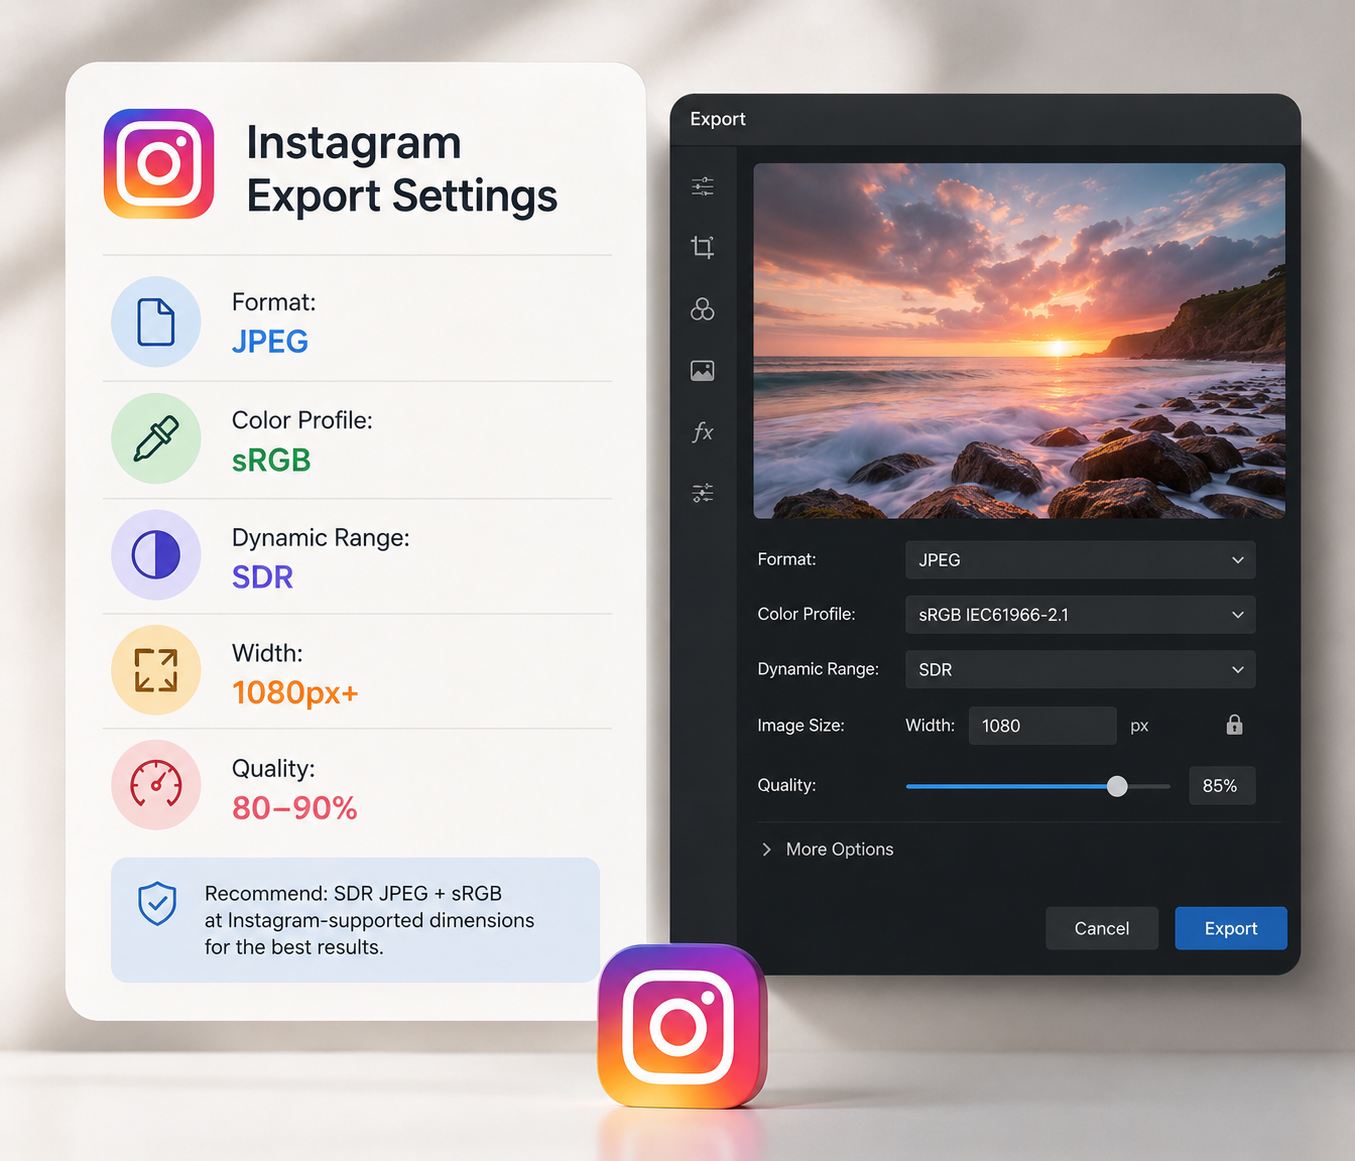
For dependable results, export still photos as SDR JPEGs in sRGB and use dimensions close to Instagram’s display size. Instagram officially accepts photos at least 1080 pixels wide with aspect ratios from 1.91:1 through 3:4. Instagram help center lists the current supported range.
| Setting | Practical recommendation | Why it helps |
| Color space | sRGB | Provides predictable color across common screens |
| Dynamic range | SDR | Avoids inconsistent HDR-to-SDR tone mapping |
| File format | JPEG for standard photos | Offers broad compatibility and manageable file size |
| Width | 1080 pixels | Matches Instagram’s published minimum-width guidance |
| Square post | 1080 × 1080, 1:1 | Preserves a centered square composition |
| Portrait post | 1080 × 1350, 4:5 | Uses more vertical feed space |
| Camera portrait | 1080 × 1440, 3:4 | Matches the ratio used by many phone cameras |
| Landscape post | 1080 × 566, 1.91:1 | Fits the widest supported feed ratio |
| Story image | 1080 × 1920, 9:16 | Fills a vertical Story screen |
| JPEG quality | About 80–90% as a starting point | Limits artifacts without producing an unnecessarily large file |
| Color profile | Embed sRGB profile | Identifies how the file’s color values should be displayed |
| Sharpening | Light output sharpening | Compensates gently for resizing without creating halos |
How to Stop Instagram From Darkening Photos
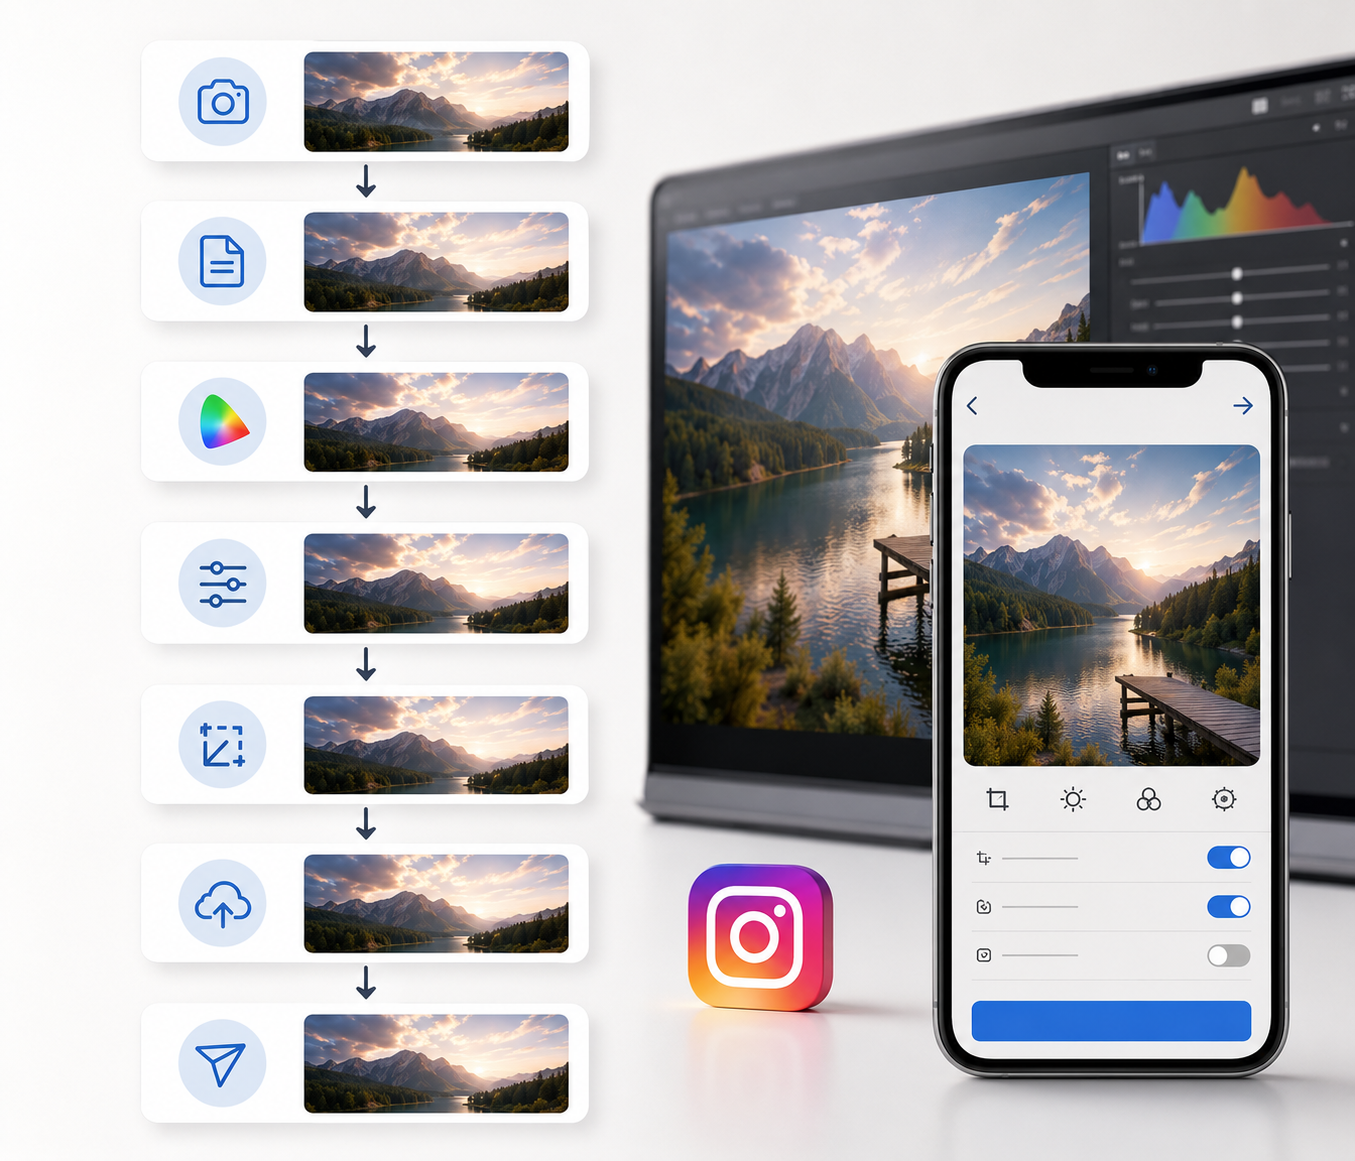
A consistent workflow is more effective than adding extra exposure immediately before every post. Work from the original, prepare a platform-specific copy, and inspect the upload preview before publishing.
Step 1: Start With the Original Photo
Return to the camera file or highest-quality edited master rather than downloading a copy from a message, website, or previous social post. Shared copies may already have been resized, compressed, stripped of metadata, or converted into another color space. If the image is stored in iCloud or Google Photos, download the full-resolution version instead of editing an optimized preview. Keeping the master untouched also lets you prepare a new Instagram export without degrading the archival file.
Step 2: Remove Unwanted Filters and Automatic Adjustments
Review both the photo editor and Instagram’s adjustment panel for edits that may be stacking together. An automatic phone enhancement followed by an Instagram filter or Lux adjustment can create stronger contrast than intended. Set the filter to Normal, return the editing sliders to their neutral values, and disable any enhancement you do not need. If you are preparing several branded social assets, ZaWa brings image editing and other creative tools into one workflow, but the final upload preview should still be compared with the prepared export.
Step 3: Create an SDR and sRGB Copy
Duplicate the finished photo, convert that copy from HDR to SDR, and assign or convert it to sRGB before making final brightness decisions. Conversion is important: merely relabeling a Display P3 file as sRGB can alter its appearance rather than preserve it. Adobe recommends sRGB for online viewing because it offers more consistent reproduction in color-managed workflows. Keep the wide-gamut or HDR master separately so the Instagram version does not replace your best source file.
Step 4: Adjust Midtones Without Blowing Out Highlights
If the SDR conversion still looks dark, raise the midtones and open the shadows slightly instead of increasing global exposure. This protects bright skin, white clothing, lamps, and clouds from clipping while recovering detail in the main subject. Users who are unfamiliar with curves or local masks can upload the photo to the ZaWa AI photo eitor and describe the desired change, such as restoring shadow detail and improving brightness while preserving the original skin tone, colors, and composition. Export the result in sRGB and inspect Instagram’s preview again.
Step 5: Resize and Export With the Color Profile Embedded
Resize the final copy to the intended Instagram dimensions rather than uploading an extremely large image and leaving all scaling to the platform. Select JPEG, choose sRGB, and enable the option to embed the color profile. Avoid repeated saves, since every new lossy JPEG export can weaken gradients and shadow detail. Pixel dimensions matter here; changing the PPI or DPI value alone will not make a screen image brighter or improve its Instagram quality.
Step 6: Enable High-Quality Uploads and Disable Data Saver
In Instagram, open your profile menu and look for Media quality or Data usage and media quality, then enable Upload at highest quality. Turn off Data Saver when image quality matters, and upload over a stable connection. The exact menu wording can differ by app version and operating system. This setting mainly protects detail and reduces aggressive upload optimization; it cannot correct an HDR conversion, embedded-profile error, or underexposed source photo.
Step 7: Test the Photo With a Private or Secondary Account
For an important campaign or client post, publish the prepared image to a private test account before using the main profile. View it on two devices and compare it with the final SDR export at similar screen brightness. A product launch image, for instance, should be checked for label readability, shadow detail, and accurate brand colors. This final test catches platform-specific changes without forcing you to delete and repost a public upload.
How to Fix a Photo That Looks Too Dark on Instagram
Once a photo has already been published, the available fix depends on whether the darkness comes from the image or the viewer’s device. Confirm that the problem appears consistently before preparing a replacement.
Brighten Midtones and Shadows With an AI Photo Editor
When the exported image itself is too dark, use an AI image brightener to improve the affected areas without lifting every tone equally. A useful instruction might be: “Brighten the face and jacket, restore detail in the background shadows, and keep the window highlights unchanged.” Specific adjustments produce a more balanced result than simply increasing overall exposure. Examine hair, skin, fabric, and other textured areas at full size before exporting to make sure the corrected photo still looks natural.
Re-Export the Photo as an SDR JPEG
If only the HDR version is affected, return to the original master and create a fresh SDR JPEG rather than editing a screenshot of the Instagram post. Convert it to sRGB, embed the profile, and check the new file in more than one viewer before uploading. This approach preserves more information and avoids adding another generation of compression. Give the replacement a new filename so you do not accidentally select the previous HDR export from your gallery.
Update Instagram and Clear the App Cache
An outdated app or corrupted cached preview can occasionally display an image incorrectly even when the uploaded file is fine. Android users can close Instagram and clear its cache through the system’s app settings; iPhone users generally need to offload or reinstall the app because iOS does not provide the same per-app cache button. Update Instagram first, restart the phone, and reopen the post before changing the image itself. Reinstallation should be a troubleshooting step, not the first response to every dark upload.
Repost Only When the Published Photo Cannot Be Corrected
Instagram lets you revise elements such as the caption, location, tags, and alt text, but it does not provide full replacement editing for the published image itself. If the file is genuinely too dark across multiple devices, prepare and verify the corrected version before removing the old post. Reposting is most worthwhile when accurate details matter—for example, a clothing color, product finish, or client portrait. A slight screen-dependent difference may not justify losing the original post’s engagement.
FAQs
Why Do Instagram Stories Look Darker?
HDR conversion, Story effects, or full-screen viewing can make shadows appear heavier. Export the image at 1080 × 1920 in SDR and sRGB, then check the final preview before posting.
Why Do Carousel Photos Have Different Brightness Levels?
Slides may use different color spaces or come from different cameras and editing apps. Convert every image to SDR sRGB and match their midtones before uploading.
Does Instagram Lower Photo Brightness Automatically?
Not universally. Apparent darkening usually comes from HDR tone mapping, color conversion, compression, active edits, or display settings.
Can Instagram Darken Photos After Posting?
Photos do not normally become darker over time. If the appearance changes, check the post on another device or browser before editing or reposting it.
Conclusion
Instagram photos usually look darker because the image is being interpreted differently after it leaves the editor—not because the platform applies the same darkening filter to every post. HDR-to-SDR tone mapping, wide-gamut conversion, compressed shadows, export gamma, active filters, and screen settings can all produce a similar visual result.
The most reliable solution is a controlled Instagram workflow: begin with the original file, create an SDR copy, convert it to sRGB, correct the midtones carefully, resize it for the intended format, and embed the color profile. Once high-quality uploads are enabled, compare the preview and published post on more than one screen. That process addresses the actual source of the change while protecting highlights, skin tones, brand colors, and natural contrast.
You May Be Interested

100+ Father’s Day Jokes That Dad Will Actually Laugh At

100+ Mother's Day Quotes to Celebrate Mom

100+ Trending Instagram Bios for Boys to Upgrade Your Profile
What Is 1440p Resolution? QHD Explained (2026)
178 Independence Day Wishes & Quotes
