Fashion Photography Retouching Without Losing Skin Texture
Fashion photography retouching should polish skin, clothing, accessories, and backgrounds without erasing natural texture or changing product details. A controlled workflow preserves pores, fabric structure, color, shapes, and the creative direction.

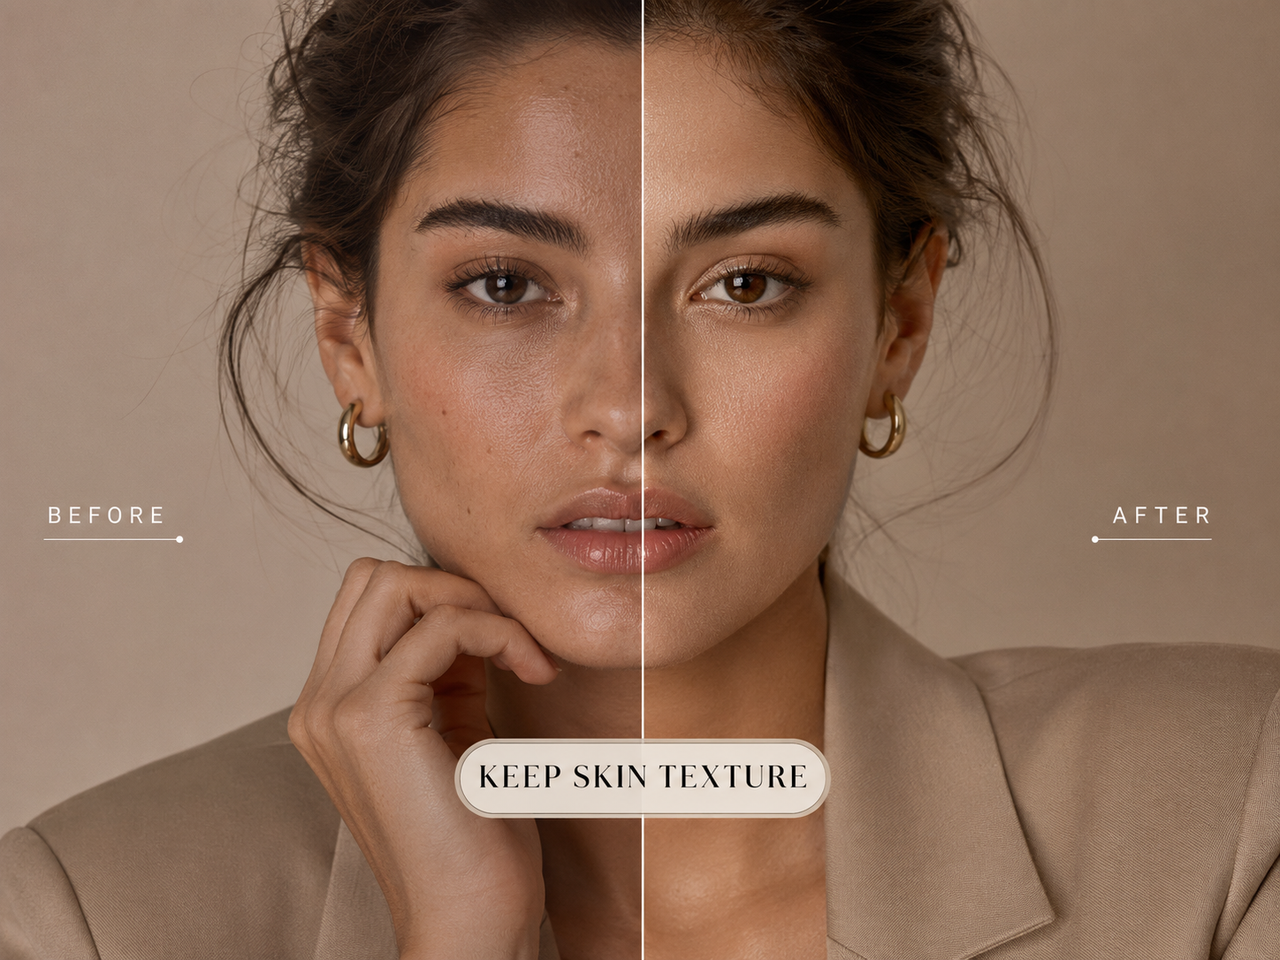
Fashion images often require more refinement than standard portraits, yet visible editing can weaken the model’s expression and the designer’s work. Retouching should correct capture-related problems while protecting skin texture, garment construction, and the intended styling.
Since every element shares the same frame, changing one area may affect how the others are perceived. A controlled edit therefore begins by deciding which details distract from the concept and which ones belong in the photograph.
What Needs Retouching in Fashion Photos?
Not every imperfection requires the same tool or level of correction. Separating temporary distractions from intentional styling and permanent features helps the image look polished without losing its character.
Skin Blemishes and Uneven Tone
Temporary blemishes, localized redness, and uneven makeup can pull attention away from the styling. These distractions may be corrected when they result from the shoot or change how light moves across the face. Permanent features and natural facial structure should remain unless the subject or client requests otherwise.
Flyaway Hair and Makeup
Around the hairline, isolated strands that cross the eyes or interrupt the silhouette usually deserve more attention than fine hairs that create a natural edge. Makeup corrections should address smudges, uneven blending, or accidental gaps without redesigning the artist’s intended look. Eyelashes, brows, and lip edges need enough definition to remain clear without appearing outlined.
Wrinkles, Lint, and Loose Threads
Lint, stray threads, and handling marks may make a finished garment appear poorly prepared. When similar creases appear across multiple frames, an AI clothing retouching tool can provide a faster first pass before manual review. Natural folds should remain when they communicate the garment’s fit, weight, and movement.
Fabric Texture and Garment Shape
The weave, sheen, pile, and weight of a fabric help viewers understand its material quality. Excessive smoothing can make wool, denim, leather, and silk look nearly identical, while aggressive reshaping may misrepresent the cut. Corrections should preserve the original silhouette and restore detail only where lighting or compression has weakened it.
Shoes, Jewelry, Bags, and Accessories
Accessories require selective cleanup in several areas:
Branded details: Keep logos, engravings, and identifying features accurate.
Edges and hardware: Preserve the original shape, placement, and construction.
Surface marks: Reduce dust, fingerprints, and handling marks.
Reflections and glare: Soften distractions without changing the material finish.
Since capture lighting determines how much glare and surface detail will require correction later, the same principles used to photograph jewelry also apply to reflective fashion accessories. The final result should improve visibility without making the accessory look artificially generated.
Background Marks and Studio Gear
Elements introduced by the shoot rather than the creative concept can weaken an otherwise polished composition. Pay particular attention to visible studio equipment, damaged backdrop areas, and objects that pull attention away from the model. Intentional set details should remain when they contribute to the campaign’s visual direction.
Lighting, Shadows, and Color
Uneven exposure, unwanted color casts, and blocked shadows can prevent skin and clothing from reading correctly. These capture-related problems should be corrected before creative grading begins. The goal at this stage is to recover usable tonal and color information rather than establish the final campaign look.
How to Retouch Fashion Photos Step by Step
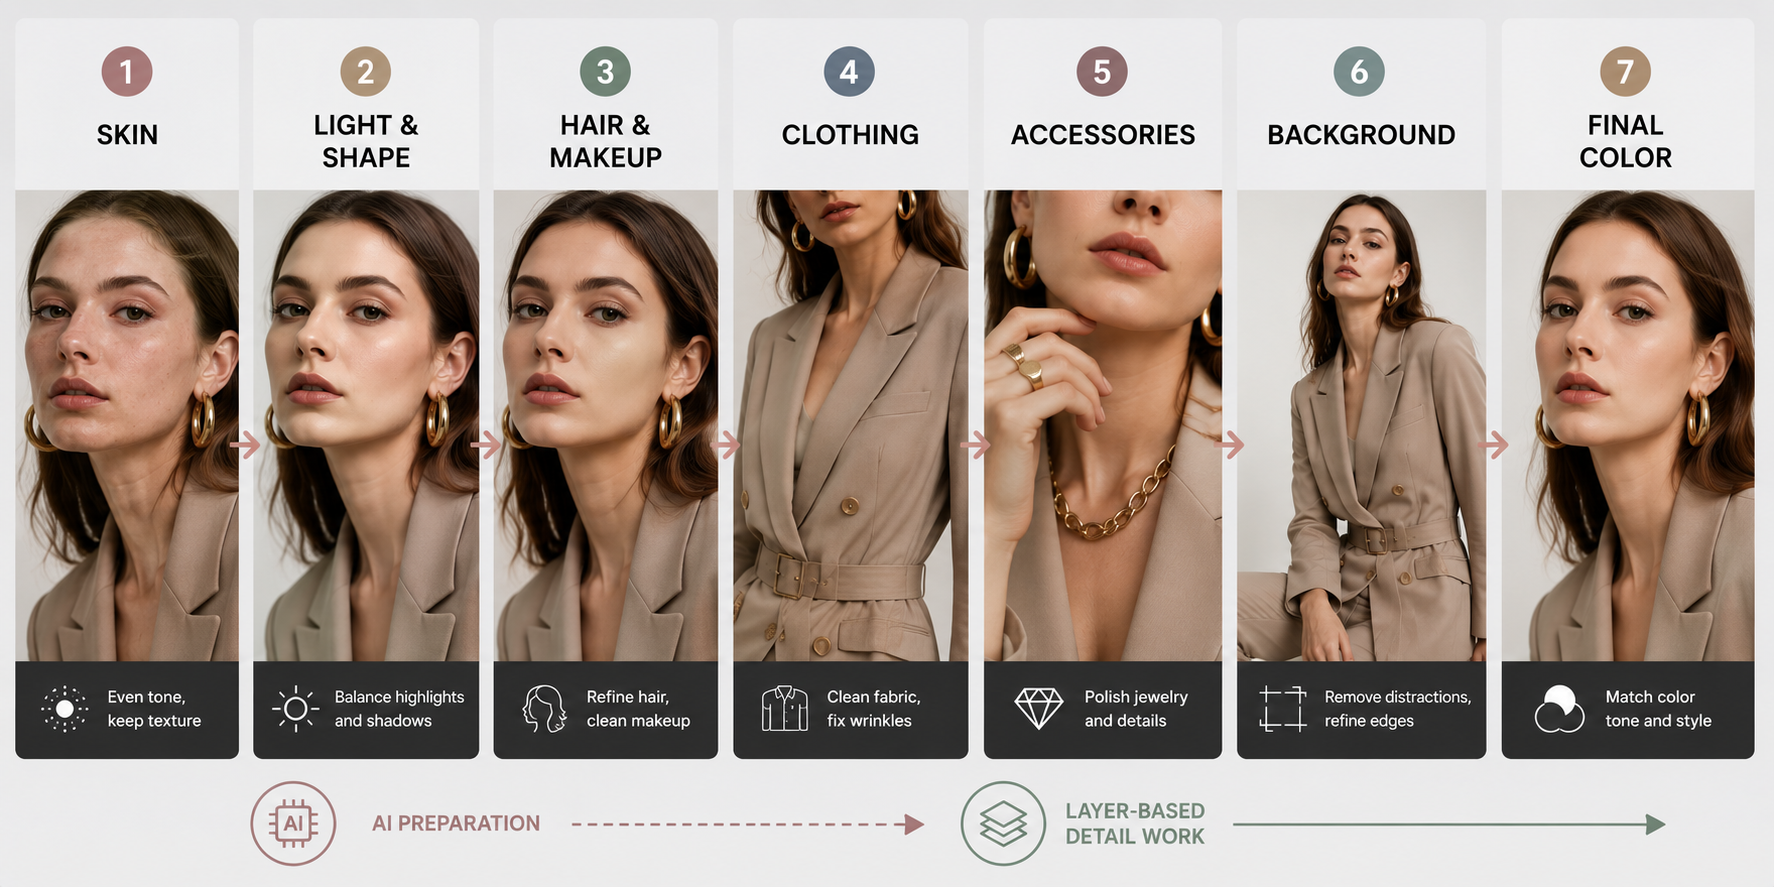
An efficient fashion retouching workflow moves from the model to the clothing, accessories, and surrounding set before applying the final color treatment. A creative AI workspace can handle preliminary image preparation before the file moves into more controlled layer-based work. Keeping later corrections separate allows each effect to be adjusted without disturbing completed areas.
Step 1: Even Skin Tone and Preserve Texture
Handle the skin in three controlled stages:
Remove temporary blemishes: Work on an empty layer with the Healing Brush or Clone Stamp.
Balance uneven light: Apply low-flow dodge and burn to soften tonal transitions without blurring pores.
Limit broad smoothing: Reserve frequency separation for areas that cannot be corrected locally.
Step 2: Balance Highlights, Shadows, and Shape
Once the complexion is stable, masked Curves layers can recover bright forehead areas, deep eye sockets, and uneven shadows across the body. Facial and body shape should be defined through controlled light rather than aggressive Liquify adjustments. Enough contrast must remain around the cheekbones, collarbones, and limbs to preserve depth.
Step 3: Refine Hair, Makeup, and Facial Details
With the main tones established, cleanup can move to the smaller features surrounding the face. The Clone Stamp provides control over broken hair edges and makeup smudges, while separate masks allow subtle adjustments to brows, lips, and eye definition. Sharpening belongs only on details that became soft during earlier corrections.
Step 4: Clean Up Clothing and Fabric Details
Attention can then shift to lint, loose threads, accidental creases, and gaps along garment edges. Repair samples should follow the direction of the weave so repeated patterns or blurred patches do not appear. When a fold interrupts a seam or print, reconstruct the original construction line instead of flattening the entire area.
Step 5: Polish Accessories, Jewelry, and Shoes
Small reflective products often require individual masks because metal, leather, gemstones, and polished surfaces respond differently to contrast. Local highlight control can reveal logos, clasps, stitching, and stone settings without eliminating every reflection. Any correction that alters the accessory’s dimensions or hardware placement should be reduced.
Step 6: Clean the Background and Refine Edges
Complete the background cleanup after finishing the subject:
Remove set distractions: Follow a controlled workflow to remove unwanted objects in Photoshop when clearing backdrop marks, equipment, floor seams, and other production debris.
Choose masks by edge type: Use precise paths for firm garment edges and softer masks for lace, sheer fabric, fur, or loose hair.
Correct color contamination: Neutralize unwanted edge colors locally while preserving the original set lighting.
A clean background should direct attention toward the fashion styling while keeping the model naturally connected to the scene.
Step 7: Match the Overall Color and Final Look
The finishing pass brings the separately retouched areas into one visual style. A campaign reference can guide contrast, saturation, and shadow color, while selective masks protect accurate skin and garment tones from the broader grade. Comparing the final image with the source reveals whether the treatment supports the fashion concept without overpowering it.
How to Keep Skin Texture Looking Natural
Natural skin depends on variation in pores, color, highlights, and facial contrast. Instead of applying one smoothing effect across the model, evaluate how texture changes with lighting and across different areas of the body. The following checks help protect that variation throughout the retouch.
Remove Blemishes, Not Real Features
Before removing a mark, classify it as temporary, permanent, or subject-approved for correction. Recent breakouts, scratches, and makeup residue usually fall within normal cleanup, while scars, moles, freckles, and expression lines may contribute to identity. When the distinction is unclear, retaining the feature is safer than making an irreversible assumption.
Use Frequency Separation Carefully
Frequency separation divides broad color transitions from fine surface detail, but that separation does not make unlimited smoothing safe. Work with small selections that follow the facial planes, avoiding broad blending across the nose, mouth, and jaw. If pores remain visible but appear identical or disconnected from the underlying light, the technique has still been pushed too far.
Match the Face, Neck, Hands, and Body
Even a well-retouched face looks artificial when nearby skin receives no corresponding attention. Compare warmth, redness, brightness, and texture across the neck, chest, arms, and hands, accounting for the way light reaches each area. Corrections should create visual continuity without forcing every part of the body into exactly the same tone.
Know When Skin Looks Too Smooth
The warning signs extend beyond missing pores. Flattened highlights, weak facial contours, abrupt texture changes, and unusually sharp eyes against soft skin can all reveal excessive smoothing. Viewing the image at both close range and its intended display size makes it easier to reduce the responsible layers before the artificial finish becomes part of the final grade.
How to Retouch a Fashion Shoot Faster
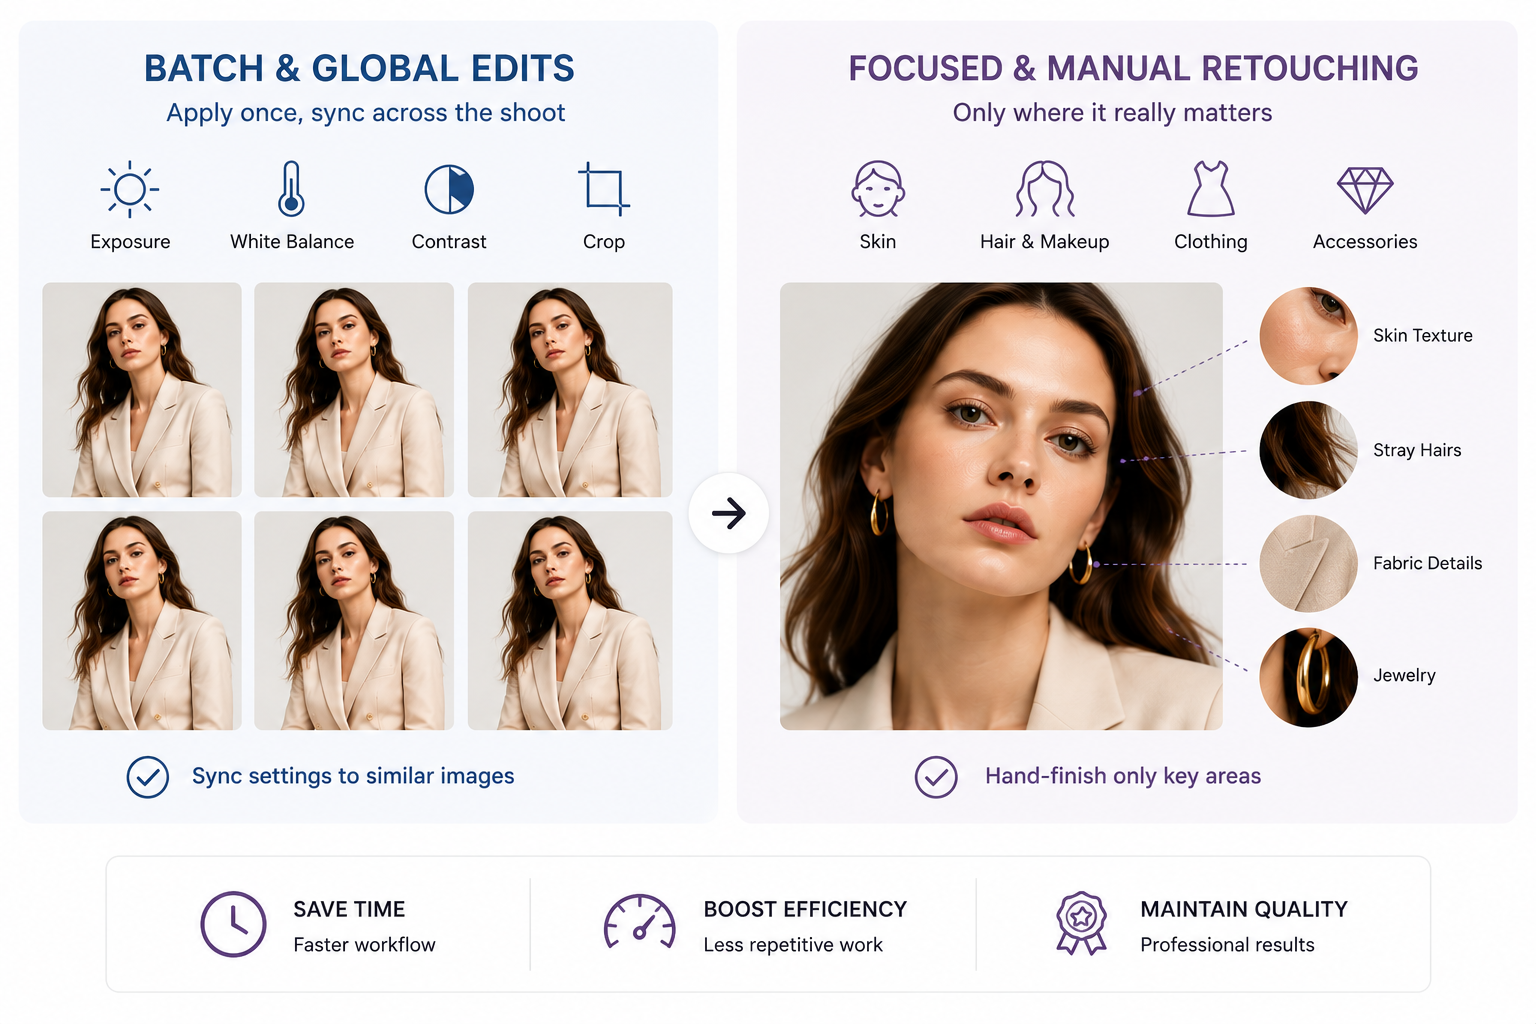
Speed comes from separating repeatable corrections from decisions that require close visual judgment. Global settings can be carried across related frames, while detailed work should be reserved for selected images and areas that genuinely need it. This division reduces unnecessary editing without lowering the standard of the final set.
Sync Basic Edits Across the Shoot
Frames captured with the same camera, lighting setup, and outfit can share a common starting point. Lens corrections, white balance, exposure, contrast, and noise reduction may be synchronized within each group, then adjusted where the model’s position changes the light. Local masks and detailed retouching should remain image-specific because they rarely align perfectly across different poses.
Use AI for Repetitive Edits
For a large fashion shoot, an AI photo editor can handle a controlled first pass before detailed retouching begins. Simple background distractions, isolated objects, soft image detail, and repeated crop preparation can be processed more quickly across similar files. Each result still needs review, particularly around hair, sheer fabric, jewelry, and garment edges where automated corrections may alter important details.
Retouch Skin and Fabric by Hand
Manual work is most valuable on campaign selects, close-ups, and images intended for large-format use. Skin transitions, fabric weave, seams, and garment fit require judgment that a synchronized preset cannot provide. Concentrating this effort on the final approved frames prevents time being spent perfecting photographs that will never be delivered.
FAQs
Can Fashion Photos Be Retouched From JPEG Files?
Yes, fashion photos can be retouched from high-resolution JPEG files, but they provide less flexibility than RAW files. Strong exposure or white balance corrections may reveal banding, compression artifacts, or damaged color transitions. Work from the largest available JPEG and avoid repeatedly saving over the same file.
How Much Retouching Is Acceptable in Fashion Photos?
Retouching is acceptable when it supports the creative brief without misleading viewers about the model or the featured products. Changes to body proportions, garment fit, product color, or construction should follow the client’s approval standards. Keeping the original and layered files also makes significant edits easier to review.
Can Retouching Fix Out-of-Focus Fashion Photos?
Mild softness can often be improved with selective sharpening or AI enhancement. Severe missed focus cannot be fully restored because the original file contains no reliable detail to recover. When sharpening begins to invent eyelashes, fabric patterns, or jewelry edges, choosing another frame is safer.
Conclusion
Successful fashion retouching is judged by how naturally the finished image communicates the creative concept. Real light behavior, material character, and human variation should remain convincing at the intended viewing size. That restraint gives the photograph a polished finish without weakening its credibility.
You May Be Interested

100+ Father’s Day Jokes That Dad Will Actually Laugh At

100+ Good Quotes for Instagram Bio (Copy & Paste Ideas)

100+ Free Stable Diffusion Prompts to Generate Amazing AI Art

133 Independence Day Captions for Social Media

20 Best Lettermark (Monogram) Logos in the World