Skin Retouching in Photoshop: A Natural-Looking Guide
Skin retouching in Photoshop should enhance a portrait without changing the subject. Use a layered workflow to correct temporary blemishes, uneven tone, redness, shine, and texture while preserving pores, facial shape, and natural expressions intact.

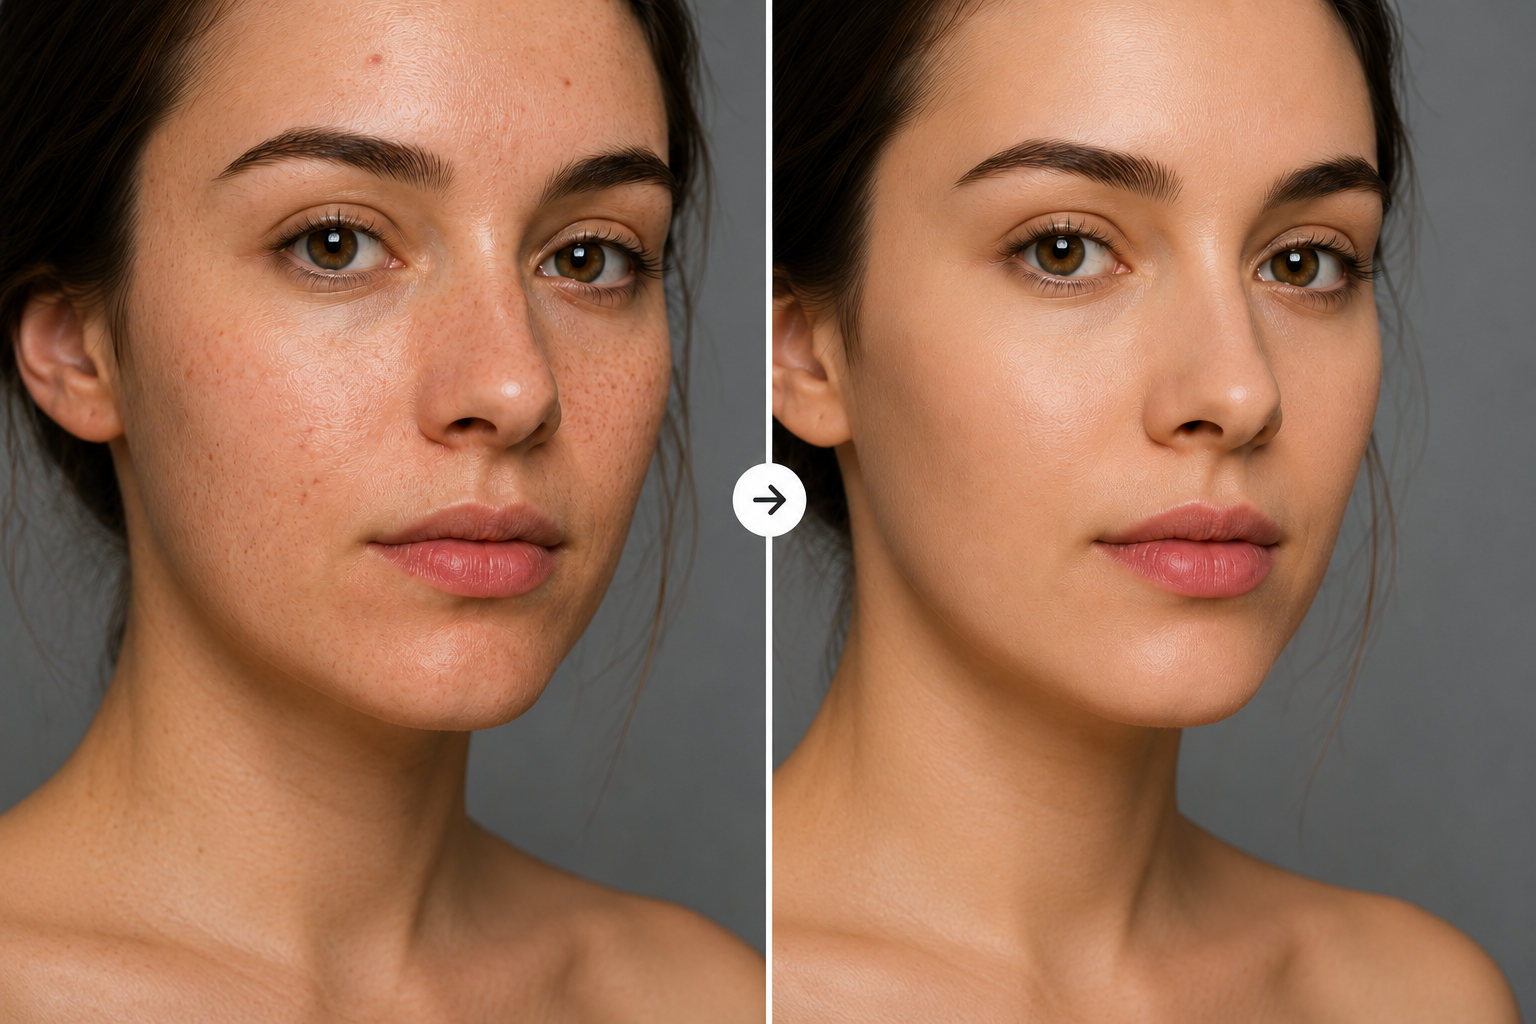
Skin retouching can strengthen a portrait, but noticeable editing often makes the result less convincing. Photoshop provides precise control over facial details, yet technical ability alone does not determine how far an image should be changed. The subject, intended use, and viewing distance all influence that decision. Before opening any correction tools, establish which changes support the portrait and which ones would alter the person.
What Should Natural Skin Retouching Change?
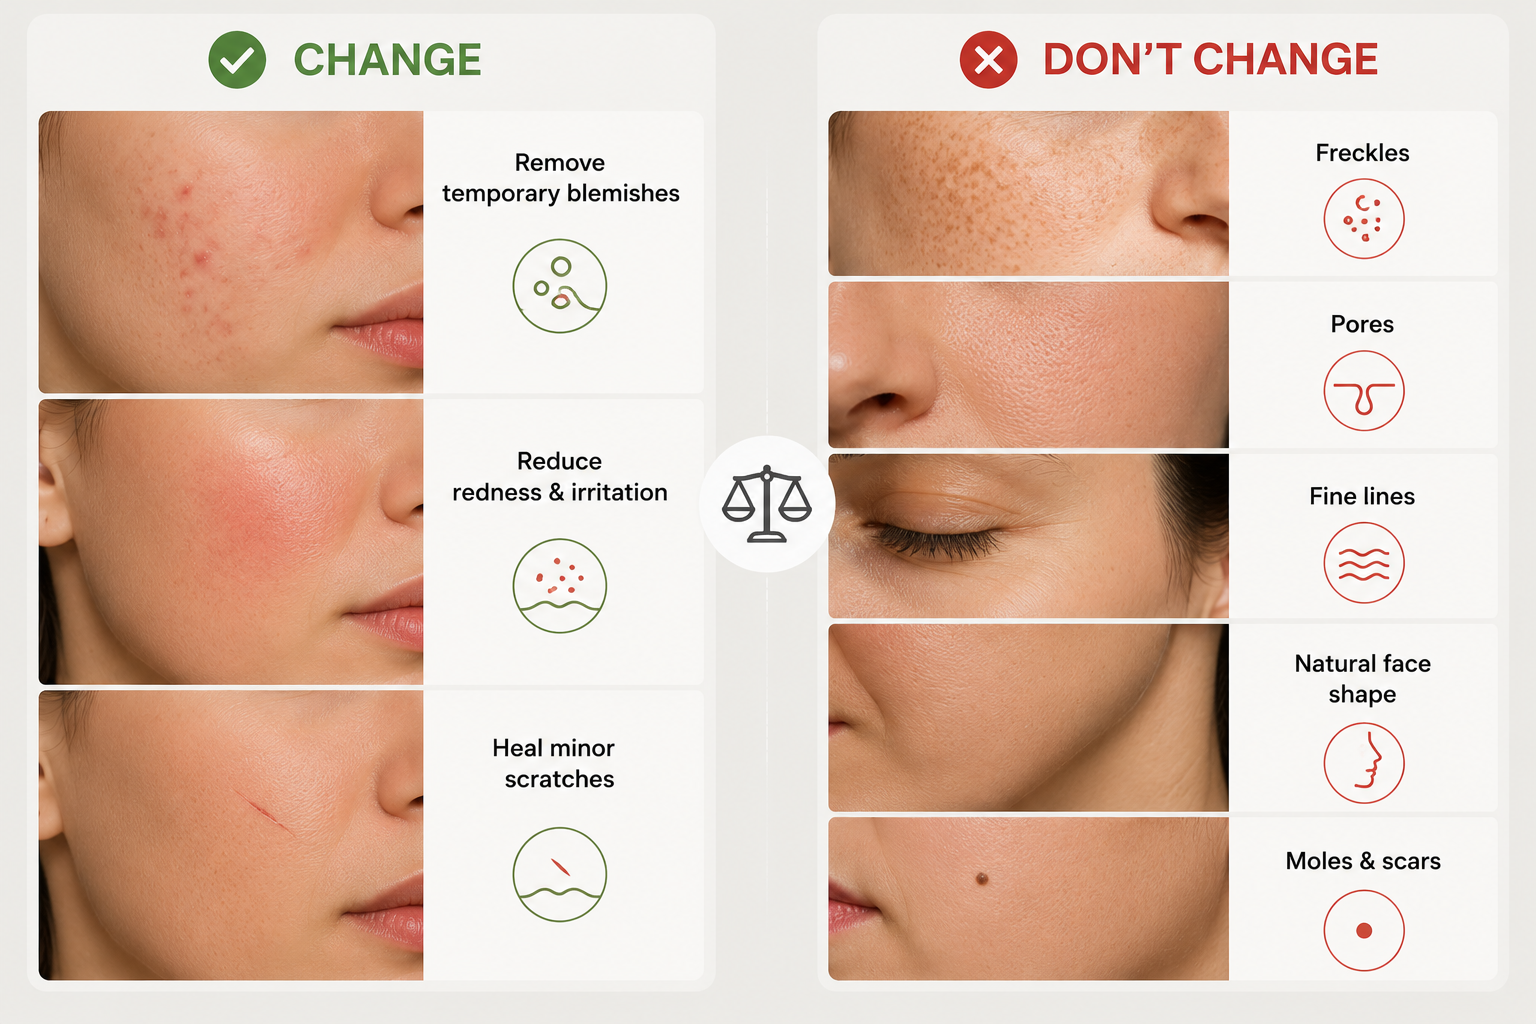
Every adjustment should solve a specific visual problem. Clear boundaries help separate useful cleanup from unnecessary changes to identity or character.
Remove Temporary Blemishes Only
Short-lived skin issues can be corrected because they do not represent the subject’s usual appearance. A model photographed during a breakout may want individual spots, irritation, or a recent scratch removed. Lasting features such as freckles, moles, and scars should remain unless the subject requests otherwise.
Keep Pores, Fine Lines, and Natural Face Shape
Pores and fine lines give skin dimension, especially in close-up portraits. Their pattern should remain continuous across the forehead, cheeks, and jaw rather than fading into blurred patches. Facial contours also need to stay stable, since narrowing the nose or changing the jaw goes beyond skin correction.
Match the Finish to the Portrait Style
The appropriate level of refinement depends on how the portrait will be viewed and used.
Corporate headshots: Keep corrections restrained and professional.
Beauty portraits: Allow more detailed tone and texture work for close viewing.
Family portraits: Use a lighter finish that preserves familiar expressions and character.
Matching the editing strength to the portrait style prevents every subject from receiving the same artificial finish. Photographers working across several portrait styles can use Zawa as an online starting point, then move into Photoshop when an image needs closer manual control.
How to Prepare a Portrait in Photoshop
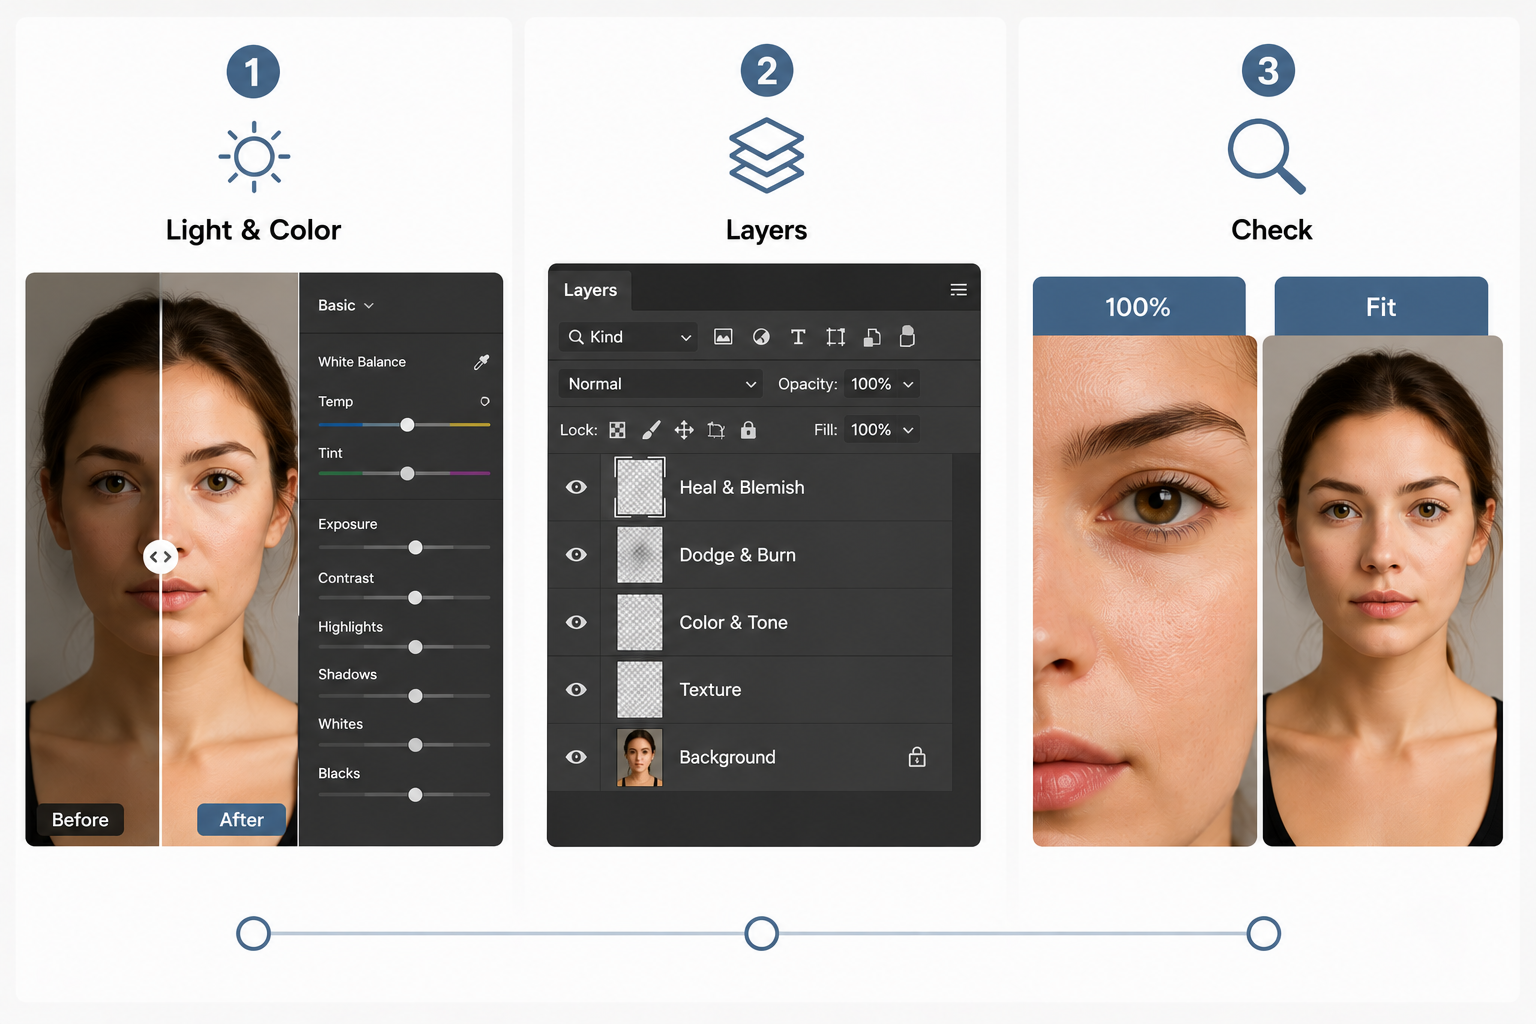
Once the editing boundaries are clear, the file needs a stable, non-destructive setup. Proper preparation makes later skin corrections easier to control and reverse.
Fix Exposure and White Balance First
Accurate brightness and color prevent lighting problems from being mistaken for skin issues. A portrait photographed under green office light may appear to have uneven skin even when the complexion is normal. Global corrections in Camera Raw should recover important highlights, open heavy shadows, and establish a neutral starting point before local retouching begins.
Copy the Photo and Organize the Layers
A clean layer structure protects the source image throughout the editing process. The original can remain untouched beneath a duplicate or Smart Object, while healing, tone, texture, and color adjustments sit on separate named layers. Descriptive groups and layer masks make individual corrections easier to review, reduce, or remove later.
Check the Face at 100% and Fit-to-Screen
Zoom level changes how skin problems appear. At 100%, blemishes, cloning patterns, broken texture, and digital noise become visible; knowing how to fix grainy photos helps prevent noise reduction from erasing genuine skin detail. Fit-to-screen then shows whether the face remains balanced within the full portrait, keeping minor imperfections from receiving too much attention.
How to Retouch Skin in Photoshop Step by Step
Natural-looking skin retouching depends as much on editing order as it does on tool choice. When a portrait needs a quicker first pass, you can speed up basic portrait cleanup online before moving into more controlled Photoshop adjustments. Keeping each correction separate also makes an excessive effect easier to reduce.
Step 1: Clean Up Temporary Blemishes
At the beginning of the edit, focus only on isolated spots, scratches, and short-term irritation. Working on a blank layer keeps the source intact while the Healing Brush samples nearby skin with a similar tone and texture. Keep the brush slightly larger than the blemish so clean areas are not unnecessarily altered.
Step 2: Repair Tricky Texture and Edges
When a blemish touches the nose, lips, eyebrows, or hairline, automatic healing may blur the edge. Switch to a low-opacity Clone Stamp and sample from the same facial plane, following the direction of nearby pores or hair. Otherwise, differences in light and sharpness can leave an obvious patch.
Step 3: Even Out Light With Dodge and Burn
Once surface cleanup is complete, uneven brightness becomes easier to recognize. Create two masked Curves layers, using one to lift dark patches and the other to lower bright areas. With a soft, low-flow brush, build the correction gradually so the original facial volume remains visible.
Step 4: Fix Redness, Shine, and Dark Circles
Not every skin issue should be handled with the same adjustment. While redness responds well to a masked Hue/Saturation or Selective Color layer, strong shine is better reduced through controlled highlight correction. For dark circles, lift the deepest shadow and neutralize excess color without erasing the lower eyelid’s shape.
Step 5: Smooth Uneven Areas Without Losing Pores
If broad smoothing is applied too early, natural texture can disappear before tonal problems are solved. Frequency separation allows uneven color to be blended on the low-frequency layer while the high-frequency layer retains pore detail. Across the forehead, cheeks, and jaw, the remaining texture should appear continuous rather than copied or blurred.
Step 6: Restore Details Around Eyes, Lips, and Hair
Only the definition softened during earlier corrections needs to be restored.
Eyes: Add subtle clarity to the irises and eyelashes.
Lips and eyebrows: Recover clean edges without creating hard outlines.
Hair: Sharpen selected fine strands while keeping the surrounding skin soft.
A masked method for sharpening an image in Photoshop gives more control over where the effect appears. Bright halos or overly crisp edges indicate that the sharpening strength should be reduced.
Step 7: Compare, Dial Back, and Export
Before exporting, switch the retouching groups on and off to judge their combined effect. Wherever the face appears flatter, younger, or more uniform than the source, lower the relevant layer opacity. Keep the layered PSD editable, then export a separate copy for its final use. If the required output dimensions exceed the source resolution, an AI image upscaler can create a larger version, but the skin texture and edges should be checked again at the final size.
How to Avoid Over-Retouching Skin
Over-retouching often reveals itself through mismatched texture, color, and facial contrast rather than one obvious mistake. These warning signs show which adjustment has been pushed too far and where the edit should be reduced.
The Skin Looks Blurry or Plastic
A plastic finish appears when pore detail and small tonal transitions have been smoothed into one uniform surface. At 100%, the skin may look softer than the eyes, hair, and clothing, creating an unnatural difference in sharpness. Lower the smoothing layer opacity or mask the effect away from areas where real texture should remain visible.
The Face Mismatches the Neck
Even when the face looks polished on its own, a difference in color or brightness from the neck can expose the retouching. Warm facial skin against a cool neck, or a bright face above a shadowed chest, is especially noticeable in wider portraits. Either extend a subtle correction into the surrounding skin or reduce the facial adjustment until both areas belong under the same light.
Healed Areas Show Repeated Texture
Zooming to 100% often reveals identical pores or marks copied across several nearby areas. Repetition occurs when the Clone Stamp samples from the same location too often or covers too large a section. Rework the patch with smaller samples taken from different directions while preserving the local pattern of the skin.
The Face Looks Flat After Smoothing
If the cheekbones, nose, and jaw lose their natural depth, too much local contrast has been removed. Broad smoothing and heavy dodge and burn can erase the shadows that describe facial structure. Restoring part of the original shading, or reducing the tonal layers, will bring dimension back without adding artificial contour.
Eyes and Teeth Look Too Bright
Viewers should notice the expression before they notice the whitening. When eye whites approach pure white or teeth become much brighter than the surrounding skin, those features can look pasted onto the face. Judge them at fit-to-screen size and lower the adjustment until they sit naturally within the portrait’s lighting.
FAQs
Is RAW Better Than JPEG for Skin Retouching?
RAW is usually the better starting point because it retains more image data. JPEG files can still be retouched, but heavy exposure or color corrections are more likely to reveal compression and tonal gaps.
How Long Should Skin Retouching Take?
There is no fixed editing time for skin retouching. A light portrait cleanup may take less than half an hour, while close-up beauty work often requires more time because small inconsistencies remain visible.
Can Photoshop Retouch Group Photos Efficiently?
Photoshop can handle group portraits efficiently, but every face should not receive the same correction. Shared lighting and color adjustments can be applied together, followed by lighter individual work where needed.
Does Skin Retouching Affect Print Quality?
Skin retouching can affect print quality because smoothing marks and rough transitions may become clearer on paper. Checking the image at its intended print size helps reveal problems that are easy to miss on screen.
Conclusion
Natural skin retouching depends on controlled adjustments rather than aggressive smoothing. A layered Photoshop workflow keeps blemish cleanup, tone correction, texture work, and detail recovery separate, making each effect easier to refine. The final portrait should hold up both at full size and from a normal viewing distance. When the editing supports the expression without becoming noticeable, the skin will still look polished and believable.
You May Be Interested

100+ Funny Mother's Day Jokes That Will Make Mom Laugh

150+ Instagram Bio Ideas for Moms

100+ Trending Instagram Bios for Boys to Upgrade Your Profile

133 Independence Day Captions for Social Media

20 Best Lettermark (Monogram) Logos in the World