Headshot Retouching: How to Get Natural Results
Learn natural headshot retouching with a clear workflow for correcting blemishes, shine, flyaway hairs, clothing, and backgrounds while preserving real skin texture, facial structure, and a polished, recognizable professional appearance in portraits.

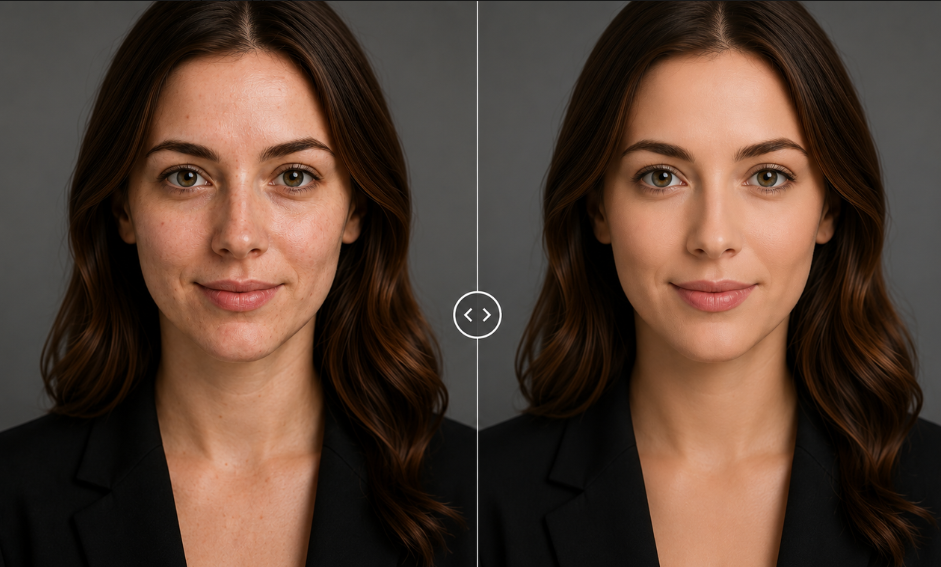
A professional headshot should look polished without making the person appear unfamiliar. Small distractions such as temporary blemishes, facial shine, flyaway hairs, or clothing lint can pull attention away from the expression, but removing too much can leave skin looking artificial.
The best retouching keeps real texture, facial structure, and identifying features intact while improving the overall presentation. Understanding what natural headshot retouching includes is the first step toward finding that balance.
What Is Natural Headshot Retouching?
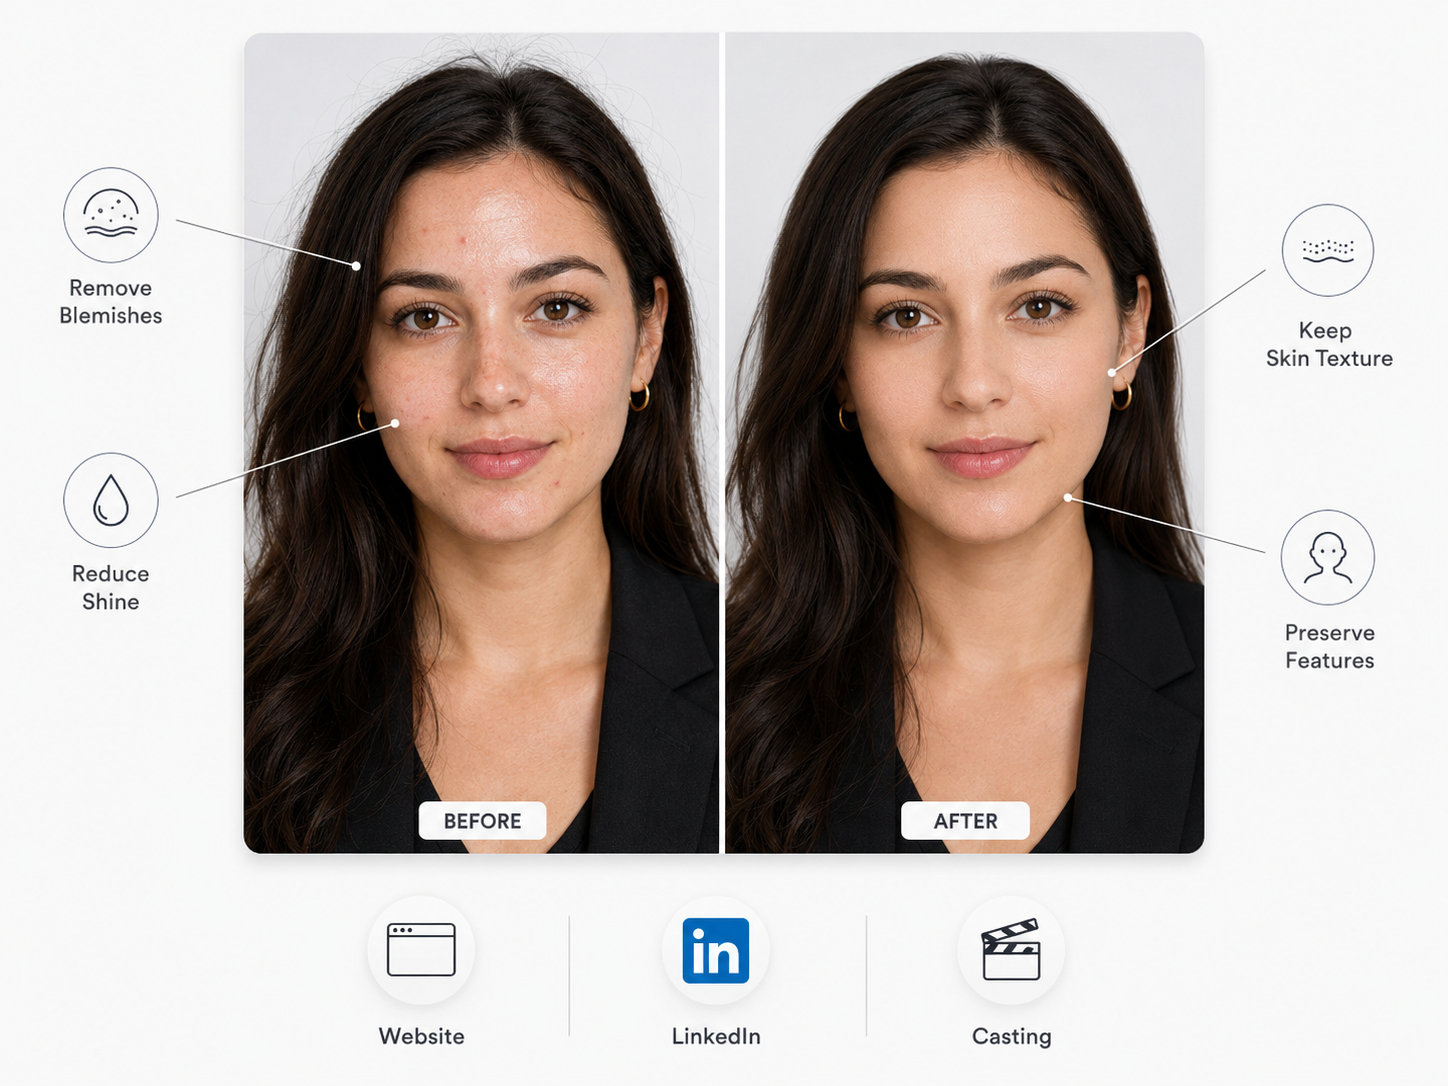
Natural headshot retouching removes temporary distractions without changing the person’s recognizable features. The finished portrait should look polished enough for a company website, LinkedIn profile, or casting page while still matching how the subject appears in person.
Headshot Retouching vs. Basic Photo Editing
Basic editing builds the visual foundation, while retouching deals with details that require more precise control.
| Comparison Area | Basic Photo Editing | Headshot Retouching |
| Main goal | Balance the whole photo | Refine specific distractions |
| Areas affected | Entire image | Selected facial or clothing areas |
| Common adjustments | Crop, exposure, color, contrast | Skin shine, stray hairs, lint, under-eye shadows |
| When it is used | At the start of editing | After overall corrections |
| Real-world case | Correct yellow office lighting | Remove lint from a lawyer’s dark suit |
| Main risk | Flat or inaccurate color | An overly polished appearance |
Most professional portraits need both stages. Basic editing makes the lighting and color consistent, but it cannot correct every distracting detail around the face or clothing. Retouching completes the image through smaller adjustments that would be difficult to achieve with global controls alone.
Natural Retouching vs. Heavy Retouching
The key difference is not how many edits are made, but whether those edits change the person’s real appearance.
| Comparison Area | Natural Retouching | Heavy Retouching |
| Main goal | Present a polished likeness | Create an idealized appearance |
| Skin treatment | Reduces distractions but keeps texture | Removes pores and fine lines |
| Facial structure | Preserves natural proportions | May reshape the jaw, nose, or eyes |
| Final impression | Professional and believable | Stylized or noticeably edited |
| Best suited for | LinkedIn, company pages, casting | Beauty campaigns or creative editorials |
| Real-world case | Actor matches the submitted headshot | Actor looks different at the audition |
Most professional portraits need both stages. Basic editing makes the lighting and color consistent, but it cannot correct every distracting detail around the face or clothing. Retouching completes the image through smaller adjustments that would be difficult to achieve with global controls alone.
Natural Retouching vs. Heavy Retouching
The key difference is not how many edits are made, but whether those edits change the person’s real appearance.
| Comparison Area | Natural Retouching | Heavy Retouching |
| Main goal | Present a polished likeness | Create an idealized appearance |
| Skin treatment | Reduces distractions but keeps texture | Removes pores and fine lines |
| Facial structure | Preserves natural proportions | May reshape the jaw, nose, or eyes |
| Final impression | Professional and believable | Stylized or noticeably edited |
| Best suited for | LinkedIn, company pages, casting | Beauty campaigns or creative editorials |
| Real-world case | Actor matches the submitted headshot | Actor looks different at the audition |
Natural retouching is usually more appropriate when recognition and credibility matter. Heavy editing may suit a stylized beauty image, but it can create problems when a recruiter, client, or casting director expects the person in the photograph to look the same in person. Comparing the final version with the original helps reveal when an adjustment has gone too far.
Temporary Blemishes vs. Permanent Features
A practical retouching decision starts with asking whether the detail is temporary or part of the subject’s established appearance.
| Comparison Area | Temporary Blemishes | Permanent Features |
| Typical examples | Pimples, redness, shaving cuts | Freckles, moles, scars |
| Likely duration | Days or weeks | Long term |
| Default approach | Remove or soften | Preserve |
| Client approval | Usually covered by the brief | Confirm before altering |
| Real-world case | Remove a breakout before a company shoot | Keep a doctor’s familiar eyebrow scar |
| Main concern | Leaving an avoidable distraction | Removing part of someone’s identity |
A useful test is whether the feature would probably still be visible several weeks later. Short-term skin issues can usually be reduced because they do not represent the subject’s everyday appearance. Permanent features require more care, and any significant change should be discussed with the person before editing begins.
How to Prepare a Headshot for Retouching
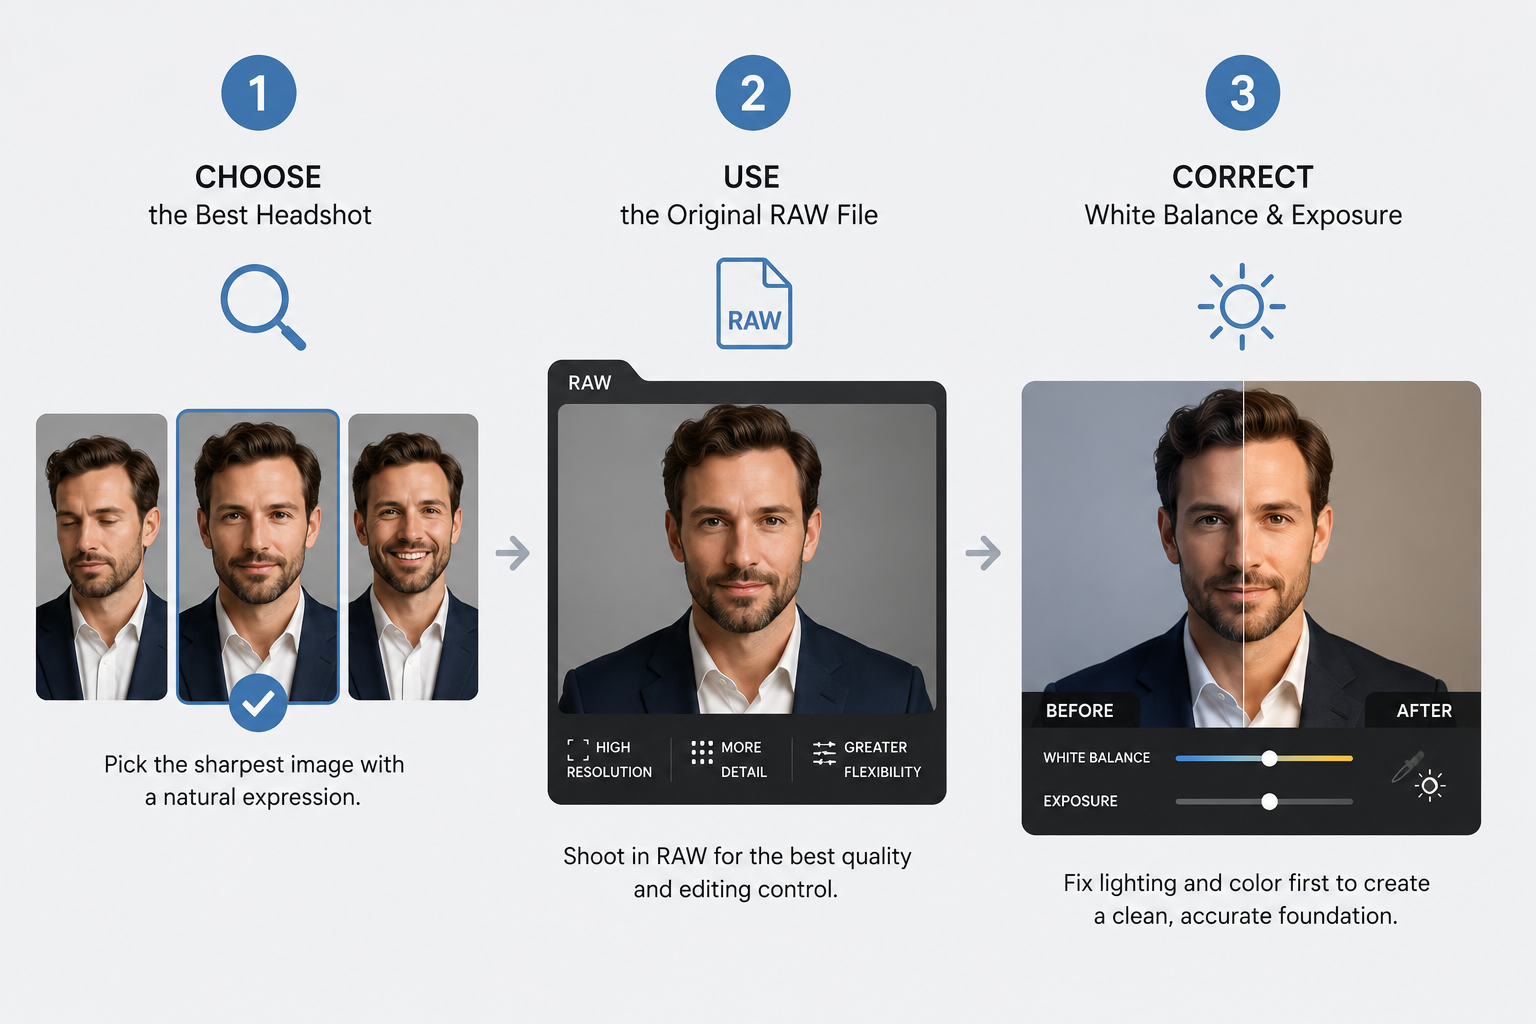
Strong results depend as much on preparation as they do on editing technique. Work through the image in a clear order so later adjustments are based on an accurate, high-quality starting point.
Choose the Best Headshot Before Editing
The strongest frame is usually defined by expression, eye sharpness, posture, and the direction of light. During a corporate portrait session, the same qualities needed to take professional headshots, including a relaxed expression and clear eyes, also help identify which image is worth editing. Skin shine and flyaway hairs can be corrected, but a tense smile or blurred eye rarely looks convincing after repair. Select the photo that already represents the person well.
Start With a High-Resolution RAW File
RAW files preserve more information in the highlights, shadows, and color channels, giving the editor greater control over subtle corrections. This flexibility matters when one portrait must work across a company website, press release, and printed conference banner. A small JPEG downloaded from LinkedIn may show noise and compression around the hair or jaw, so use suitable methods to fix grainy photos before detailed facial work. When RAW is unavailable, choose the largest original file instead of a screenshot or social media copy.
Correct White Balance and Exposure First
Overall color and brightness should be corrected before any local facial work begins. Green office lighting can make healthy skin appear uneven, while clipped highlights may hide texture on the forehead and cheeks. A doctor photographed beside a bright window might need the white coat recovered and the indoor color cast neutralized before the face is touched. Once the image has accurate light and color, genuine retouching needs become much easier to identify.
How to Retouch a Headshot Step by Step
Once the source image has accurate color and exposure, move from small facial corrections to broader cleanup around the subject. Following this order prevents one adjustment from creating extra work later.
Remove Blemishes Without Damaging Skin Texture
Begin with temporary spots that pull attention away from the face. Use a small healing or clone brush on a separate layer, sampling from nearby skin with similar texture and lighting. Work at full size instead of smoothing an entire area to hide one mark. Pores and subtle tonal variation should still be visible when the correction is finished.
Balance Skin Tone, Redness, and Shine
After removing isolated marks, address uneven color across the face, neck, and ears. A lightly masked color adjustment can reduce redness, while controlled highlight recovery softens shine without leaving the skin flat. A real estate agent photographed after walking outdoors may have flushed cheeks and a bright forehead, yet removing all warmth would make the portrait look lifeless. Keep enough variation for the complexion to remain believable.
Soften Under-Eye Shadows and Facial Lines
Under-eye areas usually need reduced contrast rather than complete removal. Lift the deepest shadow with low-opacity dodge and burn adjustments, then blend the transition into the upper cheek. On a senior executive’s portrait, erasing every line can remove years of familiar expression and make the face appear younger than it does in person. The goal is to reduce fatigue while preserving the natural shape of the lower eyelid.
Retouch Eyes and Teeth Without Over-Whitening
Eyes and teeth should remain consistent with the photograph’s original lighting and color.
Eye whites: Lift brightness slightly and reduce only the most distracting veins.
Irises: Add subtle sharpness without exaggerating color or contrast.
Teeth: Reduce strong yellow tones while preserving their natural shade.
A dentist’s professional headshot still needs realistic tooth color. Pure white teeth or overly bright eyes can make the final portrait look less credible than the original.
Clean Up Hair, Clothing, and the Background
Finish by checking the details surrounding the face.
Hair: Remove isolated flyaways while preserving fine strands along the natural edge.
Clothing: Clean up lint, loose threads, and distracting wrinkles without changing the garment’s shape.
Background: Erase marks, visible equipment, and other elements that pull attention from the subject.
For a conference speaker’s portrait, cleaning dust from a dark blazer and repairing a marked backdrop may improve the final image more than additional facial retouching.
For a faster workflow, an AI photo editor can combine several routine adjustments in one workspace. Zawa AI Editor can remove temporary blemishes and unwanted objects, balance tone and lighting, improve image quality, and clean up or replace the background. Review the generated result at full size, compare it with the original, and reduce any adjustment that changes facial structure, hair edges, or other recognizable details.
Common Headshot Retouching Mistakes to Avoid
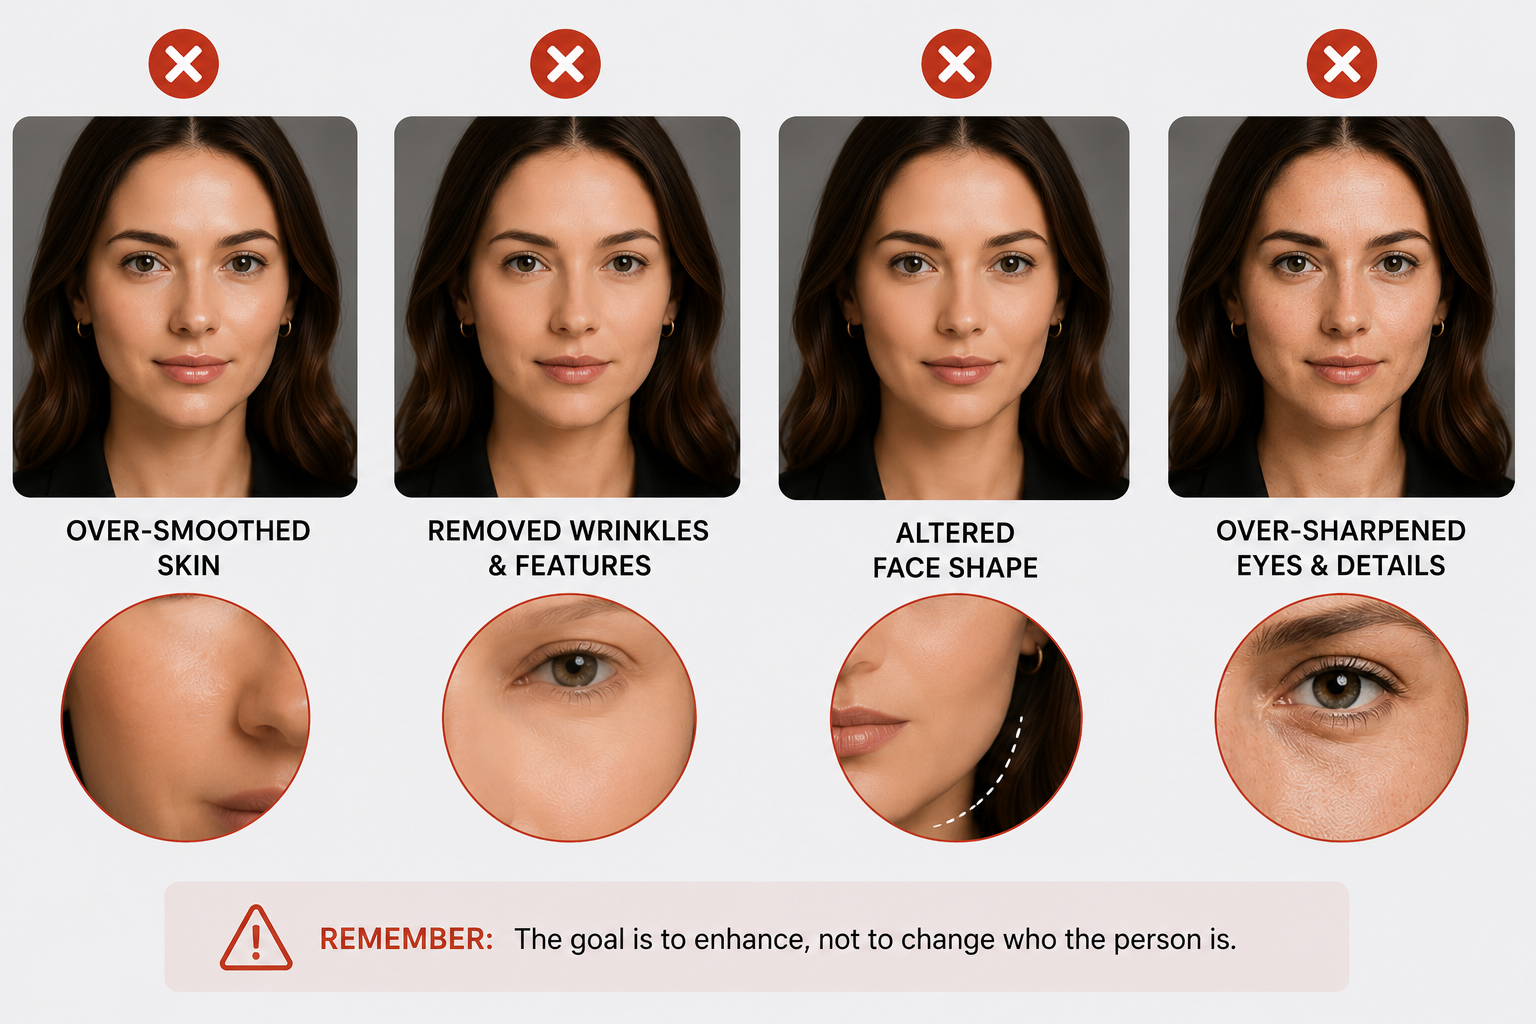
Most poor results happen when a useful adjustment is pushed beyond what the image needs. Watch for these warning signs before exporting the final headshot.
Over-Smoothing Skin and Removing Pores
Skin without pores, fine lines, or subtle color variation quickly takes on a waxy appearance. Broad blur filters can also soften the nose, lips, and jaw along with the targeted area. This may look acceptable in a small LinkedIn thumbnail but becomes obvious on a full-size company profile. Lower the smoothing strength wherever the face begins to look flat.
Removing Wrinkles and Distinctive Features
Not every facial line should be treated as a flaw. Smile lines, forehead creases, and other familiar details communicate age, expression, and character. Erasing them from a professor’s portrait could create an image that feels disconnected from how students and colleagues know that person. Reduce harsh shadows around deeper lines without deleting the lines themselves.
Reshaping the Face Too Aggressively
Liquify tools can alter identity with only a few strong movements. Narrowing the nose, lifting the jaw, or enlarging the eyes may also distort nearby hair, ears, and background lines. When an unflattering camera angle causes the problem, choosing another frame or adjusting the crop usually produces a more believable result. Facial reshaping should never create new proportions.
Over-Sharpening Eyes and Facial Details
Excessive sharpening often reveals itself in several parts of the face:
Eyes: Bright irises and hard eyelash edges overpower the expression.
Skin: Increased contrast makes pores and fine lines look rough.
Facial hair: Halos appear around eyebrows, beards, and mustaches.
Apply sharpening selectively after resizing the headshot for its final use. At a normal viewing distance, the face should look clear rather than digitally enhanced.
How to Check if a Retouched Headshot Looks Natural
A headshot may appear polished inside the editor but reveal problems at another size or in its final placement. A structured review helps catch those issues before delivery.
Compare the Before and After Headshots
A side-by-side view makes subtle changes easier to recognize. With both versions displayed at the same size, differences in facial shape, expression, skin color, and overall brightness become more obvious. The retouched image should look cleaner without drawing attention to the editing itself. After a short break from the screen, review the pair again with fresh eyes.
Review Skin Texture and Edges at Different Zoom Levels
Different zoom levels reveal different types of editing problems. At 100%, patchy skin texture, repeated cloning patterns, and rough edges around the hair, glasses, or jaw are easier to see. A medium view shows whether local corrections blend with the surrounding areas, while a thumbnail exposes features that attract too much attention. Bright eyes or pale teeth often become more noticeable when the image is reduced.
Make Sure the Headshot Still Looks Like the Person
The most important test is whether the subject remains immediately recognizable. Someone who knows the person can assess their expression, apparent age, facial proportions, and distinctive traits without being told what was changed. For a real estate agent, the profile image should match the person clients meet at an appointment. Any hesitation may signal that identity-related adjustments need to be reduced.
Export the Headshot for Its Final Use
Final use determines the appropriate crop, resolution, color space, and file format. A LinkedIn profile requires a face that stays clear at a small size, whereas a company website or printed brochure may need higher resolution and wider framing. Once exported, the file should be opened outside the editing software and viewed in its intended placement. Compression, color shifts, and excessive output sharpening often appear only at this stage.
FAQs
Should Professional Headshots Be Retouched?
Yes, professional headshots should usually receive light retouching. Color casts, temporary blemishes, shine, stray hairs, and clothing lint can be corrected, but facial structure and recognizable features should remain unchanged.
How Much Retouching Is Too Much for a Headshot?
Retouching becomes excessive when the subject looks noticeably different from their everyday appearance. Missing skin texture, altered facial proportions, pure white teeth, or unusually bright eyes are common signs that an edit has gone too far.
How Long Does Headshot Retouching Take?
Basic headshot retouching usually takes 15 to 30 minutes per image, while detailed manual work may take an hour or longer. The time depends on image quality, the number of corrections, background cleanup, and the intended output size.
Can AI Retouch a Headshot Naturally?
Yes, AI can retouch a headshot naturally when the adjustments are applied selectively and reviewed afterward. It can handle routine work such as blemish removal, tone correction, and background cleanup, but strong automated effects may still remove texture or alter facial details.
Should LinkedIn Headshots Be Retouched?
Yes, LinkedIn headshots can be lightly retouched to create a clean and professional appearance. The image should remain recognizable, use realistic skin tones, and stay clear when displayed as a small profile photo.
Conclusion
Successful headshot retouching is measured by credibility, not flawlessness. A careful workflow improves temporary distractions, uneven lighting, and presentation issues while preserving the features that make the subject recognizable. Before delivery, review the portrait at multiple sizes and in its intended placement. If the editing is difficult to notice but the person looks confident and polished, the retouching has done its job.
You May Be Interested

100+ Funny Mother's Day Jokes That Will Make Mom Laugh

100+ Trending Instagram Bios for Boys to Upgrade Your Profile

130+ Independence Day Quotes for Instagram

20 Seedance Prompts for AI Video Creation: Ready-to-Use Examples

35 AI Image Prompt Examples: How to Get Outstanding AI Images