How to Make a Restaurant Menu
Learn how to make a restaurant menu that is clear, profitable, and easy to update. This article covers menu planning, dish selection, pricing, descriptions, layout, food photos, testing, and improvements across print, QRs, web, and delivery channels.

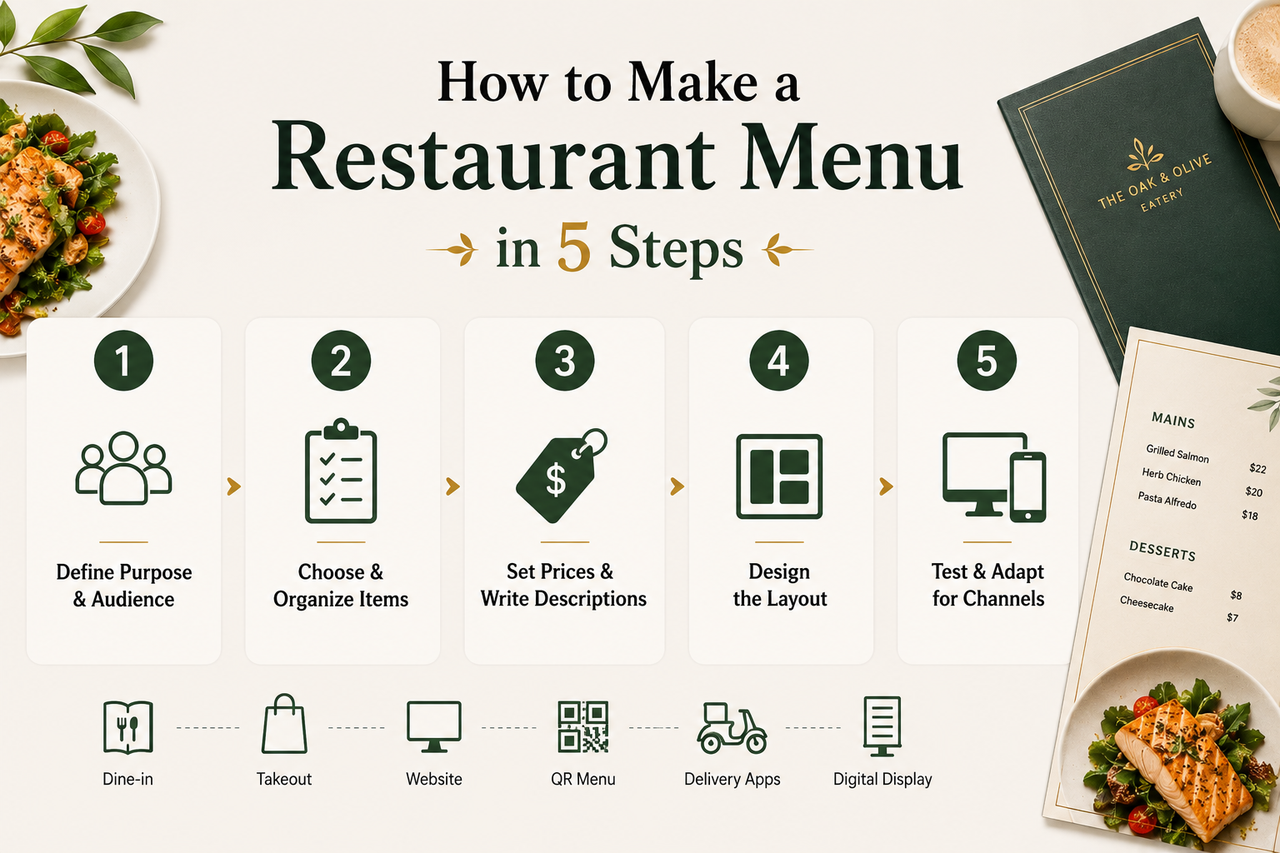
A restaurant menu should make ordering easy. Customers need to quickly see what sounds good, what comes with each dish, and how much it costs. When a menu is too long, poorly organized, or filled with vague descriptions, even your best dishes can get overlooked.
This guide covers how to make a restaurant menu in five steps, from choosing dishes and setting prices to designing the layout and testing the finished menu. It also explains how to keep menu information consistent across dine-in, takeout, QR code, website, and delivery channels.
Step 1: Define the Menu Purpose and Audience
Before choosing fonts, colors, photos, or menu templates, decide how the menu will be used and what it needs to achieve. These decisions should guide the menu content, structure, and format.
Identify Where the Menu Will Be Used
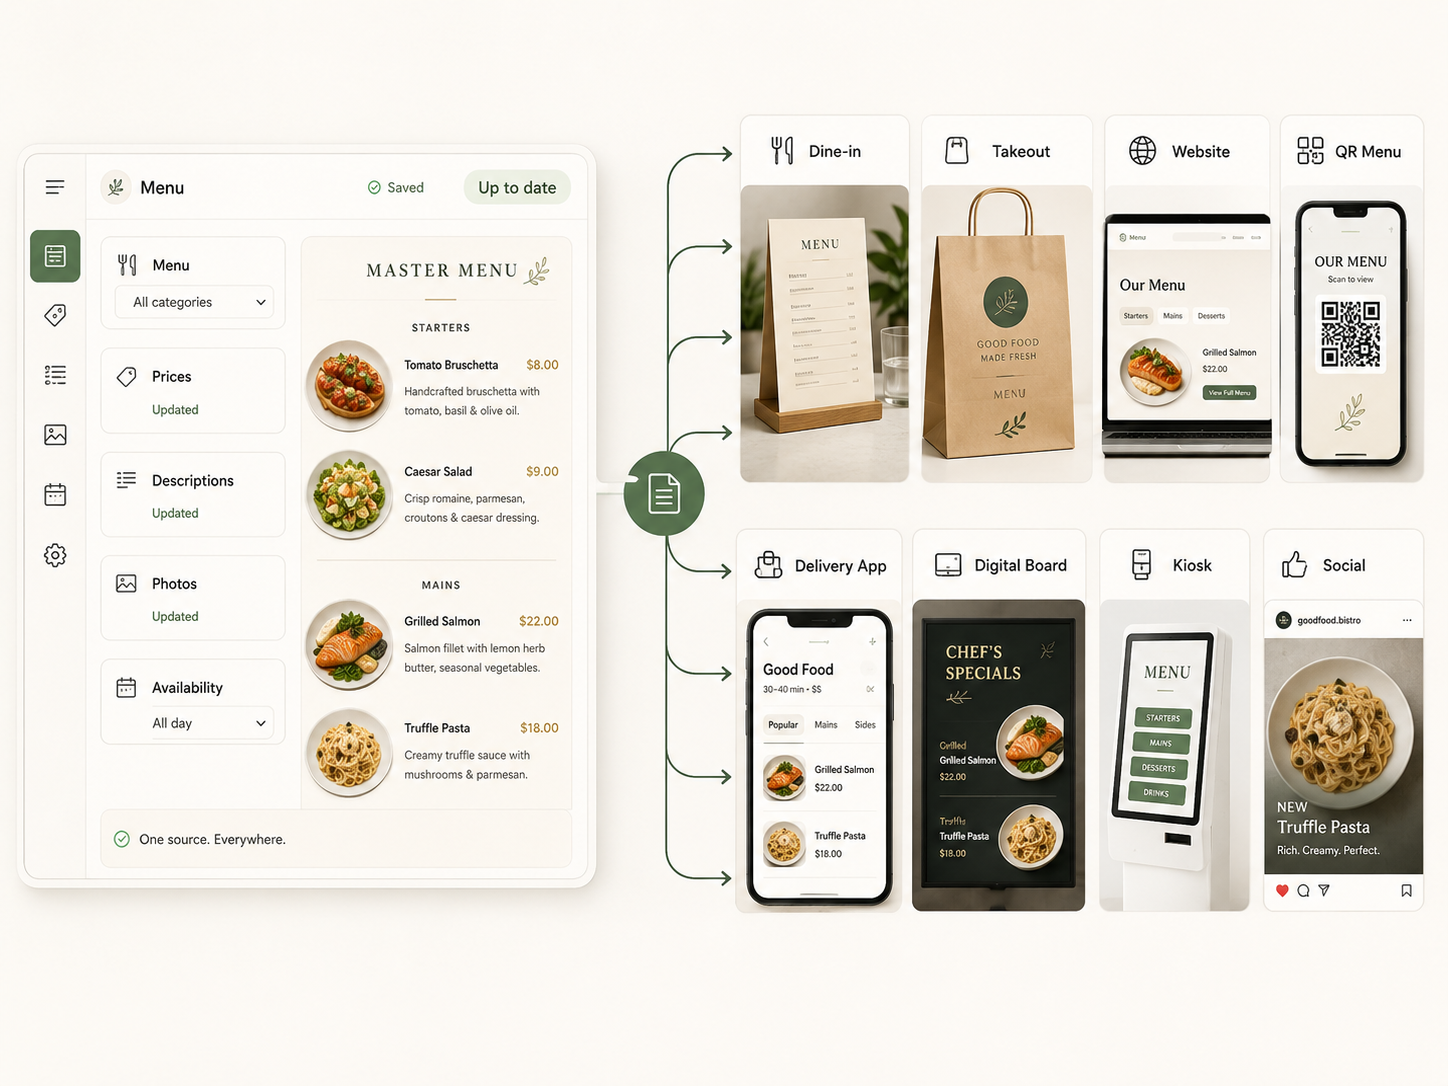
Start by listing every channel where customers may see or use the menu:
Dine-in service
Takeout orders
Restaurant website
QR code ordering
Third-party delivery apps
Digital menu boards
Self-service kiosks
Social media promotions
What customers need to see depends on how they’re ordering. A dine-in menu should make it easy to browse and compare dishes. A takeout menu should clearly show prices, portion sizes, combo options, and pickup details. A delivery menu should explain customizations, substitutions, packaging, and any extra fees. When preparing a printed handout, comparing pamphlet vs brochure formats can help determine how much space is available for dishes, prices, brand details, and promotions.
You don’t need to create every menu from scratch. Keep one up-to-date master menu with your dish names, prices, descriptions, photos, and availability, then adjust the layout for your printed menu, website, QR menu, and delivery apps. This keeps the information consistent and makes future updates much easier.
Know Who You Are Serving
Your menu should reflect how your main customers order and what they value most.
For example:
A family restaurant may need kids’ meals, shareable dishes, and options for different dietary needs.
A lunch café may emphasize speed, convenient combinations, and items that travel well.
A fine-dining restaurant may provide more detail about ingredients, preparation methods, origins, and suggested pairings.
A delivery-focused restaurant may prioritize portion size, customization options, packaging, and popular combos.
Before creating the menu, consider:
When and where do customers usually order?
What price range do they expect?
Do they care most about value, speed, portion size, dietary choices, or the overall dining experience?
Are there common allergies or dietary requirements you need to address?
Which dishes are customers most likely to compare?
These answers will help you decide what information belongs on the menu and how prominently it should be displayed.
Set a Clear Business Goal
A menu should do more than list what the restaurant serves. It should also support specific business goals, such as:
Helping customers order faster
Promoting signature dishes
Increasing the average check
Selling more drinks, sides, and desserts
Cutting down on common customer questions
For example, a lunch menu focuses on quick, affordable combos, while a dinner menu may put more attention on signature entrées and suggested drink or dessert pairings. Once you know what the menu needs to do, it becomes easier to decide which items to keep, which ones to cut, and which dishes should stand out through placement, photos, or featured labels.
Step 2: Choose and Organize Your Menu Items
After defining the menu’s purpose, create a focused list of dishes that fit your restaurant concept, customer demand, and kitchen capacity.
Every item should serve a clear purpose. It should attract a specific customer, strengthen the restaurant concept, generate reasonable profit, or support another important item on the menu.
Create a Complete Working List
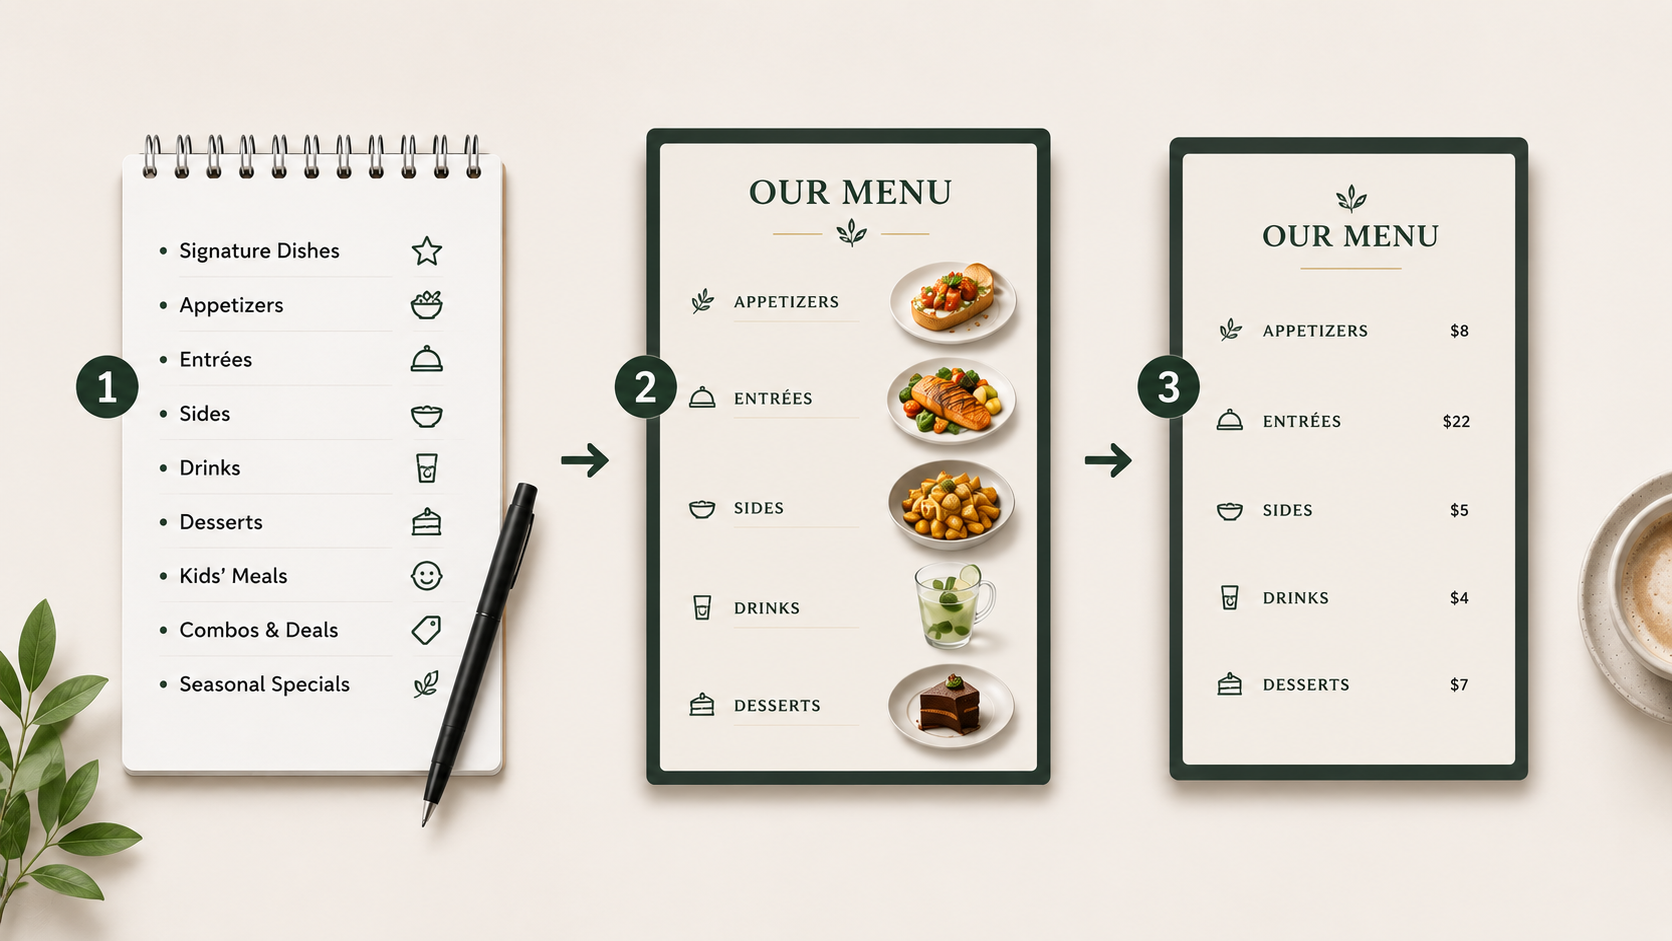
Begin by listing every item you are considering, including:
Signature dishes
Appetizers and small plates
Entrées
Sides
Drinks
Desserts
Kids’ meals
Combos and meal deals
Seasonal or limited-time dishes
Once you have created the full list, organize the items based on how customers typically order. Place appetizers before entrées, keep related add-ons near the relevant dishes, and make side choices easy to find.
After organizing the menu, review the list to remove unnecessary complexity. Revise or remove dishes that sell poorly, create waste, require unique ingredients, take too long to prepare, or overlap with similar options. The final menu should balance customer favorites, profitable items, and dishes the kitchen can prepare consistently.
Step 3: Calculate Prices and Write Clear Descriptions
Once you’ve finalized your menu items, set prices that cover your costs and write descriptions that help customers understand what they’re ordering.
Set Prices That Make Sense
Start by calculating the ingredient cost for one standard serving. Include:
Main ingredients
Sauces and garnishes
Cooking oil
Normal prep waste
Included sides
Divide the serving cost by your target food cost percentage to get a starting price.
For example, if a dish costs $6 to make and your target food cost is 30%, the calculation would be:
$6 ÷ 0.30 = $20
That gives you a baseline, not an automatic final price. You should also account for labor, takeout packaging, delivery app commissions, rent, utilities, portion size, local competition, and what customers are comfortable paying.
Look at the prices within each menu section as well. Customers should be able to understand the difference between an everyday option, a house favorite, and a premium dish. A higher price should make sense based on the ingredients, portion size, cooking method, or sides included.
For popular dishes with thin margins, consider a small price increase, portion adjustment, supplier change, or ingredient update before removing them entirely.
Write Descriptions That Help Customers Choose
Menu descriptions should quickly tell customers what comes with the dish. Focus on the main ingredients, cooking method, flavor, texture, included sides, and any relevant dietary or allergen information.
Instead of: Chicken Sandwich
Write: Grilled chicken breast with pepper jack cheese, lettuce, tomato, and chipotle mayo on a toasted brioche bun.
Use specific words such as crispy, smoky, spicy, chargrilled, or slow-roasted instead of vague claims like “delicious” or “the best.” Keep each description brief, easy to scan, and accurate to what customers will actually receive.
Step 4: Design the Menu and Prepare Food Images
Good menu design helps customers quickly understand the categories, dishes, prices, and available options. The layout should guide the eye naturally without feeling crowded or overly promotional.
Choose a Format That Fits the Menu
Let the amount and type of content determine the format.
Use a one-page or two-sided menu for a focused selection.
Use a folded or multi-page menu for a larger range of dishes.
Move drinks, desserts, or kids’ meals to a separate section when they overcrowd the main menu.
Use digital boards or screens for cafés, food trucks, and fast-casual restaurants.
Do not shrink the font just to fit more content. If the menu feels crowded, remove unnecessary items or add another page.
Digital menus should also work well on mobile devices. Customers should be able to browse categories and read item details without zooming or scrolling through long blocks of text.
Create a Clear Visual Hierarchy
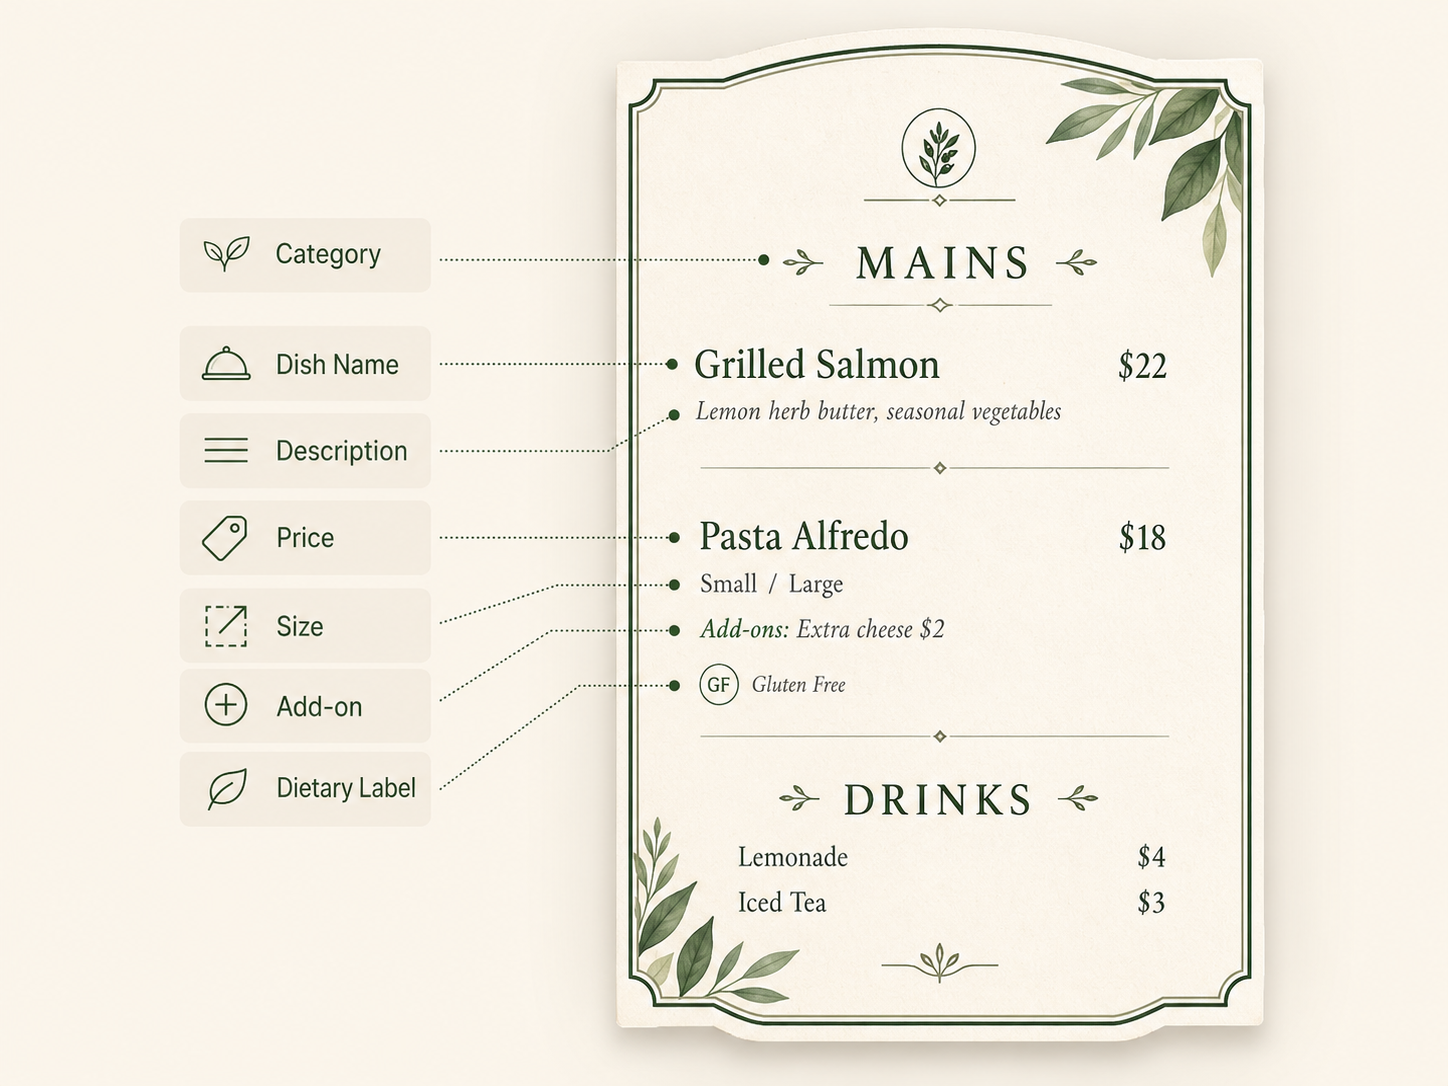
Use consistent formatting to separate:
Category headings
Dish names
Descriptions
Prices
Sizes
Add-ons
Dietary labels
Category headings and dish names should be more prominent, while descriptions can use smaller text as long as they remain easy to read.
Keep prices close to the dishes they belong to. Place side choices, substitutions, and extra charges directly beside or below the relevant item so customers do not have to search for important ordering details.
Make Online Menus Easy to Use and Find
Do not publish your entire online menu as a single image or PDF. Dish names, descriptions, categories, and prices should also appear as regular webpage text.
This makes the menu:
Easier to read on mobile devices
More accessible to screen readers
Easier to update
Searchable for customers
Easier for search engines to understand
Compress images before uploading them, keep the dimensions consistent, and add useful alt text to important food photos. When an original photo is too small for print or delivery platforms, learning how to upscale images without losing quality can help preserve important food details.
Step 5: Test, Publish, and Improve the Menu
Before launching the menu, review each version from the customer’s point of view and make sure the ordering process is clear and consistent.
Adapt the Menu for Each Sales Channel
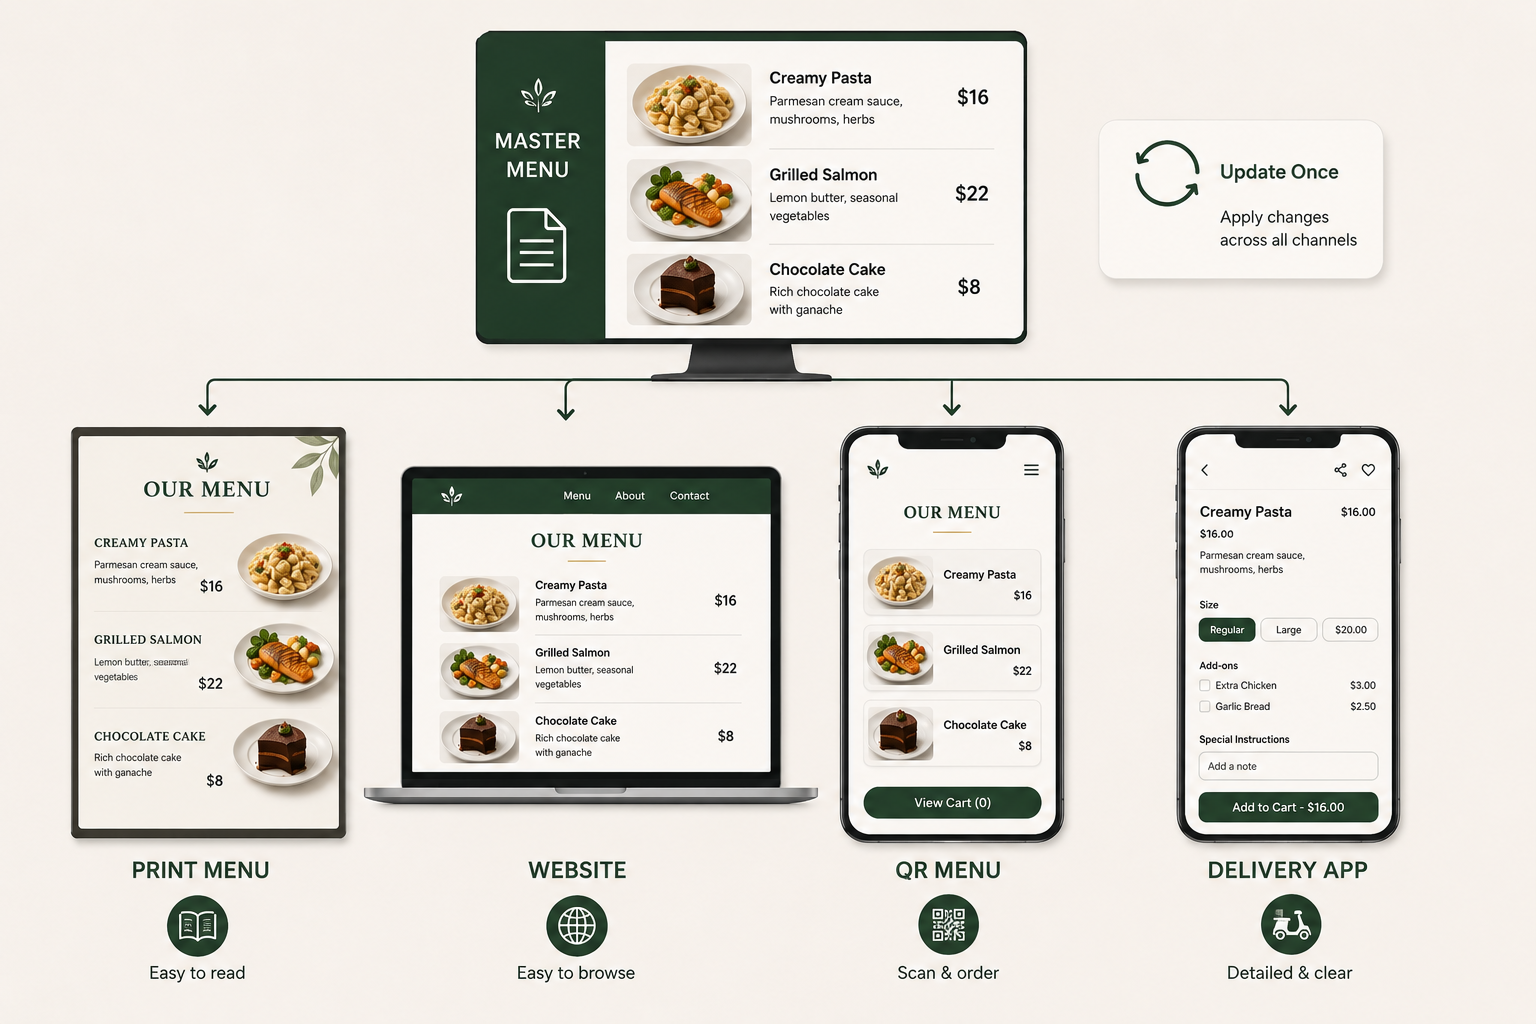
Your print menu, website, QR code menu, and delivery listings should use the same core information, but each version should fit its platform.
Print menus need readable text and practical dimensions. Mobile menus need simple navigation and easy-to-tap buttons. Delivery listings should clearly explain sizes, add-ons, substitutions, and combo contents.
Keep one master menu file and update it first whenever prices, descriptions, or availability change. Then apply the same updates across every channel.
Test Before Publishing
Ask employees or people unfamiliar with the menu to place a practice order without help. They should be able to find dishes, understand what is included, compare prices, identify extra charges, and complete the order without basic questions.
For digital menus, test different phone sizes and confirm that QR codes, links, buttons, images, and navigation work properly.
Before publishing or printing, verify that:
Item names, prices, and descriptions are correct
Photos match the right dishes
Portions, combos, add-ons, and dietary details are clear
Ordering links and QR codes work
Sold-out or discontinued items have been removed
Print one full-size sample before placing a large order to confirm that the text and spacing are easy to read.
You can also create free store logo mockups to preview how your branding will appear on printed menus, takeaway bags, table displays, and packaging before production.
Improve the Menu Over Time
Review each item based on sales and profit:
High sales, high profit: Keep it visible and available
High sales, low profit: Review pricing, portions, or ingredient costs
Low sales, high profit: Improve the name, description, photo, or placement
Low sales, low profit: Consider replacing or removing it
Sales numbers are not the only useful signal. Pay attention to customer questions, frequent substitutions, complaints, prep time, food waste, delivery quality, and how often items sell out.
Update prices and availability whenever needed. A broader menu review can be done quarterly, seasonally, or whenever food costs and customer demand change.
Tips to Make Your Menu Look More Appetizing
In addition to the above steps, the following tips can help make your food look more appealing, draw attention to signature items, and encourage customers to order.
Use Food Photos That Look Fresh and Real
Food photos should closely match what customers will actually receive. Use natural-looking light, accurate colors, and clean plating so the texture, portion size, and key ingredients are easy to see.
Avoid heavy filters, generic stock photos, or excessive editing that makes the dish look noticeably different from the real product. Overly polished images may attract attention, but they can also create unrealistic expectations.
Make Signature Dishes Stand Out
Use a larger photo, a strong position on the page, or a short label to draw attention to key dishes.
Common labels include:
House Specialty
Customer Favorite
Chef’s Pick
Best Seller
Use these selectively. When every item is highlighted, nothing feels special. For seasonal promotions, AI poster replication is commonly used to recreate an existing visual style across printed posters and social media graphics.
Use Color and Contrast to Guide Attention
Choose colors that fit your restaurant’s brand and complement your existing logo. Reviewing different restaurant logo design ideas can help you coordinate the menu’s colors, typography, and overall visual style. Make sure the text remains easy to read against the background. One accent color can be used to highlight category headings, prices, or featured dishes.
Avoid using too many bright colors, borders, icons, or decorative elements at the same time. Clear hierarchy and well-planned spacing usually make a menu look more polished than excessive decoration.
Improve Food Images Before Adding Them to the Menu
Before placing food photos into the menu, check for blur, poor lighting, unnatural colors, distracting backgrounds, and inconsistent image sizes or proportions. These issues are especially common when photos are taken at different times or with different devices.
Not sure where to start? Zawa can help you create polished, restaurant-ready menus from a simple text prompt. You can also upload your own food photos, logo, and brand assets, then use prompts to create visuals for printed menus, QR menus, delivery apps, and social media.
For restaurants, cafés, bakeries, food trucks, and delivery businesses without an in-house photographer or designer, Zawa cuts down on repetitive photo editing and layout work. It also makes it easier to reuse the same food photos across different sales and marketing channels while keeping the overall look consistent.
Conclusion
A restaurant menu does not have to be perfect on the first try. Start with a focused selection, price each dish carefully, and make the menu easy to scan and order from. After launch, pay attention to what customers order, what they ask about, and where the kitchen runs into problems. Those signals will show you what to adjust next.
Need help with the visuals? Zawa can turn your food photos and brand assets into consistent menu graphics for print, QR menus, delivery apps, and social media.
FAQ About How to Make a Menu
How do I make a digital menu?
Organize your menu items, prices, descriptions, dietary information, and photos in a mobile-friendly webpage or ordering platform. Use clear categories, readable text, compressed images, and simple navigation. You can then connect the menu to a QR code or publish it on your restaurant website and delivery platforms.
How many items should a restaurant menu have?
There is no fixed number that works for every restaurant. The right menu size depends on the restaurant concept, customer demand, kitchen capacity, ingredient availability, and ordering channel. Keep each category focused enough for customers to compare choices easily and for the kitchen to prepare every dish consistently.
Should a restaurant menu include photos?
Photos are optional, but they can help promote signature dishes, combos, premium options, and unfamiliar items. Use a limited number of clear, accurate images that match the portion and presentation customers will actually receive.
How often should a restaurant update its menu?
Update prices, availability, and sold-out information whenever they change. Conduct a broader review quarterly, seasonally, or when food costs, customer demand, or sales performance change significantly.
You May Be Interested

100+ Funny Mother's Day Jokes That Will Make Mom Laugh

100+ Earth Day Slogans That Inspire Action

150+ Instagram Bio Ideas for Moms

100 Short Success Quotes to Inspire Your Creative Journey

130+ Independence Day Quotes for Instagram