How to Retouch Photos on iPhone Without Overediting
Learn how to retouch photos on iPhone without overediting. Follow a natural workflow for cropping, light, color, blemish cleanup and object removal, while preserving real skin texture, avoiding blurry patches, and saving a polished, believable image.

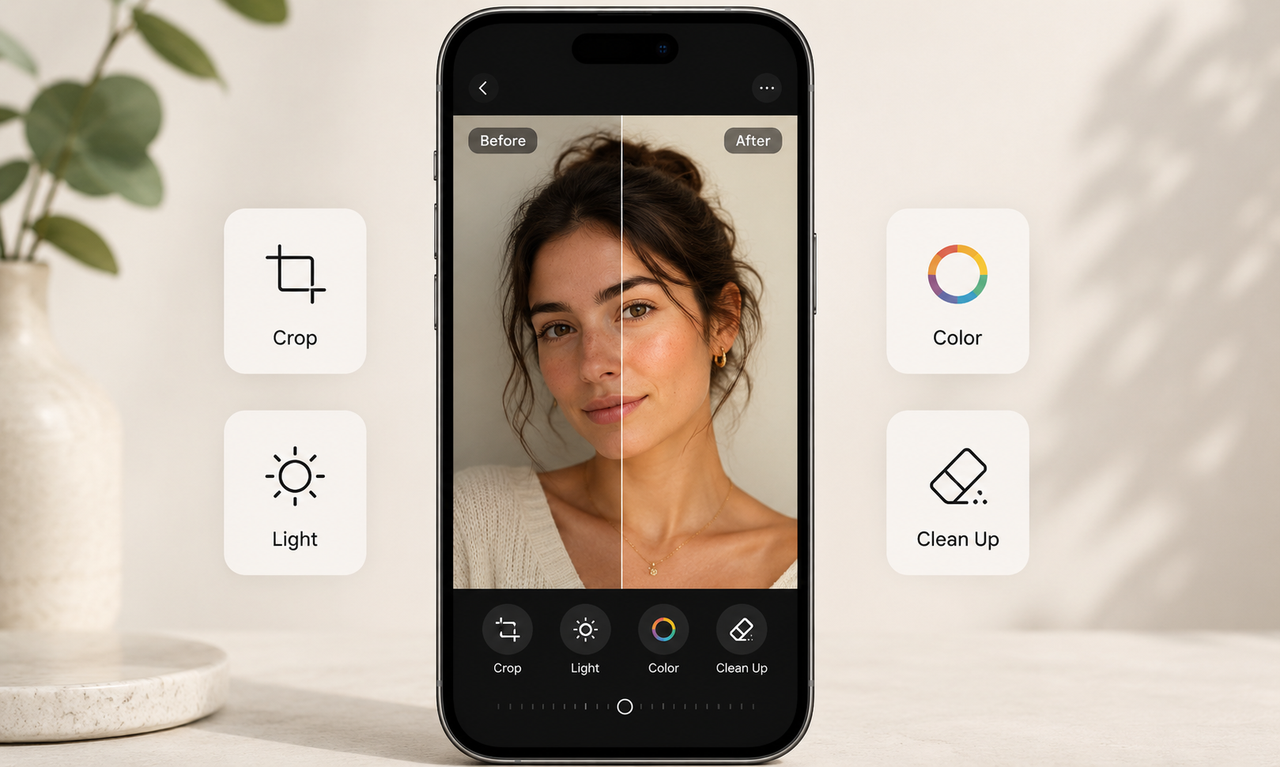
To retouch photos on an iPhone, open the image in the Photos app, tap Edit, and begin with the changes that affect the whole frame. Cropping, straightening, exposure, highlights, shadows, and color can often improve a photo before any detailed cleanup is needed. On supported models, Apple Clean Up can also remove small objects or distracting marks directly from the image.
Portrait retouching needs a lighter touch. A blemish may be worth removing, but pores, freckles, facial lines, and natural changes in skin tone help the person remain recognizable. More detailed corrections may require a separate tool with healing and blending controls. The best approach is to work gradually, check the original often, and stop before the skin or background begins to look artificial. Following a clear order also makes it easier to correct one issue without creating another.
How to Retouch Photos on iPhone
A natural-looking retouch depends as much on the order of the edits as the tools themselves. Composition, light, and color affect the entire image, so they should be settled before any blemish or background detail receives attention. Most of that work stays inside Photos. Only the final skin corrections may call for a separate app with healing and blending controls.
Step 1: Crop and Straighten the Photo
Good retouching often begins with removing what the image does not need. After opening Crop, check horizontal and vertical lines before deciding how tightly to frame the subject. For profile pictures and professional headshot images, keep some space around the head and shoulders before making the final crop. Once that space is gone, later resizing options become limited. Once that space is gone, later resizing options become limited.
Step 2: Fix Exposure and Bright Highlights
With the composition settled, turn to the overall brightness. The face should be visible without making the background pale or washing out the atmosphere of the shot. Highlights deserve separate attention when a window, white shirt, or patch of skin has lost texture. Bring back enough detail to soften the glare, then stop before those areas begin to look dull or gray.
Step 3: Bring Back Detail in Dark Areas
Lifting Shadows can reveal hair and clothing that have blended into the darker parts of the frame. The change should still leave true black areas with some depth. Push the slider too far and hidden noise begins to surface, especially in photos taken indoors or at night. If the problem affects only the face, a local adjustment will preserve the rest of the image more effectively.
Step 4: Adjust Color and Skin Tone
Indoor light often leaves an orange cast, while open shade can make skin appear cooler than it looked in person. Warmth handles the general temperature, and Tint corrects lingering green or magenta tones. The neck usually provides a more reliable reference than the cheeks, which naturally carry more redness. Vibrance can add life to a muted photo without the heavy effect that strong saturation creates.
Step 5: Remove Small Marks With Clean Up
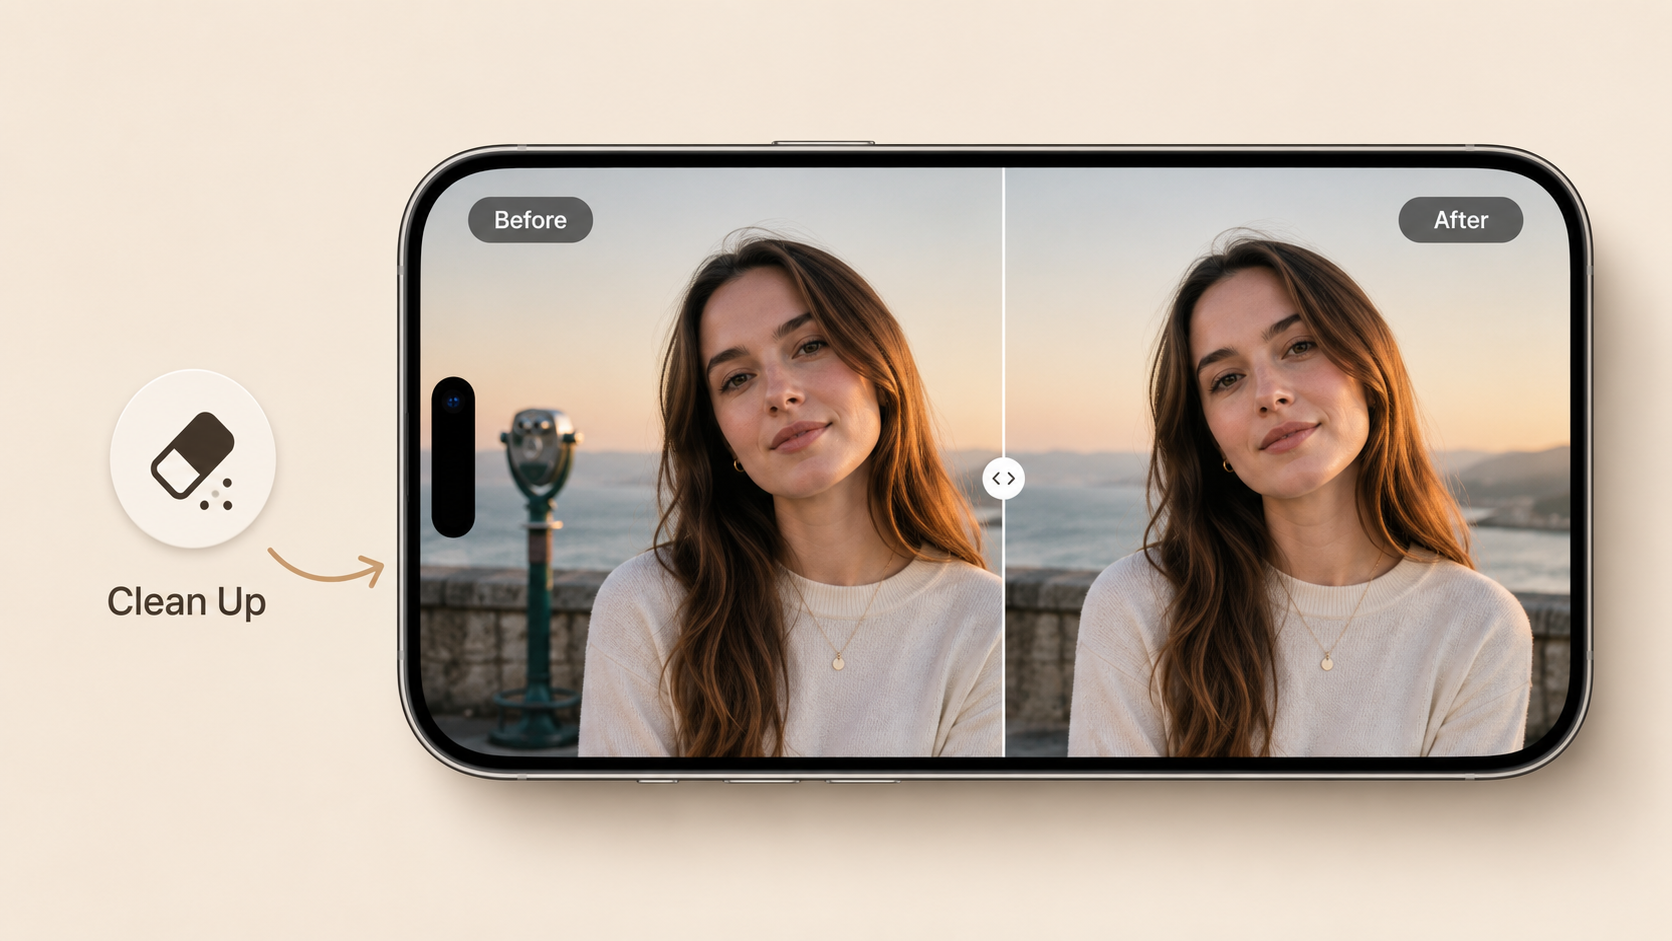
If Clean Up is available in Photos, open the image, tap Edit, and select Clean Up. Apple allows you to tap, brush, or circle the distraction, while certain items may be highlighted automatically for quick removal. For larger distractions or unsupported devices, compare the available ways to remove an object from a photo on an iPhone before moving the image to another editor. Availability depends on Apple’s current device, software, language, and regional requirements, so refer to the official Clean Up requirements for the latest information.
Step 6: Fix Spots With a Healing Tool
The built-in Photos controls may be enough for light and color, but they are not designed for precise blemish work. A separate healing tool lets you target one temporary spot without softening the rest of the face. Keep the brush only slightly larger than the area being corrected and use a single tap where possible. Freckles, moles, and natural lines should remain recognizable.
Step 7: Blend Edits With Nearby Skin
Sometimes the blemish disappears, yet the correction still looks obvious because the new patch is too smooth. Matching texture matters just as much as matching color. Skin sampled from the cheek rarely belongs on the forehead, where the grain and highlights behave differently. Moving between close and full views makes it easier to judge whether the repaired area still attracts attention.
Step 8: Compare and Save the Final Photo
Before tapping Done, view the original and edited versions side by side. At full size, check whether the portrait still feels like the same person. Closer inspection can reveal lost texture, overly bright eyes, rough cleanup edges, or softness that may require one of the best AI photo enhancers rather than additional skin smoothing. Photos edits can be reverted, while another app may create a new file instead. An untouched copy gives you a clean starting point if you want a different look later.
How to Keep Photo Retouching Natural
Natural retouching is less about how many tools you use and more about what you leave untouched. The face should still have texture, the lighting should remain believable, and corrected areas should not stand apart from the rest of the image. A good result feels like a stronger version of the original photo, not a different person or scene.
Keep Pores and Real Skin Texture
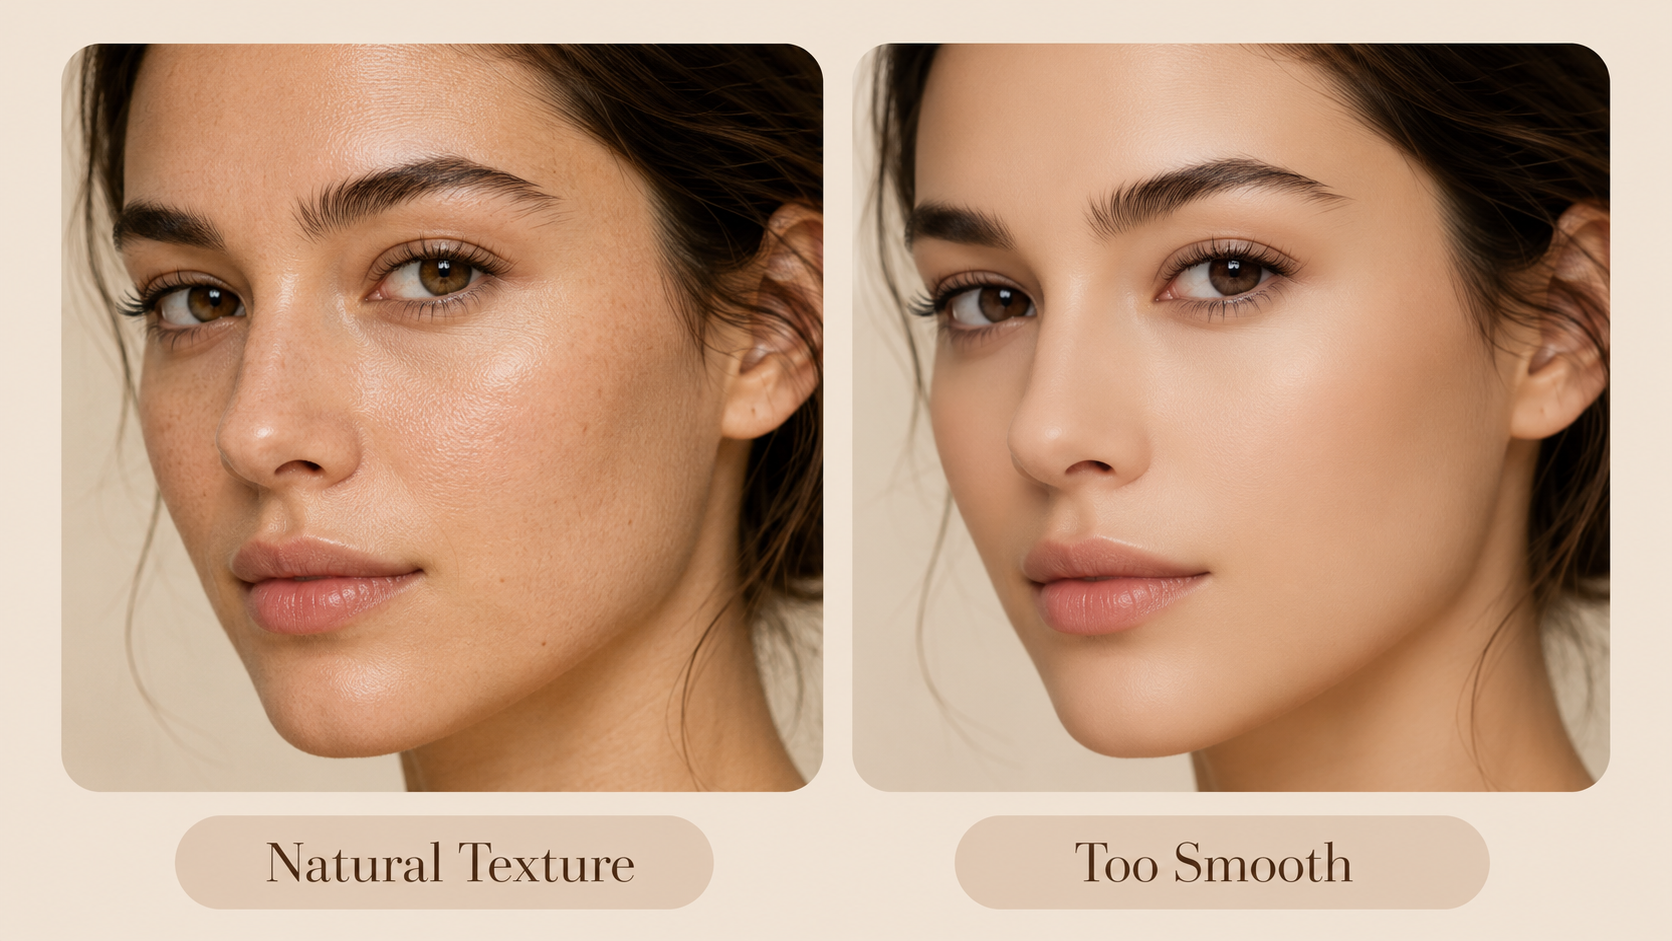
Skin is not equally smooth across the entire face. The nose, cheeks, and forehead each have their own texture, which should remain visible after retouching. Instead of blurring a large area, soften only the uneven patch and leave the surrounding pores intact. This keeps the skin from taking on a flat, filtered appearance.
Remove Temporary Marks, Not Facial Features
A recent breakout, makeup smudge, or stray eyelash will not define how someone normally looks, so removing it rarely changes their identity. Moles, scars, freckles, and natural asymmetry are different. Unless the person requests the change, those lasting features usually belong in the final portrait.
Zoom Out to Check the Full Photo
Close-up work makes tiny problems seem more important than they are. After correcting a small area, return to the full image and notice where your eye goes first. If the edit disappears into the portrait, it is probably balanced. If one cheek looks smoother or brighter than the other, the correction still needs adjustment.
Watch for Blur, Halos, and Repeated Patterns
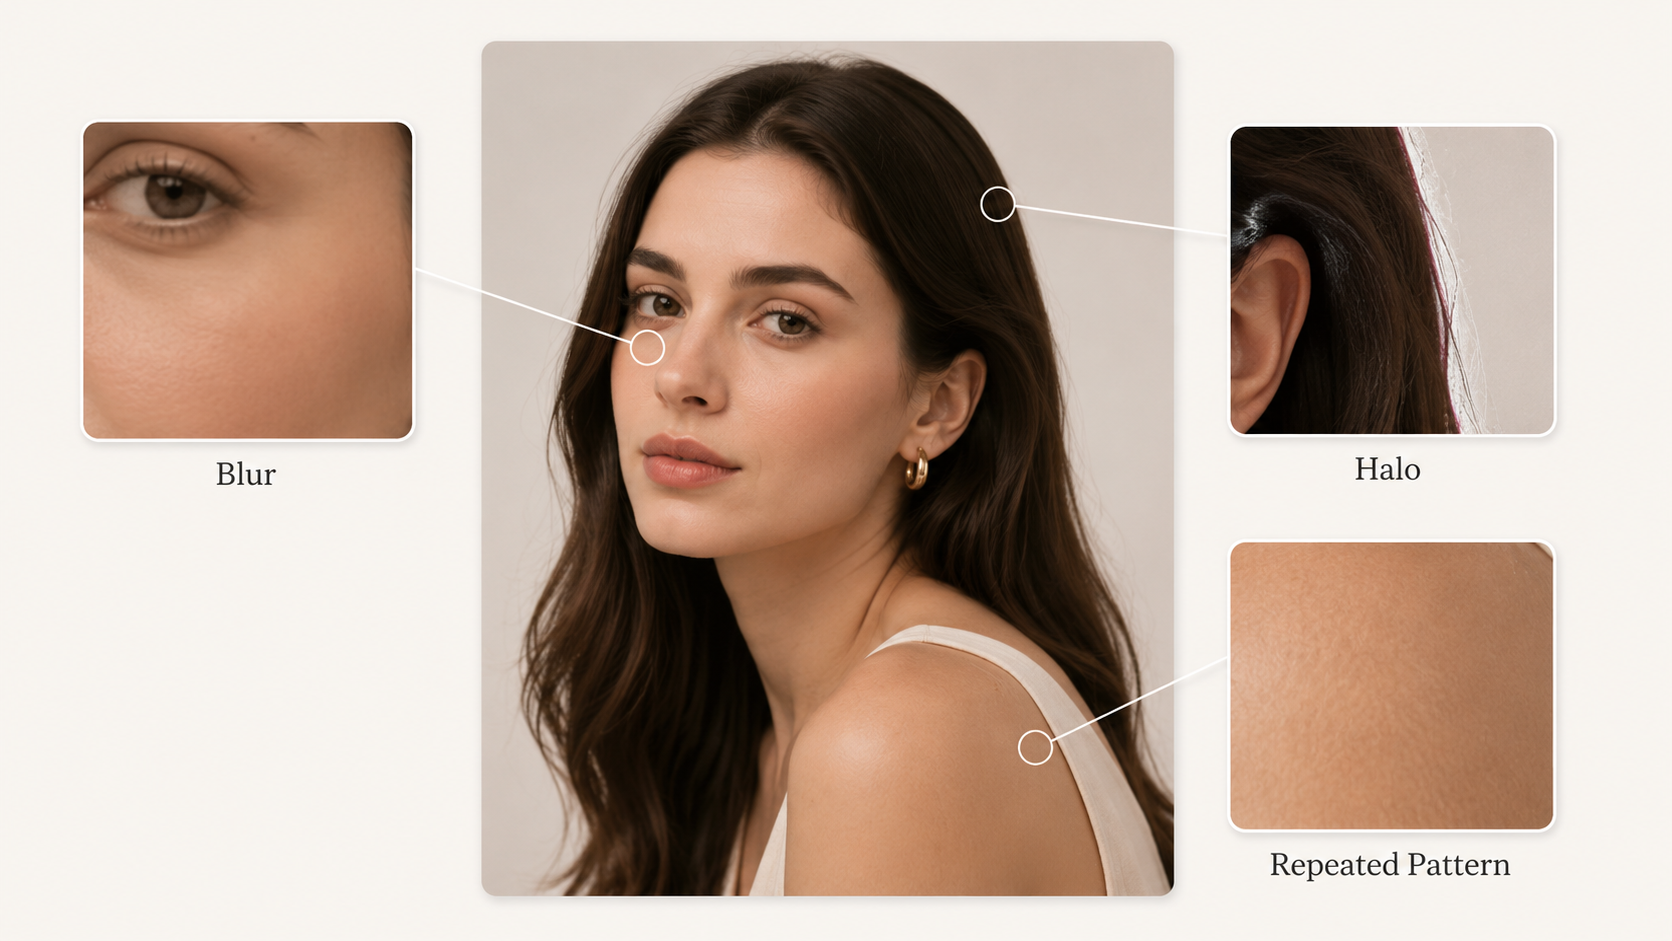
Retouching artifacts often hide along the edge of an edited area. Check around the hair, jawline, clothing, and any object removed from the background. Soft patches suggest lost texture, pale outlines point to poor blending, and identical details appearing twice usually come from cloning. Reviewing the photo at several zoom levels helps expose all three.
Know When You Need Another Tool
The Photos app is well suited to cropping and broad light or color changes, but sliders cannot isolate every local problem. Detailed skin cleanup or a distraction crossing a textured area requires more control. An AI photo editor can handle the first round of precise corrections without making you adjust every setting by hand. Once it removes the unwanted element or refines the problem area, review the result for realistic texture and clean edges before saving.
Why Is iPhone Photo Retouching Not Working?
Not every failed edit comes from the same place. Clean Up may be unavailable under the current device setup, while a strange-looking removal usually points to an area the tool could not rebuild convincingly. Skin and image quality problems tend to appear later, after the photo has passed through stronger corrections or another app. The result itself usually reveals where the workflow went wrong.
Clean Up Is Missing From the Photos App
You may open a vacation photo, tap Edit, and find that Clean Up is not listed at all. That does not necessarily mean Photos is malfunctioning. The feature depends on Apple’s current requirements for the device, system software, language, and region, and Apple may update those conditions over time. Check the official Clean Up requirements, then confirm that the necessary features are available and enabled on your iPhone.
Clean Up Leaves a Blurry or Strange Patch
Busy backgrounds give Clean Up less predictable information to work with. When people are the main distraction, comparing several apps to remove a person from a picture can help you find a tool that handles complex backgrounds more accurately. Instead of accepting the first result, undo it, zoom closer, and select a smaller section at a time. Apple notes that generative results can vary, so the reconstructed area should always be reviewed before saving.
Skin Looks Too Smooth After Editing
The problem often starts with one blemish and grows as the surrounding skin is softened to make the correction blend. By the end, one cheek may have no pores while the forehead still holds its natural texture. Pull the image back to full view and compare both sides of the face. If the skin resembles a beauty filter rather than the original portrait, undo the broad smoothing and keep the correction limited to the temporary mark.
The Saved Photo Looks Lower Quality
A photo can remain sharp inside Photos and still look soft after it is exported or shared. This often happens when someone saves a screenshot, chooses a smaller output size in another app, or sends the image through a service that compresses uploads. If the full-resolution version still appears soft, check how to make a picture less blurry before applying stronger sharpening or repeatedly exporting the file. The final version should also be checked outside the editing app before the original is deleted.
FAQs
Can You Retouch a Live Photo on an iPhone?
Yes. The Photos app lets you adjust a Live Photo’s color, light, crop, and filters. You can also select a new key photo, shorten the motion, mute the sound, or convert it into a still image. Some advanced retouching tools may only affect the selected frame.
Does Retouching Replace the Original Photo?
Edits made in the Photos app do not permanently overwrite the original. Even after saving, you can open the image and choose Revert to Original. A third-party app may work differently, so save a separate copy before making detailed skin or object corrections.
Can You Copy the Same Edits to Multiple Photos?
The same adjustments can be copied to one photo or an entire batch. Open the edited image, choose Copy Edits, select the other photos, and tap Paste Edits. This works well for pictures taken under similar lighting, although each result should still be checked for differences in exposure and skin tone.
Can an iPhone Remove Glare From Glasses?
Only mild glare can usually be reduced in the Photos app. Lowering Highlights or Exposure may recover some eye detail, but strong reflections that completely cover the eyes cannot be accurately restored with basic sliders. A precise retouching tool may help when some original detail remains; otherwise, another photo will give a more believable result.
Conclusion
An iPhone can handle more photo retouching than most images actually need. The Photos app is often enough to improve framing, restore difficult light, balance skin tone, and clear a small distraction. Detailed corrections may call for another tool, but more editing does not automatically produce a better portrait.
The final check is simple: does the photo still feel like the moment and person you originally captured? If the skin retains texture, the light stays believable, and no repaired area draws attention, the retouch is finished.
You May Be Interested

What Is 1440p Resolution? QHD Explained (2026)

100+ Free Stable Diffusion Prompts to Generate Amazing AI Art

133 Independence Day Captions for Social Media
2D Animation vs. 3D Animation: A Detailed Guide for 2026

5 Free AI Random Image Generators—Generate Unique Images Instantly Online